Computers
Computer Parts
Custom PC Builder
DIY/ Maker
{$smarty.capture.menu}
Activity
Categories
Discussions
Computers
Computer Parts
Custom PC Builder
DIY/ Maker
Inland LCD1602 Expansion Shield - Micro Center
<main> <article class="userContent"> <div class="embedExternal embedImage display-large float-none"> <div class="embedExternal-content"> <a class="embedImage-link" href="https://us.v-cdn.net/6031942/uploads/AU98RRVB1Q21/image.png" rel="nofollow noreferrer noopener ugc" target="_blank"> <img class="embedImage-img" src="https://us.v-cdn.net/6031942/uploads/AU98RRVB1Q21/image.png" alt="image.png" height="341" width="469" loading="lazy" data-display-size="large" data-float="none"></img></a> </div> </div> <h2 data-id="introduction"><strong>Introduction</strong></h2><p>The LCD shield integrates 1602 LCD display and six buttons into one piece, which is fully compatible with UNO R3 control board. It is very simple and convenient for you to stack it onto UNO board.</p><p>There are two communication methods for 1602 LCD display and UNO R3 board, separately the 8-Bit connection and 4-Bit connection. The LCD shield is default the 4-Bit connection.</p><p>Under LCD there are 5 control buttons (Select, Up, Down, Left, Right) and a reset button. The 5 buttons are connected with A0 analog input only, so you can monitor button status using just one Arduino input. Pay attention: status monitoring is unavailable when several buttons are pressed.</p><p>The shield also comes with a potentiometer to adjust the LCD backlight.</p><h2 data-id="technical-details"><strong>Technical Details</strong></h2><p>1. LCD size: 20.5mm * 41mm</p><p>2. Display capacity: 16*2 character</p><p>3. White texts on blue background </p><p>4. Comes with a potentiometer to adjust the backlight</p><p>5. Chip working voltage: 4.5-5.5V</p><p>6. Working current: 2.0 mA (5.0V)</p><p>7. Optimum working voltage: 5.0V</p><p>8. Character size: 2.95*4.35 (W*H) mm</p><p>9. Dimensions: 80mm *58mm*22mm</p><p>10. Weight: 51.5g</p><h2 data-id="pinout-guide%3A"><strong>Pinout Guide:</strong></h2><div class="embedExternal embedImage display-large float-none"> <div class="embedExternal-content"> <a class="embedImage-link" href="https://us.v-cdn.net/6031942/uploads/88NFRL1ZQBCG/image.png" rel="nofollow noreferrer noopener ugc" target="_blank"> <img class="embedImage-img" src="https://us.v-cdn.net/6031942/uploads/88NFRL1ZQBCG/image.png" alt="image.png" height="618" width="651" loading="lazy" data-display-size="large" data-float="none"></img></a> </div> </div> <h2 data-id="how-to-test-it"><strong>How to test it ?</strong></h2><h4 data-id="connect-it-up"><strong>Connect it Up</strong></h4><p>Simply stack the LCD shield onto UNO board, then connect the board to your computer with a USB cable.</p><div class="embedExternal embedImage display-large float-none"> <div class="embedExternal-content"> <a class="embedImage-link" href="https://us.v-cdn.net/6031942/uploads/6L0WO3PP613R/image.png" rel="nofollow noreferrer noopener ugc" target="_blank"> <img class="embedImage-img" src="https://us.v-cdn.net/6031942/uploads/6L0WO3PP613R/image.png" alt="image.png" height="379" width="505" loading="lazy" data-display-size="large" data-float="none"></img></a> </div> </div> <h2 data-id="upload-the-code"><strong>Upload the Code</strong></h2><p>l Copy and paste the code below to <a href="http://wiki.keyestudio.com/index.php/How_to_Download_Arduino_IDE" rel="nofollow noreferrer ugc">Arduino IDE</a></p><p>l Or <a href="https://drive.google.com/open?id=1KavI1PvtaQY8eSkcowr0Mruq3d9sW66L" rel="nofollow noreferrer ugc">click here</a> to download the code</p><p>l <a href="https://drive.google.com/open?id=1I-VnwhX1IEcYjQvMFjI0TJSc5yfdX9AH" rel="nofollow noreferrer ugc">Click here</a> to download the libraries <em>LiquidCrystal.h</em></p><p><strong>Note: </strong>Before compile the code, do remember to add the necessary libraries inside the libraries folder of Arduino IDE.</p><p><br></p><p> Liquid Crystal Library - Hello World</p><p> </p><p> Demonstrates the use a 16x2 LCD display. The Liquid Crystal</p><p> library works with all LCD displays that are compatible with the</p><p> Hitachi HD44780 driver. There are many of them out there, and you</p><p> can usually tell them by the 16-pin interface.</p><p> This sketch prints "Hello World!" to the LCD</p><p> and shows the time.</p><h4 data-id="the-circuit%3A"> The circuit:</h4><p> * LCD RS pin to digital pin 8</p><p> * LCD Enable pin to digital pin 9</p><p> * LCD D4 pin to digital pin 4</p><p> * LCD D5 pin to digital pin 5</p><p> * LCD D6 pin to digital pin 6</p><p> * LCD D7 pin to digital pin 7</p><p> * Button pin to analog pin A0</p><p> * LCD R/W pin to ground</p><p> * 10K resistor:</p><p> * ends to +5V and ground</p><p> * wiper to LCD VO pin (pin 3)</p><p> </p><p> Library originally added 18 Apr 2008</p><p> by David A. Mellis</p><p> library modified 5 Jul 2009</p><p> by Limor Fried (<a href="http://www.ladyada.net)" rel="nofollow noreferrer ugc">http://www.ladyada.net)</a></p><p> example added 9 Jul 2009</p><p> by Tom Igoe</p><p> modified 22 Nov 2010</p><p> by Tom Igoe</p><p> </p><h4 data-id="this-example-code-is-in-the-public-domain."> This example code is in the public domain.</h4><p> <a href="http://www.arduino.cc/en/Tutorial/LiquidCrystal" rel="nofollow noreferrer ugc">http://www.arduino.cc/en/Tutorial/LiquidCrystal</a></p><p> */</p><pre class="code codeBlock" spellcheck="false" tabindex="0">// include the library code: #include <LiquidCrystal.h> // initialize the library with the numbers of the interface pins LiquidCrystal lcd(8, 9, 4, 5, 6, 7); void setup() { // set up the LCD's number of columns and rows: lcd.begin(16, 2); Serial.begin(9600); // Print a message to the LCD. lcd.print("Hello,World"); } void loop() { // set the cursor to column 0, line 1 // (note: line 1 is the second row, since counting begins with 0): lcd.setCursor(0, 1); // print the number of seconds since reset: lcd.print(millis() / 1000); int val=analogRead(A0); Serial.println(val); if(val>=0&&val<=50) { lcd.setCursor(5,1); lcd.print("R"); } else if(val>=50&&val<=150) { lcd.setCursor(5,1); lcd.print("U"); } else if(val>=150&&val<=300) { lcd.setCursor(5,1); lcd.print("D"); } else if(val>=300&&val<=500) { lcd.setCursor(5,1); lcd.print("L"); } else if(val>=500&&val<=750) { lcd.setCursor(5,1); lcd.print("S"); } } </pre><div class="embedExternal embedImage display-large float-none"> <div class="embedExternal-content"> <a class="embedImage-link" href="https://us.v-cdn.net/6031942/uploads/GNY9ZIEALC3R/image.png" rel="nofollow noreferrer noopener ugc" target="_blank"> <img class="embedImage-img" src="https://us.v-cdn.net/6031942/uploads/GNY9ZIEALC3R/image.png" alt="image.png" height="601" width="501" loading="lazy" data-display-size="large" data-float="none"></img></a> </div> </div> <h2 data-id="what-you-should-see"><strong>
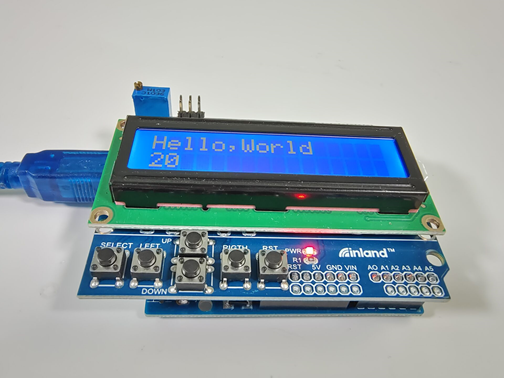
What you should see?</strong></h2><p>Done uploading the code to the board, you should see the LCD screen show “Hello World” on the first line, and the second line shows the increasing number. If cannot see the text clearly, rotate the potentiometer on the shield to adjust the screen backlight. You could press the five buttons to separately get the letter S U D L R, and press the Reset button to restart it again.</p><div class="embedExternal embedImage display-large float-none"> <div class="embedExternal-content"> <a class="embedImage-link" href="https://us.v-cdn.net/6031942/uploads/JKQB7BXKKQ96/image.png" rel="nofollow noreferrer noopener ugc" target="_blank"> <img class="embedImage-img" src="https://us.v-cdn.net/6031942/uploads/JKQB7BXKKQ96/image.png" alt="image.png" height="484" width="645" loading="lazy" data-display-size="large" data-float="none"></img></a> </div> </div> <p><br></p><p><strong> </strong></p> </article> </main>