Computers
Computer Parts
Custom PC Builder
DIY/ Maker
{$smarty.capture.menu}
Activity
Categories
Discussions
Computers
Computer Parts
Custom PC Builder
DIY/ Maker
Inland USB to ESP-01S Wi-Fi Module Serial Port Shield (Black and Eco-friendly) - Micro Center
<main> <article class="userContent"> <h2 data-id="inland-usb-to-esp-01s-wi-fi-module-serial-port-shield-(black-and-eco-friendly)">Inland USB to ESP-01S Wi-Fi Module Serial Port Shield (Black and Eco-friendly)</h2><div class="embedExternal embedImage display-small float-none"> <div class="embedExternal-content"> <a class="embedImage-link" href="https://us.v-cdn.net/6031942/uploads/06OR9VAD2LPC/image.png" rel="nofollow noreferrer noopener ugc" target="_blank"> <img class="embedImage-img" src="https://us.v-cdn.net/6031942/uploads/06OR9VAD2LPC/image.png" alt="image.png" height="190" width="303" loading="lazy" data-display-size="small" data-float="none"></img></a> </div> </div> <div class="embedExternal embedImage display-small float-none"> <div class="embedExternal-content"> <a class="embedImage-link" href="https://us.v-cdn.net/6031942/uploads/U5GEZ5BKN486/image.png" rel="nofollow noreferrer noopener ugc" target="_blank"> <img class="embedImage-img" src="https://us.v-cdn.net/6031942/uploads/U5GEZ5BKN486/image.png" alt="image.png" height="190" width="209" loading="lazy" data-display-size="small" data-float="none"></img></a> </div> </div> <div class="embedExternal embedImage display-large float-none"> <div class="embedExternal-content"> <a class="embedImage-link" href="https://us.v-cdn.net/6031942/uploads/OY24KHG60IS4/image.png" rel="nofollow noreferrer noopener ugc" target="_blank"> <img class="embedImage-img" src="https://us.v-cdn.net/6031942/uploads/OY24KHG60IS4/image.png" alt="image.png" height="493" width="664" loading="lazy" data-display-size="large" data-float="none"></img></a> </div> </div> <h2 data-id="1)-description"><strong>1) Description</strong></h2><p>This is an expansion board for the ESP-01S Wi-Fi module. The shield comes with a USB to Serial port chip CH340G.</p><p>Installed the driver, push the shield’s button to<strong> Flash Boot</strong>, and plug into computer’s USB port. You can use Serial debugging tool to test the AT command.</p><p>Push the shield’s button to<strong> Download</strong>, and plug into computer’s USB port, ESP-01 module is at download mode. You can download the firmware to ESP-01 module using firmware software.</p><h2 data-id="2)-technical-parameters"><strong>2) Technical Parameters</strong></h2><ul><li>Working voltage: DC 5V</li><li>Working current: minimum 500mA</li><li>Communication voltage: 3.3V</li><li>Environmental attributes: ROHS</li><li>Dimensions: 55mm*18mm*12mm</li><li>Weight: 5.6g</li></ul><h2 data-id="3)-driver-installation"><strong>3) Driver Installation</strong></h2><p>The USB to serial port chip of this control board is <strong>CH340G</strong>. So you need to install the chip driver. You can click the driver file here<strong> </strong><a href="https://drive.google.com/open?id=1ssALY3RCks_VnWJJ-TuBczs28s2gimEI" rel="nofollow noreferrer ugc"><strong>usb_ch341_3.1.2009.06 </strong></a>to download.</p><p><a href="https://drive.google.com/open?id=1E-KGJpTfksqAw174uTVVSDSPknfW6r0N" rel="nofollow noreferrer ugc">https://drive.google.com/open?id=1E-KGJpTfksqAw174uTVVSDSPknfW6r0N</a></p><p>In different systems, the driver installation is similar. Here we start to install the driver on the Win7 system.</p><p>Plug one end of your USB cable into the Keyestudio ESP-01S WI-FI board and the other into a USB socket on your computer. </p><p>When you connect the WI-FI board to your computer at the first time, right click your “Computer” —>for “Properties”—> click the “Device manager”, under Other devices, you should see the “USB2.0-Serial”. </p><div class="embedExternal embedImage display-medium float-none"> <div class="embedExternal-content"> <a class="embedImage-link" href="https://us.v-cdn.net/6031942/uploads/2JZYG5UQDU3W/image.png" rel="nofollow noreferrer noopener ugc" target="_blank"> <img class="embedImage-img" src="https://us.v-cdn.net/6031942/uploads/2JZYG5UQDU3W/image.png" alt="image.png" height="455" width="622" loading="lazy" data-display-size="medium" data-float="none"></img></a> </div> </div> <p>Then right-click on the<em> “USB2.0-Serial” </em>and select the top menu option (Update Driver Software...) shown as the figure below.</p><div class="embedExternal embedImage display-medium float-none"> <div class="embedExternal-content"> <a class="embedImage-link" href="https://us.v-cdn.net/6031942/uploads/GMVKSNAUUE04/image.png" rel="nofollow noreferrer noopener ugc" target="_blank"> <img class="embedImage-img" src="https://us.v-cdn.net/6031942/uploads/GMVKSNAUUE04/image.png" alt="image.png" height="455" width="613" loading="lazy" data-display-size="medium" data-float="none"></img></a> </div> </div> <p>Then it will be prompted to either <em>“Search Automatically for updated driver software” </em>or<em> “Browse my computer for driver software”.</em> Shown as below. </p><p>In this page, select <em>“Browse my computer for driver software”.</em></p><div class="embedExternal embedImage display-medium float-none"> <div class="embedExternal-content"> <a class="embedImage-link" href="https://us.v-cdn.net/6031942/uploads/5231KU7AWW50/image.png" rel="nofollow noreferrer noopener ugc" target="_blank"> <img class="embedImage-img" src="https://us.v-cdn.net/6031942/uploads/5231KU7AWW50/image.png" alt="image.png" height="455" width="628" loading="lazy" data-display-size="medium" data-float="none"></img></a> </div> </div> <p>After that, select the option to browse and navigate to the <em>“drivers”</em> folder of usb-ch341 installation.</p><p> </p><div class="embedExternal embedImage display-medium float-none"> <div class="embedExternal-content"> <a class="embedImage-link" href="https://us.v-cdn.net/6031942/uploads/LXO5PET8Z3V4/image.png" rel="nofollow noreferrer noopener ugc" target="_blank"> <img class="embedImage-img" src="https://us.v-cdn.net/6031942/uploads/LXO5PET8Z3V4/image.png" alt="image.png" height="455" width="618" loading="lazy" data-display-size="medium" data-float="none"></img></a> </div> </div> <p>Once the software has been installed, you will get a confirmation message. </p><p>Installation completed, click “Close”. </p><div class="embedExternal embedImage display-medium float-none"> <div class="embedExternal-content"> <a class="embedImage-link" href="https://us.v-cdn.net/6031942/uploads/ZSMTY7T2LVOZ/image.png" rel="nofollow noreferrer noopener ugc" target="_blank"> <img class="embedImage-img" src="https://us.v-cdn.net/6031942/uploads/ZSMTY7T2LVOZ/image.png" alt="image.png" height="455" width="623" loading="lazy" data-display-size="medium" data-float="none"></img></a> </div> </div> <p>
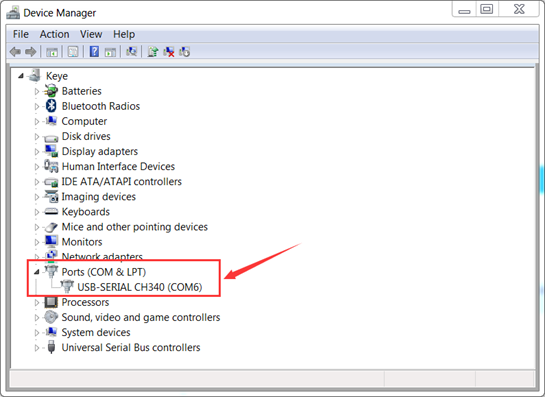
Finally, the driver is installed well. You can right click <em>“Computer” —>“Properties”—>“Device manager”</em>, check out the CH340 device as the figure shown below. </p><div class="embedExternal embedImage display-medium float-none"> <div class="embedExternal-content"> <a class="embedImage-link" href="https://us.v-cdn.net/6031942/uploads/WM4D5ZXLUBFT/image.png" rel="nofollow noreferrer noopener ugc" target="_blank"> <img class="embedImage-img" src="https://us.v-cdn.net/6031942/uploads/WM4D5ZXLUBFT/image.png" alt="image.png" height="455" width="624" loading="lazy" data-display-size="medium" data-float="none"></img></a> </div> </div> <p>Here you can check out the Port COM21. </p><p>If you want to modify the COM Port. Follow the methods below.
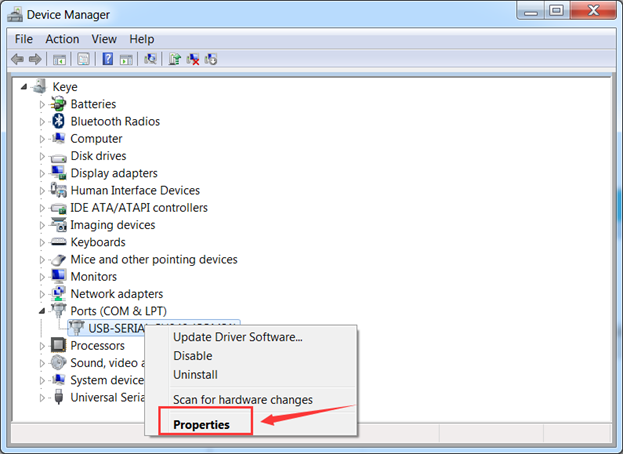
</p><p>Right click the<strong> <em>USB-SERIAL CH340 (COM21)</em></strong><em>,</em> then select <strong><em>Properties</em></strong><em>.</em></p><p> </p><div class="embedExternal embedImage display-medium float-none"> <div class="embedExternal-content"> <a class="embedImage-link" href="https://us.v-cdn.net/6031942/uploads/2L25RGYAQZBR/image.png" rel="nofollow noreferrer noopener ugc" target="_blank"> <img class="embedImage-img" src="https://us.v-cdn.net/6031942/uploads/2L25RGYAQZBR/image.png" alt="image.png" height="455" width="624" loading="lazy" data-display-size="medium" data-float="none"></img></a> </div> </div> <p> Pop up the following window, click <strong><em>Port Settings</em></strong> and <strong><em>Advanced</em></strong>. </p><div class="embedExternal embedImage display-medium float-none"> <div class="embedExternal-content"> <a class="embedImage-link" href="https://us.v-cdn.net/6031942/uploads/CXUVP1XAU6O9/image.png" rel="nofollow noreferrer noopener ugc" target="_blank"> <img class="embedImage-img" src="https://us.v-cdn.net/6031942/uploads/CXUVP1XAU6O9/image.png" alt="image.png" height="379" width="375" loading="lazy" data-display-size="medium" data-float="none"></img></a> </div> </div> <p>Then you can choose any COM ports as you like. </p><p>Here we select COM6, and click OK. </p><div class="embedExternal embedImage display-medium float-none"> <div class="embedExternal-content"> <a class="embedImage-link" href="https://us.v-cdn.net/6031942/uploads/B11WF7AIEP6F/image.png" rel="nofollow noreferrer noopener ugc" target="_blank"> <img class="embedImage-img" src="https://us.v-cdn.net/6031942/uploads/B11WF7AIEP6F/image.png" alt="image.png" height="398" width="567" loading="lazy" data-display-size="medium" data-float="none"></img></a> </div> </div> <p>It will pop up the prompt window. Click <strong><em>Yes</em></strong>. </p><div class="embedExternal embedImage display-medium float-none"> <div class="embedExternal-content"> <a class="embedImage-link" href="https://us.v-cdn.net/6031942/uploads/WFUEPOVAS2JG/image.png" rel="nofollow noreferrer noopener ugc" target="_blank"> <img class="embedImage-img" src="https://us.v-cdn.net/6031942/uploads/WFUEPOVAS2JG/image.png" alt="image.png" height="266" width="577" loading="lazy" data-display-size="medium" data-float="none"></img></a> </div> </div> <p>Continue to click <strong><em>OK</em></strong>. </p><div class="embedExternal embedImage display-medium float-none"> <div class="embedExternal-content"> <a class="embedImage-link" href="https://us.v-cdn.net/6031942/uploads/RD1OHV6JRODU/image.png" rel="nofollow noreferrer noopener ugc" target="_blank"> <img class="embedImage-img" src="https://us.v-cdn.net/6031942/uploads/RD1OHV6JRODU/image.png" alt="image.png" height="398" width="394" loading="lazy" data-display-size="medium" data-float="none"></img></a> </div> </div> <p>Now, set well the COM6. Shown below.</p><div class="embedExternal embedImage display-medium float-none"> <div class="embedExternal-content"> <a class="embedImage-link" href="https://us.v-cdn.net/6031942/uploads/RLEP6XNYHFPZ/image.png" rel="nofollow noreferrer noopener ugc" target="_blank"> <img class="embedImage-img" src="https://us.v-cdn.net/6031942/uploads/RLEP6XNYHFPZ/image.png" alt="image.png" height="398" width="546" loading="lazy" data-display-size="medium" data-float="none"></img></a> </div> </div> <h2></h2><h2 data-id="4)-use-method"><strong>4) Use Method</strong></h2><h3 data-id="1.-at-command-settings"><strong>1. AT Command Settings</strong></h3><p>When setting the <strong>AT </strong>command, you need to use an <strong>ESP8266 WIFI module. </strong></p><p>Plug the ESP8266 WIFI onto the shield, and then connect them to your computer’s USB port using a mini USB cable. Then push the shield’s button to <strong>Flash Boot </strong>end. </p><div class="embedExternal embedImage display-medium float-none"> <div class="embedExternal-content"> <a class="embedImage-link" href="https://us.v-cdn.net/6031942/uploads/F2KHCNBTVWB7/image.png" rel="nofollow noreferrer noopener ugc" target="_blank"> <img class="embedImage-img" src="https://us.v-cdn.net/6031942/uploads/F2KHCNBTVWB7/image.png" alt="image.png" height="152" width="582" loading="lazy" data-display-size="medium" data-float="none"></img></a> </div> </div> <p>Connected successfully, open the<a href="https://drive.google.com/open?id=1UAYAhdqr2iXO49ibkLyV4c2Aieteihs6" rel="nofollow noreferrer ugc"> <strong>ESP8266 debugging tool</strong></a>, set the baud rate to 115200, click to open the Serial Port, and click Test the AT. </p><p>You should see the data received window will print out<strong> AT OK</strong>. </p><p>To set other AT commands, the method is similar. You can download the ESP8266 debugging tool from the link below:</p><p><a href="https://drive.google.com/open?id=1TS56giNcC3Jd98Rg1mNyWyq13ePnZeyQ" rel="nofollow noreferrer ugc">https://drive.google.com/open?id=1TS56giNcC3Jd98Rg1mNyWyq13ePnZeyQ</a> </p><div class="embedExternal embedImage display-large float-none"> <div class="embedExternal-content"> <a class="embedImage-link" href="https://us.v-cdn.net/6031942/uploads/W3AVG2UUPRP1/image.png" rel="nofollow noreferrer noopener ugc" target="_blank"> <img class="embedImage-img" src="https://us.v-cdn.net/6031942/uploads/W3AVG2UUPRP1/image.png" alt="image.png" height="402" width="654" loading="lazy" data-display-size="large" data-float="none"></img></a> </div> </div> <p><br></p><h3 data-id="2.-firmware-programming"><strong>2. Firmware Programming</strong></h3><p> 
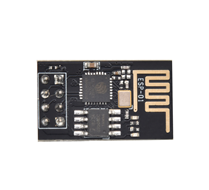
When setting the AT command, you need to use an <a href="http://www.keyestudio.com/ks0339.html" rel="nofollow noreferrer ugc">ESP8266 WIFI module</a>. </p><p> Plug the ESP8266 WIFI onto the shield, and then connect them to your computer’s USB port using a mini USB cable. Then push the shield’s button to <strong>Download </strong>end. </p><div class="embedExternal embedImage display-medium float-none"> <div class="embedExternal-content"> <a class="embedImage-link" href="https://us.v-cdn.net/6031942/uploads/KW7SQPGBZ7LH/image.png" rel="nofollow noreferrer noopener ugc" target="_blank"> <img class="embedImage-img" src="https://us.v-cdn.net/6031942/uploads/KW7SQPGBZ7LH/image.png" alt="image.png" height="171" width="578" loading="lazy" data-display-size="medium" data-float="none"></img></a> </div> </div> <p>Then open<a href="https://drive.google.com/open?id=1Zjg-lg7ySsmN4C3A0Oz9UJCdXqtkdf_R" rel="nofollow noreferrer ugc"><strong> flash_download_tools_v3.6.5software</strong></a>, click to open. </p><div class="embedExternal embedImage display-medium float-none"> <div class="embedExternal-content"> <a class="embedImage-link" href="https://us.v-cdn.net/6031942/uploads/45QPKGLEBO9X/image.png" rel="nofollow noreferrer noopener ugc" target="_blank"> <img class="embedImage-img" src="https://us.v-cdn.net/6031942/uploads/45QPKGLEBO9X/image.png" alt="image.png" height="24" width="219" loading="lazy" data-display-size="medium" data-float="none"></img></a> </div> </div> <p>You can download the flash download tools v3.6.5 from the link:</p><p><a href="https://drive.google.com/open?id=1JkBDPF3J11g5cMhsGxDjxbBYEHvqzJ-K" rel="nofollow noreferrer ugc">https://drive.google.com/open?id=1JkBDPF3J11g5cMhsGxDjxbBYEHvqzJ-K</a></p><div class="embedExternal embedImage display-medium float-none"> <div class="embedExternal-content"> <a class="embedImage-link" href="https://us.v-cdn.net/6031942/uploads/R1QCNRU3DMTP/image.png" rel="nofollow noreferrer noopener ugc" target="_blank"> <img class="embedImage-img" src="https://us.v-cdn.net/6031942/uploads/R1QCNRU3DMTP/image.png" alt="image.png" height="341" width="586" loading="lazy" data-display-size="medium" data-float="none"></img></a> </div> </div> <p> Wait for a minute, pop up the below interface, click the <strong>ESP8266 Download Tool</strong>.</p><div class="embedExternal embedImage display-small float-none"> <div class="embedExternal-content"> <a class="embedImage-link" href="https://us.v-cdn.net/6031942/uploads/TNC48K0FC567/image.png" rel="nofollow noreferrer noopener ugc" target="_blank"> <img class="embedImage-img" src="https://us.v-cdn.net/6031942/uploads/TNC48K0FC567/image.png" alt="image.png" height="455" width="273" loading="lazy" data-display-size="small" data-float="none"></img></a> </div> </div> <p> Enter the interface to set the firmware burning. This is the address of firmware burning.
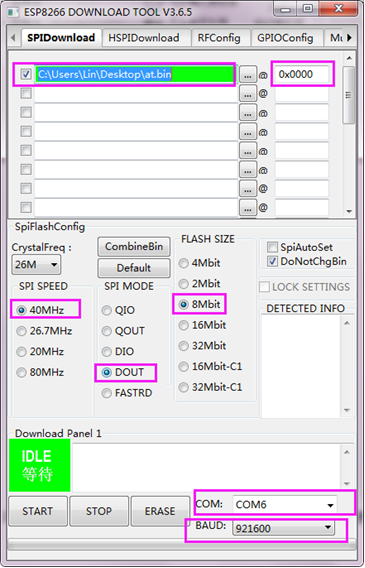
 </p><div class="embedExternal embedImage display-medium float-none"> <div class="embedExternal-content"> <a class="embedImage-link" href="https://us.v-cdn.net/6031942/uploads/OXQW3PC1T3IR/image.png" rel="nofollow noreferrer noopener ugc" target="_blank"> <img class="embedImage-img" src="https://us.v-cdn.net/6031942/uploads/OXQW3PC1T3IR/image.png" alt="image.png" height="35" width="327" loading="lazy" data-display-size="medium" data-float="none"></img></a> </div> </div> <div class="embedExternal embedImage display-medium float-none"> <div class="embedExternal-content"> <a class="embedImage-link" href="https://us.v-cdn.net/6031942/uploads/BW51XINQEEN3/image.png" rel="nofollow noreferrer noopener ugc" target="_blank"> <img class="embedImage-img" src="https://us.v-cdn.net/6031942/uploads/BW51XINQEEN3/image.png" alt="image.png" height="568" width="365" loading="lazy" data-display-size="medium" data-float="none"></img></a> </div> </div> <p> Tap <strong>START </strong>button, the module will enter the download mode. Shown below.</p><div class="embedExternal embedImage display-small float-none"> <div class="embedExternal-content"> <a class="embedImage-link" href="https://us.v-cdn.net/6031942/uploads/RZOOI2GJB5EV/image.png" rel="nofollow noreferrer noopener ugc" target="_blank"> <img class="embedImage-img" src="https://us.v-cdn.net/6031942/uploads/RZOOI2GJB5EV/image.png" alt="image.png" height="492" width="317" loading="lazy" data-display-size="small" data-float="none"></img></a> </div> </div> <div class="embedExternal embedImage display-small float-none"> <div class="embedExternal-content"> <a class="embedImage-link" href="https://us.v-cdn.net/6031942/uploads/S1RMRHQJFICX/image.png" rel="nofollow noreferrer noopener ugc" target="_blank"> <img class="embedImage-img" src="https://us.v-cdn.net/6031942/uploads/S1RMRHQJFICX/image.png" alt="image.png" height="492" width="316" loading="lazy" data-display-size="small" data-float="none"></img></a> </div> </div> <p>Firmware download completed, can enter the corresponding software to program the firmware.</p><h2 data-id="5)-schematic-diagram"><strong>5) Schematic Diagram</strong></h2><div class="embedExternal embedImage display-large float-none"> <div class="embedExternal-content"> <a class="embedImage-link" href="https://us.v-cdn.net/6031942/uploads/7799I9UN4IRJ/image.png" rel="nofollow noreferrer noopener ugc" target="_blank"> <img class="embedImage-img" src="https://us.v-cdn.net/6031942/uploads/7799I9UN4IRJ/image.png" alt="image.png" height="455" width="643" loading="lazy" data-display-size="large" data-float="none"></img></a> </div> </div> <p><br></p> </article> </main>