Looking for a quick way to take a screenshot of a specific part of your Windows 10 computer? The built-in snipping tool is a great way to do that quickly. This guide will show you how to use the snipping tool in Windows 10.
Here is how to access and use the snipping tool:
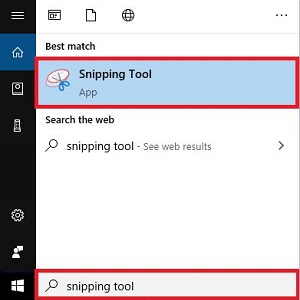
1) In the Windows Search Bar, typically found at the lower left corner of the screen, type in Snipping Tool and then select it from the list to open the app.

2) You will now see the a Snipping Tool window appear and you can proceed to use it.
To use the basic rectangular snip, select New.
This will change your cursor for the snipping tool to what resembles a plus sign. Select and drag over a selection on the screen that you want to snip. See our example below:

3) There are several things you can do when snipping with this tool, which we will label in this picture:

- Reset snip or take a new snip
- Change the mode of snip
- Change the snip type to delay so you can take a delayed shot
- Save your snip as a file
- Copy your snip so that you can paste it
- Attach snip to an email to send
- Use a pen or pencil to mark your snip
- Highlight sections of your snip
- Erase changes that you have made with the pen or highlighter
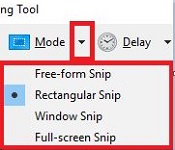
4) There are multiple modes that you can snip with the tool, click the drop-down arrow next to Mode to select these:

- Free Form – Draw a line around what you want snipped
- Rectangular – Create a rectangle around the area
- Window – Select a window on your screen to be entirely snipped
- Full screen – Automatically snip your entire selected screen
5) Those are all the options you can find within Snipping Tool!
You can also go into the Options tab to change how snips work as well as change your pen settings, such as color of the pen.