Computers
Computer Parts
Custom PC Builder
DIY/ Maker
{$smarty.capture.menu}
Activity
Categories
Discussions
Computers
Computer Parts
Custom PC Builder
DIY/ Maker
Windows 10 Display Color Calibration Tips & Tricks - Micro Center
<main> <article class="userContent"> <p>If you're not happy with how your monitor looks on your Windows 10 PC, you can use the built in display calibration software to help you pick out some new settings for your monitor. The Windows 10 Display Color Calibration is a built-in tool that will walk you through step by step with various settings and changes that are available to get your monitor/display looking its best.</p><p><br></p><p>Here is how to go through the calibration: </p><p>1. Check your monitor manual on how to navigate the monitor calibrations. Depending on monitor, there will typically be a Menu button for monitor settings found somewhere on the physical monitor. This will vary by monitor, but commonly is found on the bottom or right side of the monitor.</p><p><br></p><p>The picture below is just an example of what this may look like on your monitor:</p><div class="embedExternal embedImage display-large float-none"> <div class="embedExternal-content"> <a class="embedImage-link" href="https://us.v-cdn.net/6031942/uploads/editor/c8/m7zrd2a9bstj.png" rel="nofollow noreferrer noopener ugc" target="_blank"> <img class="embedImage-img" src="https://us.v-cdn.net/6031942/uploads/editor/c8/m7zrd2a9bstj.png" alt="m7zrd2a9bstj.png"></img></a> </div> </div> <p><br></p><p>The monitor itself will have plenty of settings found in its menu that can be adjusted as well, so be sure to look through the various options/presets your monitor offers.</p><p><br></p><p>
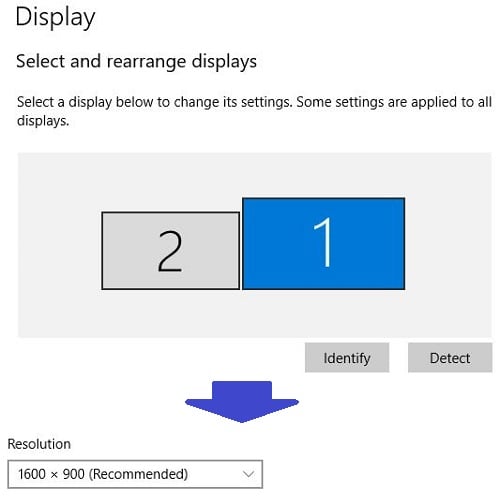
2. To continue with the Windows 10 calibration settings, if you are running multiple monitor setups, make sure the correct monitor is selected first. Go into <strong>Display Settings</strong> by right clicking on the desktop and selecting Display Settings on the menu.</p><p> </p><div class="embedExternal embedImage display-large float-none"> <div class="embedExternal-content"> <a class="embedImage-link" href="https://us.v-cdn.net/6031942/uploads/editor/na/kz9bmld0zsyt.png" rel="nofollow noreferrer noopener ugc" target="_blank"> <img class="embedImage-img" src="https://us.v-cdn.net/6031942/uploads/editor/na/kz9bmld0zsyt.png" alt="kz9bmld0zsyt.png"></img></a> </div> </div> <p></p><p><br></p><p>3. Under <strong>Resolution</strong>, click the drop-down box and choose the one with recommended in parenthesis beside it.<strong> </strong>If you have multiple displays, make sure you select each monitor in the Display Settings window and repeat this step.</p><p> </p><div class="embedExternal embedImage display-large float-none"> <div class="embedExternal-content"> <a class="embedImage-link" href="https://us.v-cdn.net/6031942/uploads/editor/so/isc9bjpfwxwn.jpg" rel="nofollow noreferrer noopener ugc" target="_blank"> <img class="embedImage-img" src="https://us.v-cdn.net/6031942/uploads/editor/so/isc9bjpfwxwn.jpg" alt="isc9bjpfwxwn.jpg"></img></a> </div> </div> <p></p><p><br></p><p>
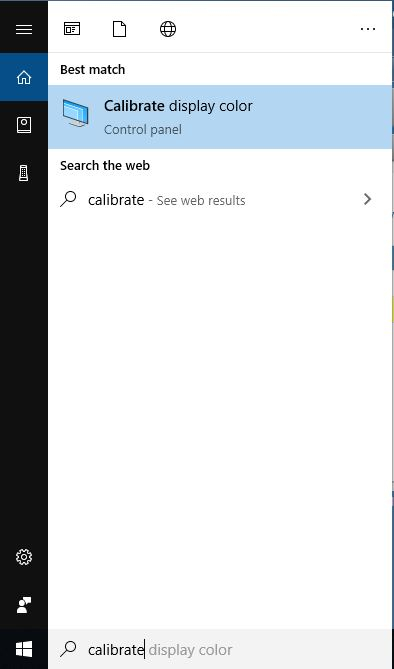
4. Click the search box by the Windows Start Menu and search for <strong>calibrate</strong>. Click on <strong>Calibrate display color</strong>.</p><p> </p><div class="embedExternal embedImage display-large float-none"> <div class="embedExternal-content"> <a class="embedImage-link" href="https://us.v-cdn.net/6031942/uploads/editor/nd/rj546zulge1j.jpg" rel="nofollow noreferrer noopener ugc" target="_blank"> <img class="embedImage-img" src="https://us.v-cdn.net/6031942/uploads/editor/nd/rj546zulge1j.jpg" alt="rj546zulge1j.jpg"></img></a> </div> </div> <p></p><p><br></p><p>5. Choose the best Gamma option. Gamma changes color values and the amount of light emitted for each value. Move the slider up and down to change any settings, then click <strong>Next</strong> to continue.</p><p><br></p><p><em>NOTE: In each of the below screenshots, the example pictures colors may look different on your monitor. Please ensure you are adjusting/looking at the examples directly on your PC to adjust your monitor's color and settings, not the pictures in our guide.</em></p><p> </p><div class="embedExternal embedImage display-large float-none"> <div class="embedExternal-content"> <a class="embedImage-link" href="https://us.v-cdn.net/6031942/uploads/editor/3w/4i4jhtzrck6o.jpg" rel="nofollow noreferrer noopener ugc" target="_blank"> <img class="embedImage-img" src="https://us.v-cdn.net/6031942/uploads/editor/3w/4i4jhtzrck6o.jpg" alt="4i4jhtzrck6o.jpg"></img></a> </div> </div> <p></p><p><br></p><div class="embedExternal embedImage display-large float-none"> <div class="embedExternal-content"> <a class="embedImage-link" href="https://us.v-cdn.net/6031942/uploads/editor/mz/2vrd8gyxhdnn.png" rel="nofollow noreferrer noopener ugc" target="_blank"> <img class="embedImage-img" src="https://us.v-cdn.net/6031942/uploads/editor/mz/2vrd8gyxhdnn.png" alt="2vrd8gyxhdnn.png"></img></a> </div> </div> <p></p><p><br></p><p>6. Choose the best brightness option. You will need to use the controls found on your monitor directly to adjust the brightness and can use the reference picture to pick your preferred setting. Once finished, click on <strong>Next.</strong></p><p> </p><div class="embedExternal embedImage display-large float-none"> <div class="embedExternal-content"> <a class="embedImage-link" href="https://us.v-cdn.net/6031942/uploads/editor/sk/c0q36iq5izns.jpg" rel="nofollow noreferrer noopener ugc" target="_blank"> <img class="embedImage-img" src="https://us.v-cdn.net/6031942/uploads/editor/sk/c0q36iq5izns.jpg" alt="c0q36iq5izns.jpg"></img></a> </div> </div> <p></p><p><br></p><div class="embedExternal embedImage display-large float-none"> <div class="embedExternal-content"> <a class="embedImage-link" href="https://us.v-cdn.net/6031942/uploads/editor/0n/i8l8hko9btic.png" rel="nofollow noreferrer noopener ugc" target="_blank"> <img class="embedImage-img" src="https://us.v-cdn.net/6031942/uploads/editor/0n/i8l8hko9btic.png" alt="i8l8hko9btic.png"></img></a> </div> </div> <p></p><p><br></p><p>7. Choose the best contrast option. You will need to use the controls found on your monitor directly to adjust the contrast and can use the reference picture to pick your preferred setting. Once finished, click on <strong>Next.</strong></p><div class="embedExternal embedImage display-large float-none"> <div class="embedExternal-content"> <a class="embedImage-link" href="https://us.v-cdn.net/6031942/uploads/editor/mh/d1uj5m8p3hui.png" rel="nofollow noreferrer noopener ugc" target="_blank"> <img class="embedImage-img" src="https://us.v-cdn.net/6031942/uploads/editor/mh/d1uj5m8p3hui.png" alt="d1uj5m8p3hui.png"></img></a> </div> </div> <p></p><p><br></p><p>
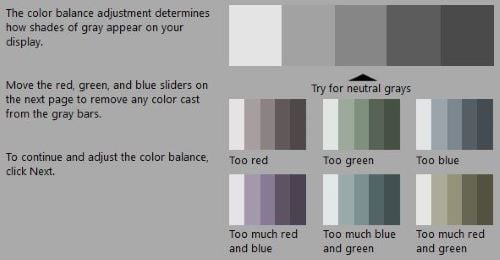
8. The next setting to be changed is for color balance, which allows you to change the color value for red, blue and green. You will need to use the controls found on your monitor directly to adjust the contrast and can use the reference picture to pick your preferred setting. Once finished, click on <strong>Next.</strong></p><p> </p><div class="embedExternal embedImage display-large float-none"> <div class="embedExternal-content"> <a class="embedImage-link" href="https://us.v-cdn.net/6031942/uploads/editor/95/xosgtj91vnme.jpg" rel="nofollow noreferrer noopener ugc" target="_blank"> <img class="embedImage-img" src="https://us.v-cdn.net/6031942/uploads/editor/95/xosgtj91vnme.jpg" alt="xosgtj91vnme.jpg"></img></a> </div> </div> <p></p><p><br></p><div class="embedExternal embedImage display-large float-none"> <div class="embedExternal-content"> <a class="embedImage-link" href="https://us.v-cdn.net/6031942/uploads/editor/bl/rnf046ecbjte.png" rel="nofollow noreferrer noopener ugc" target="_blank"> <img class="embedImage-img" src="https://us.v-cdn.net/6031942/uploads/editor/bl/rnf046ecbjte.png" alt="rnf046ecbjte.png"></img></a> </div> </div> <p></p><p><br></p><p>9. The final screen allows you to compare your previous settings with the new changes. Click <strong>Finish</strong> if you are satisfied with the new calibration or click on <strong>Cancel</strong> if you are not and wish to discard it.</p><p> </p><div class="embedExternal embedImage display-large float-none"> <div class="embedExternal-content"> <a class="embedImage-link" href="https://us.v-cdn.net/6031942/uploads/editor/dc/e5jkl6kzt4i8.png" rel="nofollow noreferrer noopener ugc" target="_blank"> <img class="embedImage-img" src="https://us.v-cdn.net/6031942/uploads/editor/dc/e5jkl6kzt4i8.png" alt="e5jkl6kzt4i8.png"></img></a> </div> </div> <p><br></p> </article> </main>