Computers
Computer Parts
Custom PC Builder
DIY/ Maker
{$smarty.capture.menu}
Activity
Categories
Discussions
Computers
Computer Parts
Custom PC Builder
DIY/ Maker
How to configure DNS Servers on the ASUS RT-AC68U Wireless Router - Micro Center
<main> <article class="userContent"> <p>This article will show how to change the DNS settings on an ASUS RT-AC68U Wireless Router. Changing DNS Servers can sometimes improve the performance of accessing certain websites.</p><h2 data-id="how-to-configure-the-dns-servers%3A">How to configure the DNS servers:</h2><p>1.) Open any web browser on your computer and type <strong>192.168.1.1</strong> into the address bar. Then press <strong>Enter </strong>on your keyboard.</p><div class="embedExternal embedImage display-large float-none"> <div class="embedExternal-content"> <a class="embedImage-link" href="https://60a99bedadae98078522-a9b6cded92292ef3bace063619038eb1.ssl.cf2.rackcdn.com/images_TechSupportArticlePix_8207Image1.jpg" rel="nofollow noreferrer noopener ugc" target="_blank"> <img class="embedImage-img" src="https://60a99bedadae98078522-a9b6cded92292ef3bace063619038eb1.ssl.cf2.rackcdn.com/images_TechSupportArticlePix_8207Image1.jpg" alt="Browser address bar" height="180" width="320" loading="lazy"></img></a> </div> </div> <p></p><p><br></p><p>2.) Enter the administrator username and password for the router (not your Wi-Fi password) and then click <strong>OK.</strong></p><p>The default username and password are both <strong>admin</strong>.</p><div class="embedExternal embedImage display-large float-none"> <div class="embedExternal-content"> <a class="embedImage-link" href="https://60a99bedadae98078522-a9b6cded92292ef3bace063619038eb1.ssl.cf2.rackcdn.com/images_TechSupportArticlePix_8207Image2.jpg" rel="nofollow noreferrer noopener ugc" target="_blank"> <img class="embedImage-img" src="https://60a99bedadae98078522-a9b6cded92292ef3bace063619038eb1.ssl.cf2.rackcdn.com/images_TechSupportArticlePix_8207Image2.jpg" alt="Browser authentication screen" height="180" width="320" loading="lazy"></img></a> </div> </div> <p></p><p><br></p><p>
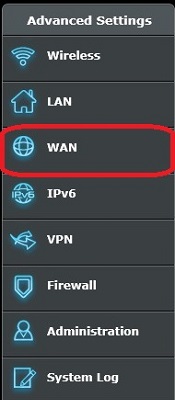
3. From the advanced menu on the left side of the router settings, click on <strong>WAN</strong>.</p><div class="embedExternal embedImage display-large float-none"> <div class="embedExternal-content"> <a class="embedImage-link" href="https://60a99bedadae98078522-a9b6cded92292ef3bace063619038eb1.ssl.cf2.rackcdn.com/images_TechSupportArticlePix_8207Image3.jpg" rel="nofollow noreferrer noopener ugc" target="_blank"> <img class="embedImage-img" src="https://60a99bedadae98078522-a9b6cded92292ef3bace063619038eb1.ssl.cf2.rackcdn.com/images_TechSupportArticlePix_8207Image3.jpg" alt="Router WAN Settings" height="180" width="320" loading="lazy"></img></a> </div> </div> <p></p><p><br></p><p>
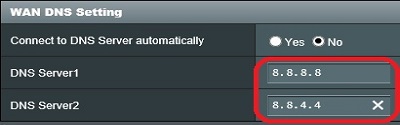
4. Under "WAN DNS Setting", next to Connect to DNS Server automatically, click on <strong>No</strong>.</p><div class="embedExternal embedImage display-large float-none"> <div class="embedExternal-content"> <a class="embedImage-link" href="https://60a99bedadae98078522-a9b6cded92292ef3bace063619038eb1.ssl.cf2.rackcdn.com/images_TechSupportArticlePix_8207Image4.jpg" rel="nofollow noreferrer noopener ugc" target="_blank"> <img class="embedImage-img" src="https://60a99bedadae98078522-a9b6cded92292ef3bace063619038eb1.ssl.cf2.rackcdn.com/images_TechSupportArticlePix_8207Image4.jpg" alt="WAN DNS Setting" height="180" width="320" loading="lazy"></img></a> </div> </div> <p><br></p><p>Additional fields will now appear, prompting for the addresses of the DNS Servers you wish to use.</p><p>A common alternative DNS server is the Google DNS, which uses <strong>8.8.8.8</strong> and <strong>8.8.4.4</strong></p><p>We will enter this in for our example.</p><div class="embedExternal embedImage display-large float-none"> <div class="embedExternal-content"> <a class="embedImage-link" href="https://60a99bedadae98078522-a9b6cded92292ef3bace063619038eb1.ssl.cf2.rackcdn.com/images_TechSupportArticlePix_8207Image5.jpg" rel="nofollow noreferrer noopener ugc" target="_blank"> <img class="embedImage-img" src="https://60a99bedadae98078522-a9b6cded92292ef3bace063619038eb1.ssl.cf2.rackcdn.com/images_TechSupportArticlePix_8207Image5.jpg" alt="WAN DNS Setting" height="180" width="320" loading="lazy"></img></a> </div> </div> <p></p><p><br></p><p>Once the DNS server addresses are entered, click on the <strong>Apply</strong> button at the bottom of the page to save the changes.</p><div class="embedExternal embedImage display-large float-none"> <div class="embedExternal-content"> <a class="embedImage-link" href="https://60a99bedadae98078522-a9b6cded92292ef3bace063619038eb1.ssl.cf2.rackcdn.com/images_TechSupportArticlePix_8207Image6.jpg" rel="nofollow noreferrer noopener ugc" target="_blank"> <img class="embedImage-img" src="https://60a99bedadae98078522-a9b6cded92292ef3bace063619038eb1.ssl.cf2.rackcdn.com/images_TechSupportArticlePix_8207Image6.jpg" alt="Apply to Save Changes" height="180" width="320" loading="lazy"></img></a> </div> </div> <p><br></p> </article> </main>