Computers
Computer Parts
Custom PC Builder
DIY/ Maker
{$smarty.capture.menu}
Activity
Categories
Discussions
Computers
Computer Parts
Custom PC Builder
DIY/ Maker
How to perform a Wi-Fi Setup on a Tenda AC15 Router - Micro Center
<main> <article class="userContent"> <p>This article will show you how to log in to the Tenda AC15 AC1900 router wirelessly for the first time.</p><p>Here is how to do the setup:</p><p>
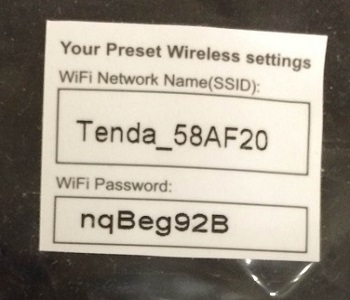
1. First, select the router name from the list of wireless connections on the computer. The name of the router will be listed on the cover and on a sticker on the back of the router. Select this and connect to it, the default security key will also be listed on both the cover and sticker on the back.</p><div class="embedExternal embedImage display-large float-none"> <div class="embedExternal-content"> <a class="embedImage-link" href="https://60a99bedadae98078522-a9b6cded92292ef3bace063619038eb1.ssl.cf2.rackcdn.com/images_TechSupportArticlePix_8763Image1.jpg" rel="nofollow noreferrer noopener ugc" target="_blank"> <img class="embedImage-img" src="https://60a99bedadae98078522-a9b6cded92292ef3bace063619038eb1.ssl.cf2.rackcdn.com/images_TechSupportArticlePix_8763Image1.jpg" alt="Tenda Label Preset Settings" height="180" width="320" loading="lazy"></img></a> </div> </div> <p></p><p><br></p><p>2. Once connected to the router, open a browser and connect to <strong>tendawifi.com</strong>.</p><div class="embedExternal embedImage display-large float-none"> <div class="embedExternal-content"> <a class="embedImage-link" href="https://60a99bedadae98078522-a9b6cded92292ef3bace063619038eb1.ssl.cf2.rackcdn.com/images_TechSupportArticlePix_8763Image2.jpg" rel="nofollow noreferrer noopener ugc" target="_blank"> <img class="embedImage-img" src="https://60a99bedadae98078522-a9b6cded92292ef3bace063619038eb1.ssl.cf2.rackcdn.com/images_TechSupportArticlePix_8763Image2.jpg" alt="Tenda Router Setup Wizard" height="180" width="320" loading="lazy"></img></a> </div> </div> <p></p><p><br></p><p>3. Once this page loads, it will show a screen that will say <strong>Tenda Router Quick Setup Wizard</strong>. Click <strong>Start</strong> to begin this process.</p><div class="embedExternal embedImage display-large float-none"> <div class="embedExternal-content"> <a class="embedImage-link" href="https://60a99bedadae98078522-a9b6cded92292ef3bace063619038eb1.ssl.cf2.rackcdn.com/images_TechSupportArticlePix_8763Image3.jpg" rel="nofollow noreferrer noopener ugc" target="_blank"> <img class="embedImage-img" src="https://60a99bedadae98078522-a9b6cded92292ef3bace063619038eb1.ssl.cf2.rackcdn.com/images_TechSupportArticlePix_8763Image3.jpg" alt="Tenda Router Plug In Ethernet" height="180" width="320" loading="lazy"></img></a> </div> </div> <p></p><p><br></p><p>
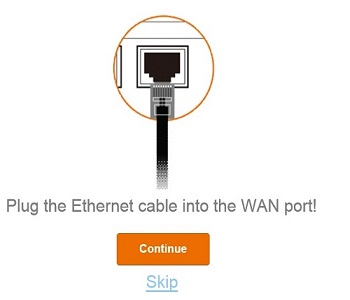
4. The next screen will show to plug in an Ethernet cable from the cable or DSL modem into the WAN port. Here you can click on <strong>Continue</strong> once plugged in, or click on <strong>Skip</strong> to configure wirelessly.</p><div class="embedExternal embedImage display-large float-none"> <div class="embedExternal-content"> <a class="embedImage-link" href="https://60a99bedadae98078522-a9b6cded92292ef3bace063619038eb1.ssl.cf2.rackcdn.com/images_TechSupportArticlePix_8763Image4.jpg" rel="nofollow noreferrer noopener ugc" target="_blank"> <img class="embedImage-img" src="https://60a99bedadae98078522-a9b6cded92292ef3bace063619038eb1.ssl.cf2.rackcdn.com/images_TechSupportArticlePix_8763Image4.jpg" alt="Tenda Wireless Settings" height="180" width="320" loading="lazy"></img></a> </div> </div> <p></p><p><br></p><p>
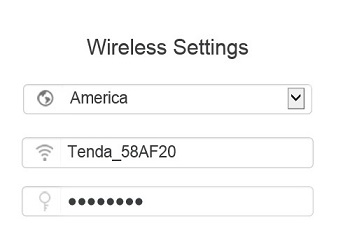
5. A wireless settings page will appear next. First, the country or region can be selected here. Second, the wireless router name and password will need to be filled in, as found on the sticker on the back of the router or on the cover.</p><div class="embedExternal embedImage display-large float-none"> <div class="embedExternal-content"> <a class="embedImage-link" href="https://60a99bedadae98078522-a9b6cded92292ef3bace063619038eb1.ssl.cf2.rackcdn.com/images_TechSupportArticlePix_8763Image5.jpg" rel="nofollow noreferrer noopener ugc" target="_blank"> <img class="embedImage-img" src="https://60a99bedadae98078522-a9b6cded92292ef3bace063619038eb1.ssl.cf2.rackcdn.com/images_TechSupportArticlePix_8763Image5.jpg" alt="Tenda Wireless Settings" height="180" width="320" loading="lazy"></img></a> </div> </div> <p></p><p><br></p><p>
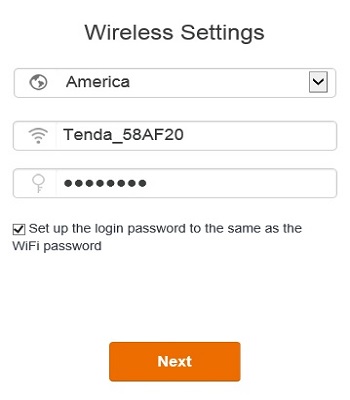
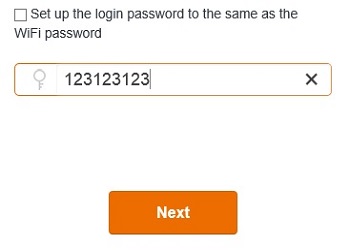
6. Next, the router admin password will need to be set. To have this be the same as the wireless password, check the box here that says <strong>Set up the login password to be the same as the WiFi Password</strong>.</p><p>To make a different password for the router admin login, uncheck the box and an additional dialog box will appear. This will require at least an eight character password here which will be used to sign in to the router directly. Click <strong>Next</strong> when finished.</p><div class="embedExternal embedImage display-large float-none"> <div class="embedExternal-content"> <a class="embedImage-link" href="https://60a99bedadae98078522-a9b6cded92292ef3bace063619038eb1.ssl.cf2.rackcdn.com/images_TechSupportArticlePix_8763Image6.jpg" rel="nofollow noreferrer noopener ugc" target="_blank"> <img class="embedImage-img" src="https://60a99bedadae98078522-a9b6cded92292ef3bace063619038eb1.ssl.cf2.rackcdn.com/images_TechSupportArticlePix_8763Image6.jpg" alt="Tenda Wireless Settings" height="180" width="320" loading="lazy"></img></a> </div> </div> <p></p><p><br></p><div class="embedExternal embedImage display-large float-none"> <div class="embedExternal-content"> <a class="embedImage-link" href="https://60a99bedadae98078522-a9b6cded92292ef3bace063619038eb1.ssl.cf2.rackcdn.com/images_TechSupportArticlePix_8763Image7.jpg" rel="nofollow noreferrer noopener ugc" target="_blank"> <img class="embedImage-img" src="https://60a99bedadae98078522-a9b6cded92292ef3bace063619038eb1.ssl.cf2.rackcdn.com/images_TechSupportArticlePix_8763Image7.jpg" alt="Tenda Wireless Settings" height="180" width="320" loading="lazy"></img></a> </div> </div> <p></p><p><br></p><p>7. The next screen it will show will say <strong>Connecting…please wait…</strong> and it will count down from 10 until completed.</p><div class="embedExternal embedImage display-large float-none"> <div class="embedExternal-content"> <a class="embedImage-link" href="https://60a99bedadae98078522-a9b6cded92292ef3bace063619038eb1.ssl.cf2.rackcdn.com/images_TechSupportArticlePix_8763Image8.jpg" rel="nofollow noreferrer noopener ugc" target="_blank"> <img class="embedImage-img" src="https://60a99bedadae98078522-a9b6cded92292ef3bace063619038eb1.ssl.cf2.rackcdn.com/images_TechSupportArticlePix_8763Image8.jpg" alt="Configuration Countdown" height="180" width="320" loading="lazy"></img></a> </div> </div> <p></p><p><br></p><p>8. Once the countdown is finished, a new screen will appear, showing a check mark and the connections that will be available. Once this is shown, setup is completed and any additional configuration can be done by logging into the router at <strong>192.168.1.1</strong>.</p><div class="embedExternal embedImage display-large float-none"> <div class="embedExternal-content"> <a class="embedImage-link" href="https://60a99bedadae98078522-a9b6cded92292ef3bace063619038eb1.ssl.cf2.rackcdn.com/images_TechSupportArticlePix_8763Image9.jpg" rel="nofollow noreferrer noopener ugc" target="_blank"> <img class="embedImage-img" src="https://60a99bedadae98078522-a9b6cded92292ef3bace063619038eb1.ssl.cf2.rackcdn.com/images_TechSupportArticlePix_8763Image9.jpg" alt="Tenda Wireless Connected" height="180" width="320" loading="lazy"></img></a> </div> </div> <p></p><p><br></p><div class="embedExternal embedImage display-large float-none"> <div class="embedExternal-content"> <a class="embedImage-link" href="https://60a99bedadae98078522-a9b6cded92292ef3bace063619038eb1.ssl.cf2.rackcdn.com/images_TechSupportArticlePix_8763Image10.jpg" rel="nofollow noreferrer noopener ugc" target="_blank"> <img class="embedImage-img" src="https://60a99bedadae98078522-a9b6cded92292ef3bace063619038eb1.ssl.cf2.rackcdn.com/images_TechSupportArticlePix_8763Image10.jpg" alt="Browser Address Bar" height="180" width="320" loading="lazy"></img></a> </div> </div> <p><br></p> </article> </main>