Computers
Computer Parts
Custom PC Builder
DIY/ Maker
{$smarty.capture.menu}
Activity
Categories
Discussions
Computers
Computer Parts
Custom PC Builder
DIY/ Maker
How to set up a WinBook D5008DH 8-Channel DVR - Micro Center
<main> <article class="userContent"> <p>This article will show how to set up the WinBook D5008DH 8-Channel DVR System using basic setup parameters.</p><ol><li>
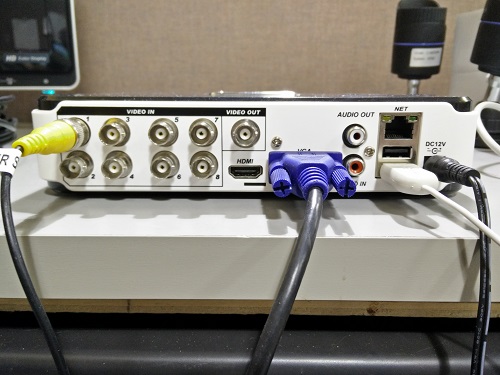
Start by inserting the connections to the power adapter, camera(s), USB mouse, and VGA or HDMI enabled monitor to display video feed.</li></ol><ul><li>The male BNC cable should be in <strong>Port 1</strong>.</li><li>The VGA input should be plugged into the port labeled <strong>VGA</strong>.</li><li>The mouse should be plugged into one of the <strong>USB ports</strong> below the networking port.</li><li>The power adapter should be plugged into the port labeled <strong>DC-12V</strong>.</li></ul><div class="embedExternal embedImage display-large float-none"> <div class="embedExternal-content"> <a class="embedImage-link" href="https://60a99bedadae98078522-a9b6cded92292ef3bace063619038eb1.ssl.cf2.rackcdn.com/images_TechSupportArticlePix_8205Image1.jpg" rel="nofollow noreferrer noopener ugc" target="_blank"> <img class="embedImage-img" src="https://60a99bedadae98078522-a9b6cded92292ef3bace063619038eb1.ssl.cf2.rackcdn.com/images_TechSupportArticlePix_8205Image1.jpg" alt="images_TechSupportArticlePix_8205Image1.jpg" height="180" width="320" loading="lazy"></img></a> </div> </div> <p><br></p><p>
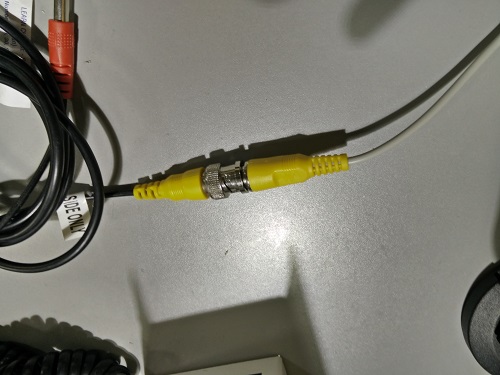
2. Connect the male BNC cable coming from the DVR to the female BNC cable coming from the camera being used.</p><div class="embedExternal embedImage display-large float-none"> <div class="embedExternal-content"> <a class="embedImage-link" href="https://60a99bedadae98078522-a9b6cded92292ef3bace063619038eb1.ssl.cf2.rackcdn.com/images_TechSupportArticlePix_8205Image2.jpg" rel="nofollow noreferrer noopener ugc" target="_blank"> <img class="embedImage-img" src="https://60a99bedadae98078522-a9b6cded92292ef3bace063619038eb1.ssl.cf2.rackcdn.com/images_TechSupportArticlePix_8205Image2.jpg" alt="images_TechSupportArticlePix_8205Image2.jpg" height="180" width="320" loading="lazy"></img></a> </div> </div> <p><br></p><p>
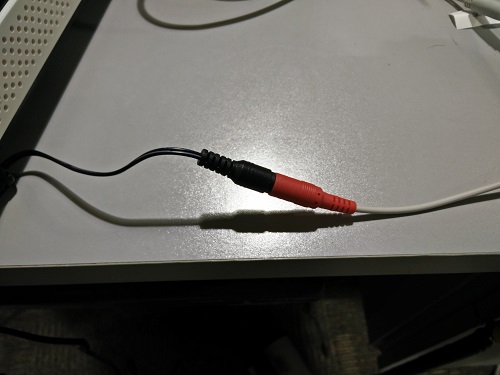
3. Connect the power adapter supplied with the camera to the cables that have the male BNC cables attached to them.</p><div class="embedExternal embedImage display-large float-none"> <div class="embedExternal-content"> <a class="embedImage-link" href="https://60a99bedadae98078522-a9b6cded92292ef3bace063619038eb1.ssl.cf2.rackcdn.com/images_TechSupportArticlePix_8205Image3.jpg" rel="nofollow noreferrer noopener ugc" target="_blank"> <img class="embedImage-img" src="https://60a99bedadae98078522-a9b6cded92292ef3bace063619038eb1.ssl.cf2.rackcdn.com/images_TechSupportArticlePix_8205Image3.jpg" alt="images_TechSupportArticlePix_8205Image3.jpg" height="180" width="320" loading="lazy"></img></a> </div> </div> <p><br></p><p>
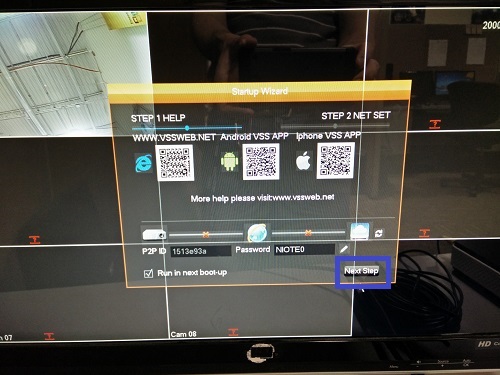
4. Once the camera has been detected by the system, the camera will be visible on the display in the top-left pane and the <strong>Startup Wizard</strong> window will appear. This tutorial only covers the initial setup of the DVR itself, so click <strong>Next Step</strong>.</p><div class="embedExternal embedImage display-large float-none"> <div class="embedExternal-content"> <a class="embedImage-link" href="https://60a99bedadae98078522-a9b6cded92292ef3bace063619038eb1.ssl.cf2.rackcdn.com/images_TechSupportArticlePix_8205Image4.jpg" rel="nofollow noreferrer noopener ugc" target="_blank"> <img class="embedImage-img" src="https://60a99bedadae98078522-a9b6cded92292ef3bace063619038eb1.ssl.cf2.rackcdn.com/images_TechSupportArticlePix_8205Image4.jpg" alt="images_TechSupportArticlePix_8205Image4.jpg" height="180" width="320" loading="lazy"></img></a> </div> </div> <p><br></p><p>
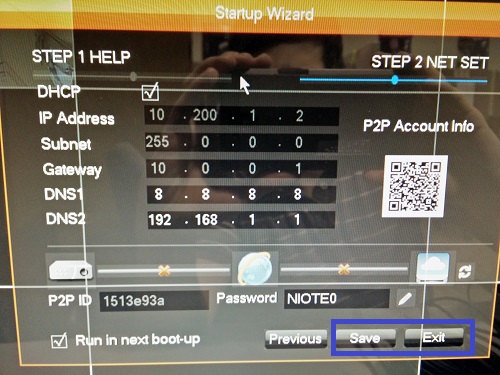
5. If the DVR is to be networked through Ethernet, check the box for <strong>DHCP</strong> and then click <strong>Save</strong>. Click <strong>Exit</strong>.</p><div class="embedExternal embedImage display-large float-none"> <div class="embedExternal-content"> <a class="embedImage-link" href="https://60a99bedadae98078522-a9b6cded92292ef3bace063619038eb1.ssl.cf2.rackcdn.com/images_TechSupportArticlePix_8205Image5.jpg" rel="nofollow noreferrer noopener ugc" target="_blank"> <img class="embedImage-img" src="https://60a99bedadae98078522-a9b6cded92292ef3bace063619038eb1.ssl.cf2.rackcdn.com/images_TechSupportArticlePix_8205Image5.jpg" alt="images_TechSupportArticlePix_8205Image5.jpg" height="180" width="320" loading="lazy"></img></a> </div> </div> <p><br></p><p>The DVR is now set up and is ready for basic use or further advanced configuration.</p> </article> </main>