Computers
Computer Parts
Custom PC Builder
DIY/ Maker
{$smarty.capture.menu}
Activity
Categories
Discussions
Computers
Computer Parts
Custom PC Builder
DIY/ Maker
How to replace the Video Card in a PowerSpec X251 - Micro Center
<main> <article class="userContent"> <p>This article will show how to replace the pre-installed video card in a PowerSpec X251 computer. The video card will have to be removed by opening the case, removing the front and sliding the existing video card out of the front of the case.</p><p>Here is how to do this:</p><p>
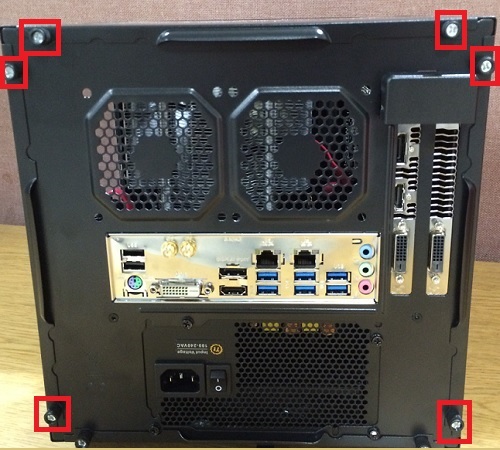
1. To remove the sides, top, and if necessary, bottom of the case for the X251, unscrew the case screws from the back corners of the unit. Slide the sides off the case and pull up on the top panel to remove.</p><div class="embedExternal embedImage display-large float-none"> <div class="embedExternal-content"> <a class="embedImage-link" href="https://60a99bedadae98078522-a9b6cded92292ef3bace063619038eb1.ssl.cf2.rackcdn.com/images_TechSupportArticlePix_9439Image1.jpg" rel="nofollow noreferrer noopener ugc" target="_blank"> <img class="embedImage-img" src="https://60a99bedadae98078522-a9b6cded92292ef3bace063619038eb1.ssl.cf2.rackcdn.com/images_TechSupportArticlePix_9439Image1.jpg" alt="Back of PowerSpec X251" height="180" width="320" loading="lazy"></img></a> </div> </div> <p></p><p><br></p><p>
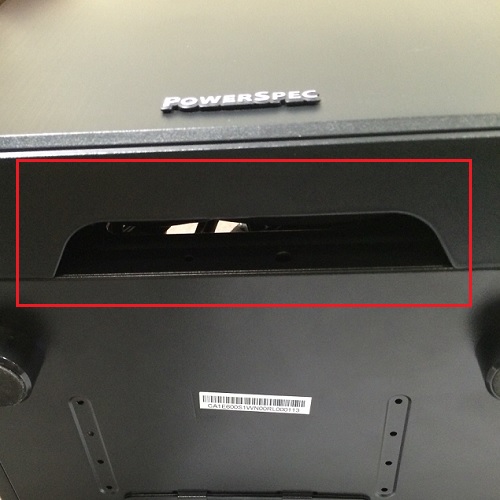
2. To remove the front of the case, pull forward from the bottom of the case - the front should come off easily.</p><div class="embedExternal embedImage display-large float-none"> <div class="embedExternal-content"> <a class="embedImage-link" href="https://60a99bedadae98078522-a9b6cded92292ef3bace063619038eb1.ssl.cf2.rackcdn.com/images_TechSupportArticlePix_9439Image2.jpg" rel="nofollow noreferrer noopener ugc" target="_blank"> <img class="embedImage-img" src="https://60a99bedadae98078522-a9b6cded92292ef3bace063619038eb1.ssl.cf2.rackcdn.com/images_TechSupportArticlePix_9439Image2.jpg" alt="Bottom of case" height="180" width="320" loading="lazy"></img></a> </div> </div> <p></p><p><br></p><div class="embedExternal embedImage display-large float-none"> <div class="embedExternal-content"> <a class="embedImage-link" href="https://60a99bedadae98078522-a9b6cded92292ef3bace063619038eb1.ssl.cf2.rackcdn.com/images_TechSupportArticlePix_9439Image3.jpg" rel="nofollow noreferrer noopener ugc" target="_blank"> <img class="embedImage-img" src="https://60a99bedadae98078522-a9b6cded92292ef3bace063619038eb1.ssl.cf2.rackcdn.com/images_TechSupportArticlePix_9439Image3.jpg" alt="Front removed from case" height="180" width="320" loading="lazy"></img></a> </div> </div> <p></p><p><br></p><p>
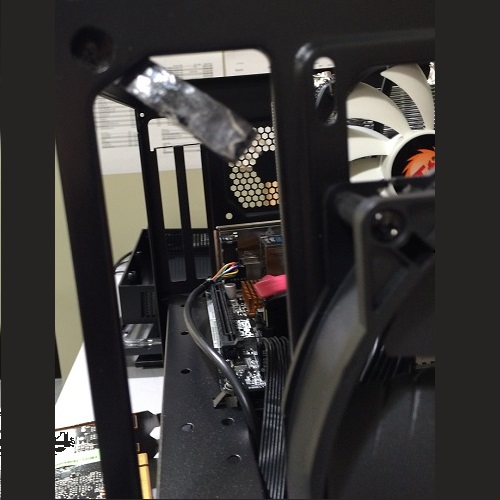
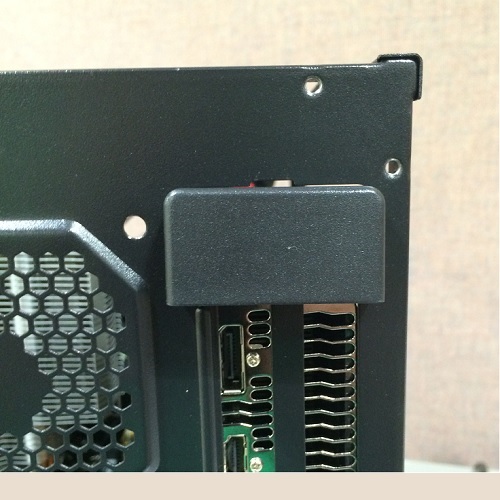
3. Remove the cover from above the video card by pushing in on it to pop the cover off. Once removed, unscrew the two screws from the back of the video card.</p><div class="embedExternal embedImage display-large float-none"> <div class="embedExternal-content"> <a class="embedImage-link" href="https://60a99bedadae98078522-a9b6cded92292ef3bace063619038eb1.ssl.cf2.rackcdn.com/images_TechSupportArticlePix_9439Image4.jpg" rel="nofollow noreferrer noopener ugc" target="_blank"> <img class="embedImage-img" src="https://60a99bedadae98078522-a9b6cded92292ef3bace063619038eb1.ssl.cf2.rackcdn.com/images_TechSupportArticlePix_9439Image4.jpg" alt="Cover for video card" height="180" width="320" loading="lazy"></img></a> </div> </div> <p></p><p><br></p><div class="embedExternal embedImage display-large float-none"> <div class="embedExternal-content"> <a class="embedImage-link" href="https://60a99bedadae98078522-a9b6cded92292ef3bace063619038eb1.ssl.cf2.rackcdn.com/images_TechSupportArticlePix_9439Image5.jpg" rel="nofollow noreferrer noopener ugc" target="_blank"> <img class="embedImage-img" src="https://60a99bedadae98078522-a9b6cded92292ef3bace063619038eb1.ssl.cf2.rackcdn.com/images_TechSupportArticlePix_9439Image5.jpg" alt="Video card screws" height="180" width="320" loading="lazy"></img></a> </div> </div> <p></p><p><br></p><p>
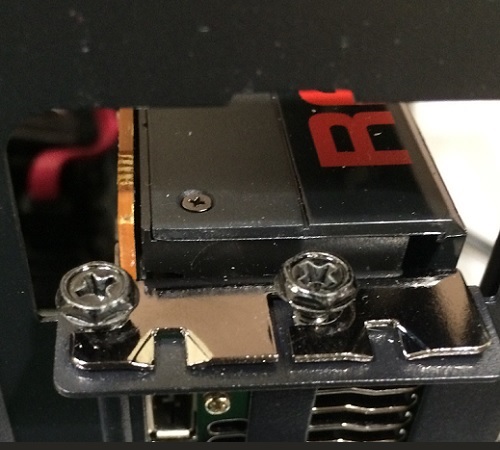
4. Remove the 8-pin and 6-pin PCI-e adapters from the video card. Lift the video card out of the PCI slot, and remove the card through the opening in the front of the case.</p><div class="embedExternal embedImage display-large float-none"> <div class="embedExternal-content"> <a class="embedImage-link" href="https://60a99bedadae98078522-a9b6cded92292ef3bace063619038eb1.ssl.cf2.rackcdn.com/images_TechSupportArticlePix_9439Image6.jpg" rel="nofollow noreferrer noopener ugc" target="_blank"> <img class="embedImage-img" src="https://60a99bedadae98078522-a9b6cded92292ef3bace063619038eb1.ssl.cf2.rackcdn.com/images_TechSupportArticlePix_9439Image6.jpg" alt="PCI Express Power Connections" height="180" width="320" loading="lazy"></img></a> </div> </div> <p><br></p><div class="embedExternal embedImage display-large float-none"> <div class="embedExternal-content"> <a class="embedImage-link" href="https://60a99bedadae98078522-a9b6cded92292ef3bace063619038eb1.ssl.cf2.rackcdn.com/images_TechSupportArticlePix_9439Image7.jpg" rel="nofollow noreferrer noopener ugc" target="_blank"> <img class="embedImage-img" src="https://60a99bedadae98078522-a9b6cded92292ef3bace063619038eb1.ssl.cf2.rackcdn.com/images_TechSupportArticlePix_9439Image7.jpg" alt="Computer without video card" height="180" width="320" loading="lazy"></img></a> </div> </div> <p><br></p><div class="embedExternal embedImage display-large float-none"> <div class="embedExternal-content"> <a class="embedImage-link" href="https://60a99bedadae98078522-a9b6cded92292ef3bace063619038eb1.ssl.cf2.rackcdn.com/images_TechSupportArticlePix_9439Image8.jpg" rel="nofollow noreferrer noopener ugc" target="_blank"> <img class="embedImage-img" src="https://60a99bedadae98078522-a9b6cded92292ef3bace063619038eb1.ssl.cf2.rackcdn.com/images_TechSupportArticlePix_9439Image8.jpg" alt="PCI Express Slot without video card" height="180" width="320" loading="lazy"></img></a> </div> </div> <p><br></p> </article> </main>