If your printer is connected properly but you’re experiencing issues, such as:
- Files are not being sent to the printer
- Documents are getting stuck in the queue
- An error message stating ‘the print spooler service is not running'
Restarting the Print Spooler can often fix these common printer problems. In case you don’t know what the Print Spooler is - it is a program built into the Windows operating system. The purpose is to manage any print jobs that need to be sent to either the printer itself or a print server.
Here is our step-by-step guide on how-to complete this process:
Step 1) Restart the Print Spooler service
- Search Services in the Windows Search Bar, typically found at the bottom of the screen on the taskbar, then click on the Services app result.


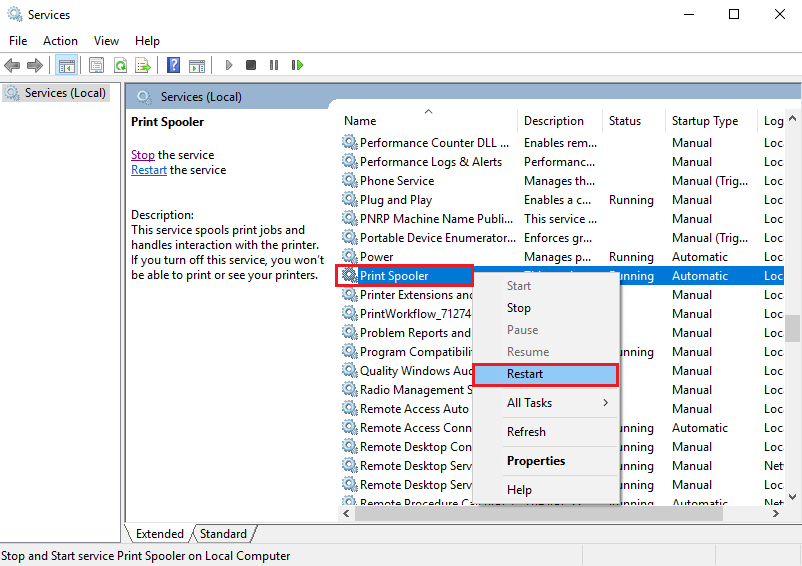
- Find the Print Spooler service on this list. It is an alphabetical order list by default. Right-click on it, then click Restart.

Now, go ahead and try to print something. If it does not work, then move on to the next step.
Step 2) Clear the print queue
- Search Printers in the Windows search bar, typically found at the lower left corner of the screen or the bottom middle, then click on the Printers and scanners system settings.


- Click on The printer you want to clear the queue for.

- Click on Open print queue.

- It will take you to this page, and it will show you all the documents that are printer queue. All you need to do is click on the three dots at the top right and select Cancel all.

At this point, you can try to print something again. If it does not work, then just continue to the next step.
Step 3) Manually Delete Files in the Print Spooler folder
Note: This is simply a different way of clearing the print queue as we showed you in step 2.
- Open the 'Services' window again, right-click the Print Spooler service, then click Stop

- Now, open File Explorer. Copy and paste this location at the top of the window. %windir%\System32\spool\PRINTERS Then press Enter on your keyboard.

- Delete all the files in this folder. You can do this by right-clicking on each one, then click on Delete.

- Once you delete all the files in this folder, Start the Print Spooler Service again in the Services window.

This is where you will want to try and print a file again. If it still does not print then move onto the next step.
Step 4) Use a batch file to clear and restart the Print Spooler
- Create a .txt document. Right-click on your desktop wallpaper, hover the cursor over New, then click Text Document

- Now, go ahead and open that text document. Then copy and paste the text below into that text document:
- net stop spooler
- del /Q /F /S "%windir%\System32\spool\PRINTERS\*.*"
- net start spooler
- It should look like this:

- Now click File, then click Save As...

- Change the 'Save as type' to All Files by clicking the dropdown. You can create any name for the file, however, you must type ‘.bat’ at the end of the file name. (see picture below)

- Right-click the file, then click Run as Administrator when you need to clear and restart the print spooler

That’s it! Just a reminder, you may want to keep the batch file we created in step 3. You can re-use it and it will allow you to restart the print spooler much faster in the future.