OneDrive is Microsoft's cloud-storage feature that comes integrated with Windows 10. It is linked to your Microsoft account and will automatically back up your data whenever it can. While OneDrive can be a useful tool, it only provides 5GB of free backup space and you have to pay for extra. Additionally, if you have very large amounts of data to back up, it can really hog your bandwidth and make your internet or computer run very slow while it's attempting to sync your data.
Whatever the reason may be, if you don't want to use OneDrive there are a few different things you can do to either stop if from automatically backing up data or disable it entirely.
Pause Syncing
If you actively use OneDrive you can temporarily pause it if you need to free up bandwidth or resources on your computer. If you're having issues with videos stuttering, or perhaps having lag when playing games, and OneDrive is actively backing things up, that could be the reason why. To pause OneDrive, we need to open it first.
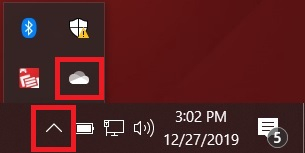
1. Locate the OneDrive icon on your taskbar, typically found at the bottom-right corner of your screen. The icon looks like a cloud, and should be located near the volume, internet and date/time on your taskbar.

OneDrive may also be in the Hidden Icons menu, designated by the ^ icon on your task bar. This should also be located in the same area near the volume, internet and date/time.

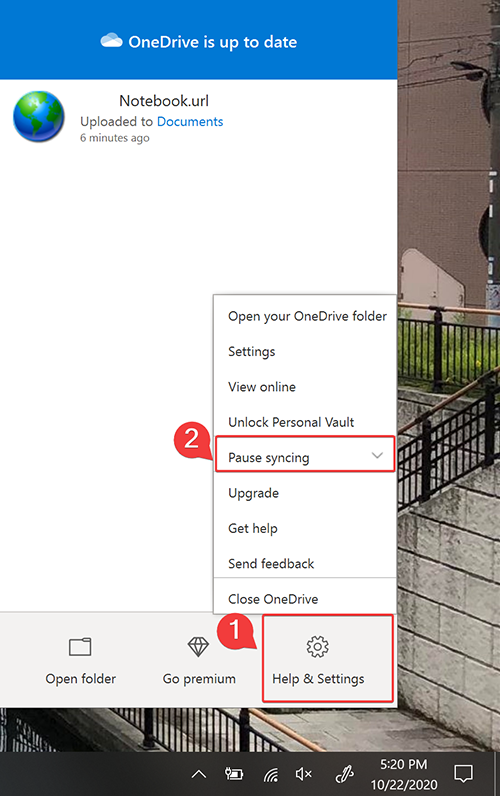
2. Click the OneDrive icon, then click More then click Pause Syncing.
You can pause for up to 24 hours, or to resume manually you click the icon again, click More and then click Resume Syncing.

Unlink your Microsoft Account
Unlinking your account will remove it from OneDrive and stop any information from being backed up to it. Any information that has already been backed up to the account will remain there, but no new information will be added unless you sign into OneDrive with your account again.
1. We need to click the OneDrive icon again as we did before, click More and now select Settings from the menu.

2. Go to the Account tab and click Unlink this PC.

You'll be prompted to confirm your choice. Click Unlink Account.

Disable OneDrive on Startup
Even if your account is unlinked, OneDrive is still set to automatically launch on startup by default. You can change this through OneDrive Settings or Task Manager.
1. Click the OneDrive icon, click More and go to Settings. This time go to the Settings tab and uncheck the box that says "Start OneDrive automatically when I sign in to Windows," then click OK.

2. To open Task Manager, right click the Start button, typically found at the lower left corner of the screen and then click Task Manager.

3. Once you have Task Manager open, go to the Startup tab and click Microsoft OneDrive, then click Disable.

If you cannot see any tabs or categories across the top, make sure you click More details on the bottom-left corner to have the full view of Task Manager, then you can adjust these settings.

Uninstall OneDrive
Finally, on some versions of Windows 10, you can even completely uninstall OneDrive. Right-click your Start Button and go to Apps and Features.

Scroll down until you find Microsoft OneDrive. Click it, then click Uninstall and click Uninstall again.

You'll receive a User Account Control prompt, click Yes to allow changes and then OneDrive will finish uninstalling from the computer.

That's it - now OneDrive is removed from your PC.