Computers
Computer Parts
Custom PC Builder
DIY/ Maker
{$smarty.capture.menu}
Activity
Categories
Discussions
Computers
Computer Parts
Custom PC Builder
DIY/ Maker
How to adjust the Virtual Memory size in Windows 10 - Micro Center
<main> <article class="userContent"> <p>If your Windows 10 computer is running low on virtual memory, you can adjust the size of paging file.</p><p>If you're getting low on memory issues with Windows 10 or seem to notice slow performance while using your PC, this can be a good way to improve system performance.</p><p>Here is how to adjust the virtual memory size in Windows 10:
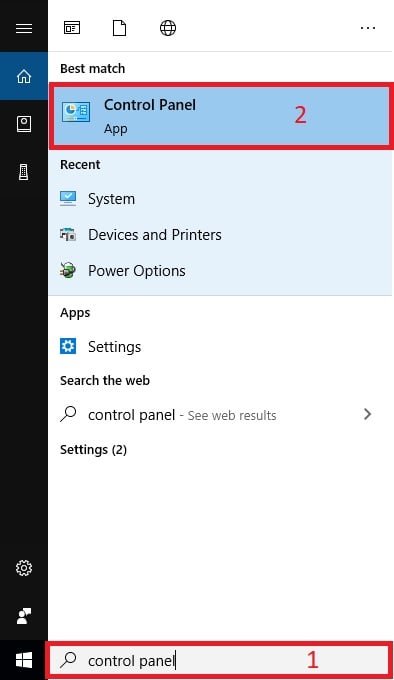
</p><p>1. Type <strong>Control Panel</strong> in the search box at the bottom left corner of the screen and click the <strong>Control Panel</strong> app under best match.</p><p><br></p><div class="embedExternal embedImage display-large float-none"> <div class="embedExternal-content"> <a class="embedImage-link" href="https://us.v-cdn.net/6031942/uploads/editor/au/g6x0aj3b78o7.jpg" rel="nofollow noreferrer noopener ugc" target="_blank"> <img class="embedImage-img" src="https://us.v-cdn.net/6031942/uploads/editor/au/g6x0aj3b78o7.jpg" alt="g6x0aj3b78o7.jpg"></img></a> </div> </div> <p></p><p><br></p><p>2. Click on <strong>System and Security</strong> from the Control Panel window<strong>.</strong></p><div class="embedExternal embedImage display-large float-none"> <div class="embedExternal-content"> <a class="embedImage-link" href="https://us.v-cdn.net/6031942/uploads/editor/dj/wwtcnnipycqr.jpg" rel="nofollow noreferrer noopener ugc" target="_blank"> <img class="embedImage-img" src="https://us.v-cdn.net/6031942/uploads/editor/dj/wwtcnnipycqr.jpg" alt="wwtcnnipycqr.jpg"></img></a> </div> </div> <p></p><p><br></p><p>3. Click on <strong>System </strong>from the list of options<strong>.</strong></p><div class="embedExternal embedImage display-large float-none"> <div class="embedExternal-content"> <a class="embedImage-link" href="https://us.v-cdn.net/6031942/uploads/editor/ht/w4r5ddn7ieol.jpg" rel="nofollow noreferrer noopener ugc" target="_blank"> <img class="embedImage-img" src="https://us.v-cdn.net/6031942/uploads/editor/ht/w4r5ddn7ieol.jpg" alt="w4r5ddn7ieol.jpg"></img></a> </div> </div> <p></p><p><br></p><p>4. On the left side of the system window, click on <strong>Advanced system settings.</strong></p><div class="embedExternal embedImage display-large float-none"> <div class="embedExternal-content"> <a class="embedImage-link" href="https://us.v-cdn.net/6031942/uploads/editor/n7/7mh5nfo86u28.jpg" rel="nofollow noreferrer noopener ugc" target="_blank"> <img class="embedImage-img" src="https://us.v-cdn.net/6031942/uploads/editor/n7/7mh5nfo86u28.jpg" alt="7mh5nfo86u28.jpg"></img></a> </div> </div> <p></p><p><br></p><p>5. On the System Properties pop-up window, click <strong>Settings</strong> under the Performance section found in the Advanced tab.</p><div class="embedExternal embedImage display-large float-none"> <div class="embedExternal-content"> <a class="embedImage-link" href="https://us.v-cdn.net/6031942/uploads/editor/gl/0v0etv9kmwcj.jpg" rel="nofollow noreferrer noopener ugc" target="_blank"> <img class="embedImage-img" src="https://us.v-cdn.net/6031942/uploads/editor/gl/0v0etv9kmwcj.jpg" alt="0v0etv9kmwcj.jpg"></img></a> </div> </div> <p></p><p><br></p><p>6. Click the <strong>Advanced</strong> tab at the top, then click <strong>Change</strong> under Virtual Memory</p><div class="embedExternal embedImage display-large float-none"> <div class="embedExternal-content"> <a class="embedImage-link" href="https://us.v-cdn.net/6031942/uploads/editor/zv/fd3gb8c35u9w.jpg" rel="nofollow noreferrer noopener ugc" target="_blank"> <img class="embedImage-img" src="https://us.v-cdn.net/6031942/uploads/editor/zv/fd3gb8c35u9w.jpg" alt="fd3gb8c35u9w.jpg"></img></a> </div> </div> <p></p><p><br></p><p>7. Make sure the <strong>Automatically manage paging file size for all drives</strong> is not checked. Click the checkbox if it is to uncheck it. Select the Drive in the box and then click the <strong>Custom size</strong> option</p><div class="embedExternal embedImage display-large float-none"> <div class="embedExternal-content"> <a class="embedImage-link" href="https://us.v-cdn.net/6031942/uploads/editor/7g/lecwpfrrh7hu.jpg" rel="nofollow noreferrer noopener ugc" target="_blank"> <img class="embedImage-img" src="https://us.v-cdn.net/6031942/uploads/editor/7g/lecwpfrrh7hu.jpg" alt="lecwpfrrh7hu.jpg"></img></a> </div> </div> <p></p><p><br></p><p>8. Type the <strong>Initial Size</strong> and the <strong>Maximum Size</strong> desired and click <strong>set</strong>.</p><div class="embedExternal embedImage display-large float-none"> <div class="embedExternal-content"> <a class="embedImage-link" href="https://us.v-cdn.net/6031942/uploads/editor/pq/xp5thkkrzxuh.jpg" rel="nofollow noreferrer noopener ugc" target="_blank"> <img class="embedImage-img" src="https://us.v-cdn.net/6031942/uploads/editor/pq/xp5thkkrzxuh.jpg" alt="xp5thkkrzxuh.jpg"></img></a> </div> </div> <p></p><p><br></p><ul><li> If you choose an initial size less than 400 MB you may see an error. It’s recommended to click no and increase the initial size.</li></ul><div class="embedExternal embedImage display-large float-none"> <div class="embedExternal-content"> <a class="embedImage-link" href="https://us.v-cdn.net/6031942/uploads/editor/of/0wgt7criucbp.jpg" rel="nofollow noreferrer noopener ugc" target="_blank"> <img class="embedImage-img" src="https://us.v-cdn.net/6031942/uploads/editor/of/0wgt7criucbp.jpg" alt="0wgt7criucbp.jpg"></img></a> </div> </div> <p></p><p><br></p><p>9. Click <strong>OK</strong> on the Virtual Memory window.</p><p>
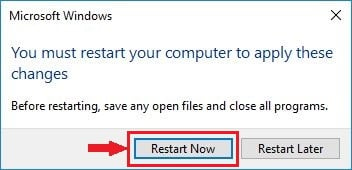
10. A message will then pop up saying the changes require a restart, click <strong>OK.</strong></p><div class="embedExternal embedImage display-large float-none"> <div class="embedExternal-content"> <a class="embedImage-link" href="https://us.v-cdn.net/6031942/uploads/editor/8j/t5s8onmngomq.jpg" rel="nofollow noreferrer noopener ugc" target="_blank"> <img class="embedImage-img" src="https://us.v-cdn.net/6031942/uploads/editor/8j/t5s8onmngomq.jpg" alt="t5s8onmngomq.jpg"></img></a> </div> </div> <p></p><p><br></p><p>11. Click <strong>OK</strong> on the Performance Options window.</p><p>12. Click <strong>OK</strong> on the System Properties box.</p><p>13. Click <strong>Restart Now</strong> to save changes.</p><div class="embedExternal embedImage display-large float-none"> <div class="embedExternal-content"> <a class="embedImage-link" href="https://us.v-cdn.net/6031942/uploads/editor/jk/g1qufjcfugal.jpg" rel="nofollow noreferrer noopener ugc" target="_blank"> <img class="embedImage-img" src="https://us.v-cdn.net/6031942/uploads/editor/jk/g1qufjcfugal.jpg" alt="g1qufjcfugal.jpg"></img></a> </div> </div> <p></p><p><br></p><p>That's it!</p> </article> </main>