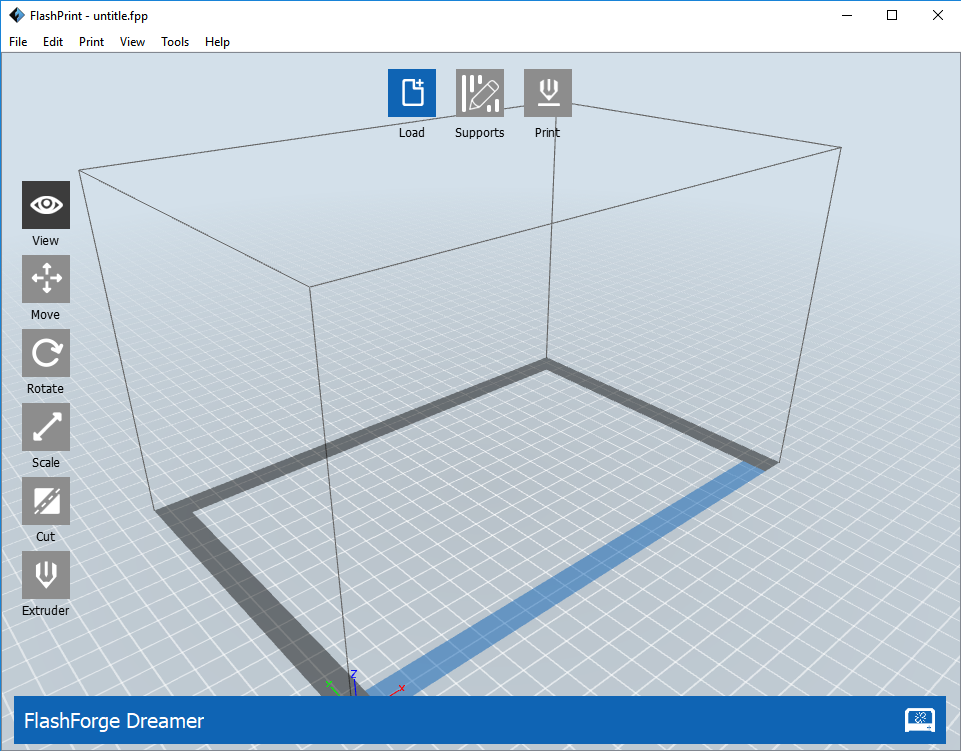
In this tutorial, we will go over how to print a file using the FlashPrint software. To begin open FlashPrint. If this is your first time opening FlashPrint there will be an automatic popup asking what machine type you are using. We can just use the default, which in this case is "Dreamer". Please note that you are not able to create printable files using any of the software included with your PowerSpec printer. This will need to be done through 3rd party software. You'll notice once you open your FlashPrint software that it just opens to a blank rectangular box, mimicking the the size of your possible print area in the printer.

You'll notice most of the options are disabled by default. Once we load in a file to print these will be automatically enabled. While we can load in a .stl file, it will need to be converted to a .g file in order to be printed. Since the majority of 3D print models are created in .stl format, we will go over the process of using an .stl file.
First, we need to click Load at the top of the screen. In this demonstration I will be printing a small wolf puppy figurine, although this will be the same process for any model you choose.
After clicking Load we need to find the .stl file for our print. In my case it is stored in my downloads folder. Although the name, date, and size of the print will vary, it will look similar to this:

You'll notice once you load in your model it will more than likely say it is off the platform. Simply clicking Yes will resolve this issue.

In this case it is still way too large:

So simply clicking Scale on the left side, and dragging while holding down left click will resize the model. You can also click on the model, and then click on scale, and scale it with exact measurements:

You'll notice as well you can convert your model to inches if you would prefer, as well as you can see an option for Maximum. This will set your model to the maximum possible size, however in some cases you may receive a "print file does not match" error on the printer itself when trying to print, which to resolve you will simply need to scale the model slightly down.
If your model is off the platform on any side, that side will show in red in FlashPrint.
The view tab is useful as well to change your camera angle so you can get a better view of certain areas on your model. You can also hold down the right mouse button and drag to rotate your view to a custom angle, while holding left click and dragging will pan the camera. You will notice one of the sides of your rectangular work area is blue, this indicates the front of the printer. If you select front view, you will notice it gives you a perspective looking from just outside the blue colored side indicating the front.

Note that both the rotate and the move options as well as scale will have a set dimensions panel that can be used for exact measurements.

Note that there are X,Y and Z coordinates for moving. If you are unsure how these work, changing the X value will move the model left or right. A positive number will move it right, while a negative number will move it left. Note these numbers are from the FRONT view, not necessarily from the front of the model. The Y value will move it forward or backwards, a positive value (again from the front view option) will move it backwards, while a negative value will move it forwards. The Z value will move the model up and down, generally to conserve filament this will just need to be set to 0. Alternatively you can click On Platform to set the Z value to 0.
You can also rotate your model. This may seem a little different than scaling or moving the model, and can be a little more difficult to grasp at first. It helps to understand that the X value is the red circle, the Y value is the green circle, and the Z value is the blue circle.

If you are just looking to change the direction your model is facing, for instance if you would like it facing the opposite direction you can simply click the +90 or -90 twice for the Z value to rotate it 180 degrees. You can also set a custom degree in the text box for each variable, as well as you can click and drag on each circle to rotate it in that direction. It can only be rotated in one direction at a time, so you will need to drag the rings for the X,Y and Z values separately. It may be slightly harder to click on these rings at first as they are rather small, however you can always zoom in with the middle mouse button, left click, and while holding left click on the ring of your choice, zoom out so you can properly rotate your model.
The cut tab in FlashPrint will allow you to cut parts of your model off, so you can print them separately. For instance if a model is too large to print all at once, you can instead cut part of it off and print it separately, or even print it beside the rest of the model in the same print.
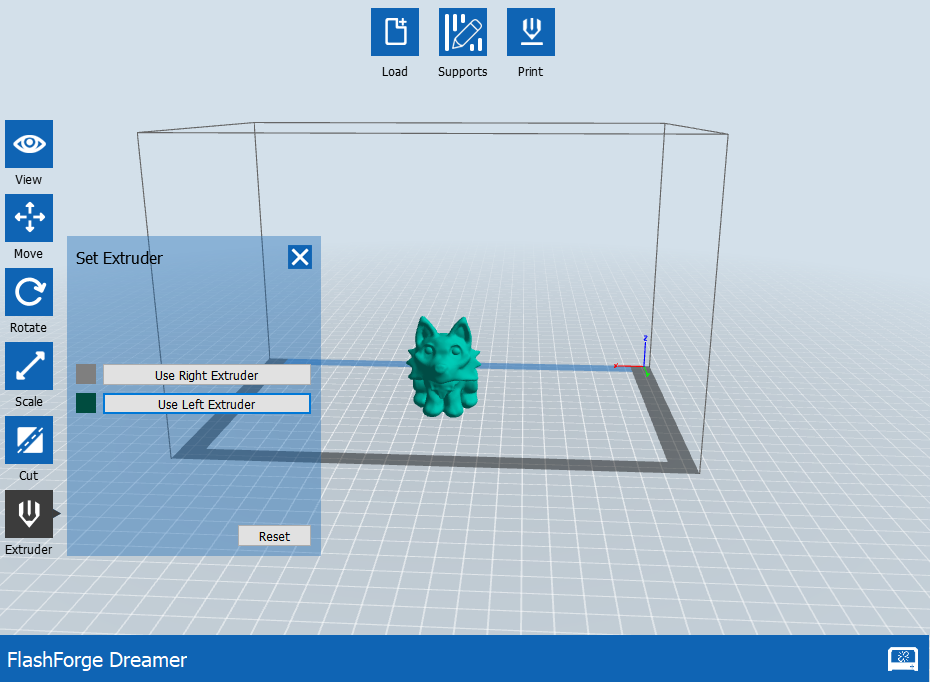
The Extruder tab will simply give you the option to choose for your model to be printed with either the right, or left extruder. By default it will print with the right extruder, however if we select the left extruder in the extruder panel, you will notice the model changes to a green color to indicate that change.

This particular model is fairly sturdy, so it does not need supports, however if your model appears as though it will not be able to stand still by itself during printing, we can select the option for supports at the top of the FlashPrint program.

Clicking auto supports is generally a safe option if you are unsure if your model may have issues. These will simply be able to be snapped off after the model is finished printing.

As you can see here, after selecting auto supports it is suggesting adding supports to the head and tail of my model. However after playing around with the settings for my particular model, I found that I did not need supports, all I needed to add was a raft, which we will get into later in this guide. If you are unsure of whether or not your model can support itself during the print, or you are having issues of the print starting to bend or fall, I would suggest using the auto supports option. As this particular model does not need supports, here is an example of a model that definitely requires supports in order to be printed:

As you can see this dragon would absolutely need supports, otherwise the wings, head, and tail would all more than likely fall off. As well as the lower part of his front left leg would more than likely not print as it does not have a surface to print on. (As it will be printing directly on the support in this instance)
If you would prefer you can also select Supports Options at the top of your screen and change the size and type of your supports. There is an option for treelike or linear. Treelike is the default option, as that will save the most filament, and will generally be the easiest to detach from the model afterwards, however you can also choose linear supports.

As you can see linear supports generally are less efficient, although they are generally better for supporting flat surfaces. In this particular model treelike supports would be the better option, as it will save more filament, and using treelike supports on this particular model vs linear supports will actually save about 3 hours of print time.
Once you are finished scaling, rotating, moving, and adding supports for your model it is time to start printing. Select the Print option at the top of your screen, and it will open a print menu with quite a few options we can change.

The material right and and material left options you will want to change depending on the filament you are using. For this model I am using PLA. If you are using supports, make sure the supports option is enabled. If your model has feet, paws, or something similar that it will be standing on you will more than likely want to add a raft to your print. This will add a platform below your model so it will print correctly if you are having issues with adhesion to the bed. This can always be removed after the print is finished. You can choose the extruder for this to change the color. The brim option will essentially add a small slope to your raft to make it look better. I was able to leave the layer height, shells, infill, speed, and others tabs at their defaults, while temperature I changed to 205 degrees for the left extruder, as it was starting to brown the filament at 210, and the platform I changed to 90 degrees, as at 100 it was not sticking correctly to the bed.
However, you will need to experiment with these settings to see what works best for you, as well as there will be different temperatures for different filaments. These temperatures are generally listed on the spools themselves. After making sure to select Save Configuration if you made any changes, click OK to begin the slice for your model.

It will ask for a save location, generally saving to your SD card is the best option, that way you can immediately take it to be printed. We will want to make sure that we save it as file type *.g.
From there we will simply need to take the SD card to your printer, select print, and select the SD card. Browse to your model and select it, then choose Print.
If you are experienced with 3D printers and just looking to see what features FlashPrint is capable of, you are also able to select File at the top left of your screen, choose Preferences, select the Print tab, and under Printing Window Type change it from basic mode to expert mode. However the majority of prints will work perfectly fine using basic mode.