Computers
Computer Parts
Custom PC Builder
DIY/ Maker
{$smarty.capture.menu}
Activity
Categories
Discussions
Computers
Computer Parts
Custom PC Builder
DIY/ Maker
How to use WinDirStat to Analyze Storage Spaces on Windows 10 - Micro Center
<main> <article class="userContent"> <p>This article describes how to use WinDirStat in Windows 10 to check storage space and delete files. This is especially helpful if a user is trying to figure out which file or program is taking up the most space.</p><p><br></p><p>1. Click the <strong>Windows Start Button, </strong>typically found at the lower left corner of the screen. Then click <strong>WinDirStat</strong> from the Start Menu.</p><div class="embedExternal embedImage display-medium float-none"> <div class="embedExternal-content"> <a class="embedImage-link" href="https://us.v-cdn.net/6031942/uploads/9T932E5Q0451/image1.jpg" rel="nofollow noreferrer noopener ugc" target="_blank"> <img class="embedImage-img" src="https://us.v-cdn.net/6031942/uploads/9T932E5Q0451/image1.jpg" alt="Image1.jpg"></img></a> </div> </div> <p><br></p><p>
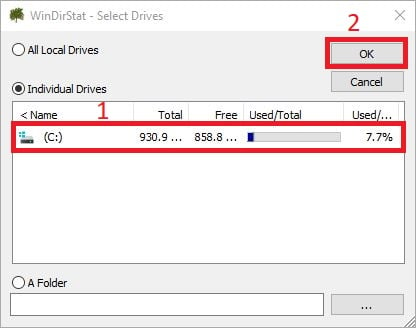
2. Choose the drive you want to analyze. Click <strong>OK</strong></p><div class="embedExternal embedImage display-large float-none"> <div class="embedExternal-content"> <a class="embedImage-link" href="https://us.v-cdn.net/6031942/uploads/RC9K81CU52IU/image2.jpg" rel="nofollow noreferrer noopener ugc" target="_blank"> <img class="embedImage-img" src="https://us.v-cdn.net/6031942/uploads/RC9K81CU52IU/image2.jpg" alt="Image2.jpg"></img></a> </div> </div> <p><br></p><p>3. Wait for the screen to finish populating. The top left section (1) shows a file structure with a percentage and size information. The top right section (2) shows the color code for different file types and how many files of each type. The bottom section (3) shows a visual representation of the files on the drive</p><div class="embedExternal embedImage display-large float-none"> <div class="embedExternal-content"> <a class="embedImage-link" href="https://us.v-cdn.net/6031942/uploads/EFTTMS3SLL68/image3.jpg" rel="nofollow noreferrer noopener ugc" target="_blank"> <img class="embedImage-img" src="https://us.v-cdn.net/6031942/uploads/EFTTMS3SLL68/image3.jpg" alt="Image3.jpg"></img></a> </div> </div> <p></p><p><br></p><p>4. Click the <strong>plus sign</strong> to expand folders.</p><div class="embedExternal embedImage display-large float-none"> <div class="embedExternal-content"> <a class="embedImage-link" href="https://us.v-cdn.net/6031942/uploads/0VEURJ4DBJXD/image4.jpg" rel="nofollow noreferrer noopener ugc" target="_blank"> <img class="embedImage-img" src="https://us.v-cdn.net/6031942/uploads/0VEURJ4DBJXD/image4.jpg" alt="Image4.jpg"></img></a> </div> </div> <p><br></p><p>5. Identify temporary files that could be deleted. ‘Temp’, ‘tmp’, and ‘cache’ are all terms used to identify temporary files. </p><p><br></p><p>6. Right click the folder and choose <strong>Explorer Here</strong>.</p><div class="embedExternal embedImage display-large float-none"> <div class="embedExternal-content"> <a class="embedImage-link" href="https://us.v-cdn.net/6031942/uploads/IP50RB4F8899/image5.jpg" rel="nofollow noreferrer noopener ugc" target="_blank"> <img class="embedImage-img" src="https://us.v-cdn.net/6031942/uploads/IP50RB4F8899/image5.jpg" alt="Image5.jpg"></img></a> </div> </div> <p></p><p><br></p><p>7. Select the file you want to delete. Then right click and choose <strong>Delete</strong></p><p>· To select multiple files at once hold the <strong>Control</strong> key on the keyboard (<strong>CTRL</strong>)</p><div class="embedExternal embedImage display-large float-none"> <div class="embedExternal-content"> <a class="embedImage-link" href="https://us.v-cdn.net/6031942/uploads/P80LRC2A0IDW/image6.jpg" rel="nofollow noreferrer noopener ugc" target="_blank"> <img class="embedImage-img" src="https://us.v-cdn.net/6031942/uploads/P80LRC2A0IDW/image6.jpg" alt="Image6.jpg"></img></a> </div> </div> <p><br></p><p>8. After deleting unwanted files, click <strong>Refresh Selected</strong></p><div class="embedExternal embedImage display-large float-none"> <div class="embedExternal-content"> <a class="embedImage-link" href="https://us.v-cdn.net/6031942/uploads/QQGQG3BKOKTW/image7.jpg" rel="nofollow noreferrer noopener ugc" target="_blank"> <img class="embedImage-img" src="https://us.v-cdn.net/6031942/uploads/QQGQG3BKOKTW/image7.jpg" alt="Image7.jpg"></img></a> </div> </div> <p></p><p><br></p><p>9. Once finished reviewing the drive information, click <strong>X</strong> to close WinDirStat</p><div class="embedExternal embedImage display-large float-none"> <div class="embedExternal-content"> <a class="embedImage-link" href="https://us.v-cdn.net/6031942/uploads/BF7B7UO5CA5X/image8.jpg" rel="nofollow noreferrer noopener ugc" target="_blank"> <img class="embedImage-img" src="https://us.v-cdn.net/6031942/uploads/BF7B7UO5CA5X/image8.jpg" alt="Image8.jpg"></img></a> </div> </div> <p><br></p><p><strong> </strong></p> </article> </main>