This guide explains how to restore the operating system on a Mac from a Time Machine backup. This can be used if the Mac is having problems starting and will restore files as to a previous time.
A Time machine drive needs to be created while your Mac is functioning, for more info on how to create a backup, visit our guide here
Here is how to restore:
Booting into recovery mode
Identifying your Mac model
How you get to Recovery mode will be different depending on whether you have an Intel based Mac, or an Apple Silicon based Mac.
If you are unsure which you have, here are some guides from Apple for how to determine you Mac model, if you look in the tech specs for your model, the processor will be what you are looking for:
MacBook
MacBook Pro
Mac mini
iMac
Intel based Macs (i5, i6, i7 etc..)
1. Turn off your Mac if you haven't already, if you are unable to shut it down normally, you can hold the power button for 10 seconds to turn it off. If this is a MacBook with Touch ID, your Touch ID button is your power button. Then connect the Time Machine drive (e.g. external USB storage device) to the Mac.
2. Turn on the Mac and Immediately press and hold the Command Key (⌘) and the R key keep holding them until you see the Apple Logo:

If you are asked to:
- Choose a network, pick one from the Wi-fi menu, or attach a network cable if you have one available.
- Choose a volume to recover, pick the startup disk, it is typically labelled as Macintosh HD, then click next.
- Pick a user, choose one you know the password for, then click next and enter the password to log into that user.
3.You should now be in Recovery mode:

Apple silicon based Mac (M1, M2, M3 Etc…)
1. Turn off your Mac if you haven't already, if you are unable to shut it down normally, you can hold the power button for 10 seconds to turn it off. If this is a MacBook with Touch ID, your Touch ID button is your power button. Once it is off, connect the Time Machine drive (e.g. external USB storage device) to the Mac.
2. Press and hold the power button and keep holding it as the mac turns on. Let go when you see Loading startup options, or the Options icon.
3. Click Options, and then click the Continue button that appears below it:

If you are asked to:
- Choose a network, pick one from the Wi-fi menu, or attach a network cable if you have one available.
- Choose a volume to recover, pick the startup disk, it is typically labelled as Macintosh HD, then click next.
- Pick a user, choose one you know the password for, then click next and enter the password to log into that user.
4. You should now be in Recovery mode:

Restoring your Mac
If you are on macOS 11 (Big Sur) or newer, you will need to reinstall macOS from recovery, then use migration assistant to get your files once you are back in macOS:

macOS X (10) - Catalina (10.15)
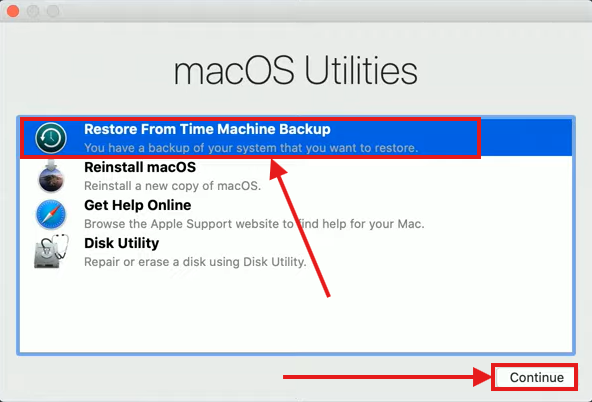
1. Click Restore from Time Machine, then click Continue:
2. Click Continue:

3. Click the Time Machine drive (Likely labeled as backup) then click Continue:

4. Choose the date of the backup you want to restore from, it i recommended that you choose the most recent backup before the date the issue started.
Once you have picked your backup, click Continue or restore:

5. Select a destination (Preferably your system disk labeled Macintosh HD), then click Restore:

6. You will get a popup informing you the disk will be erased, confirm this is the correct disk you want to restore to, then click Erase disk:

7. Your device will begin the restore process, please wait while this completes:

Once the restore is complete, you should be able to get into your computer like normal and continue using it!
macOS Big Sur (11) - Tahoe (26)
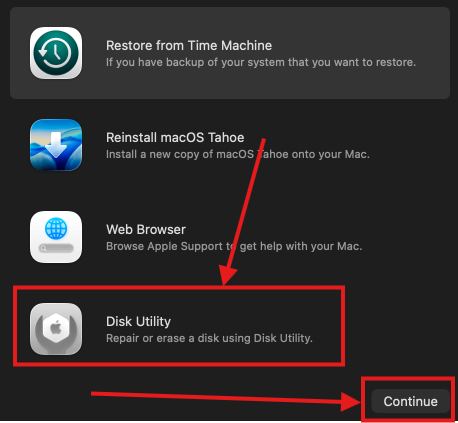
1. You will need to erase the disk before you reinstall macOS, click on Disk Utility, then click Continue:
2. Click Macintosh HD volumes, then click Erase:


3. This box will pop up, you can rename the disk if you want but you dont need to, make sure the format is APFS and then click Erase:

4. The process will begin, once it is finished, click Done:

5. Click the Red circle in the upper right hand corner to close Disk utility and return to the recovery screen:

6. Click Reinstall macOS then click Continue:

7. Click Continue:

8. Click Agree:

9. Click Agree on the small box that pops up:

10. Click on your drive, then click Continue:

11. The reinstall will start, this may take some time:

Migration Assistant
1. After the reinstall finishes, you will start the first time setup of the computer, during this process you will come across the Migration assistant screen, click the dot next to From a Mac, Time Machine backup, or Startup disk then click Continue:

2. Click your backup disk and click Continue:

3. Choose the backup you want to have Time Machine transfer from, then click Continue:

4. Migration Assistant will calculate how much space will be used by your data. Please wait while it calculates
5.Click the Check boxes next to what you want to transfer, as this is a system restore, we are going to check everything. If you have specific Items you don't want from a User profile, or your settings, you can click the > next to the category to expand it. Click continue when finished:

6. If you are importing your User profile, you will be asked to set a password before you continue. For any non Admin accounts a temporary password will be generated. Please record this password as the Owner of that profile will need to use it to log in the first time before creating their own password. Click Continue:

7. Your Mac should now start Restoring from your Time Machine backup, depending on how much data you had, this can take hours to complete. Once its done you will be able to log into your Mac like usual!