Computers
Computer Parts
Custom PC Builder
DIY/ Maker
{$smarty.capture.menu}
Activity
Categories
Discussions
Computers
Computer Parts
Custom PC Builder
DIY/ Maker
How to Physically Clean Your Computer - Micro Center
<main> <article class="userContent"> <p>This guide will show you how to clean and dust your computer. </p><p><br></p><p>1. <strong>Dusting Inside the Case:</strong> </p><p>a. Unplug the computer from the power outlet or the back of the computer.</p><div class="embedExternal embedImage display-large float-none"> <div class="embedExternal-content"> <a class="embedImage-link" href="https://us.v-cdn.net/6031942/uploads/9DR4HK3I57S9/image1.jpg" rel="nofollow noreferrer noopener ugc" target="_blank"> <img class="embedImage-img" src="https://us.v-cdn.net/6031942/uploads/9DR4HK3I57S9/image1.jpg" alt="Image1.jpg"></img></a> </div> </div> <p><br></p><p>
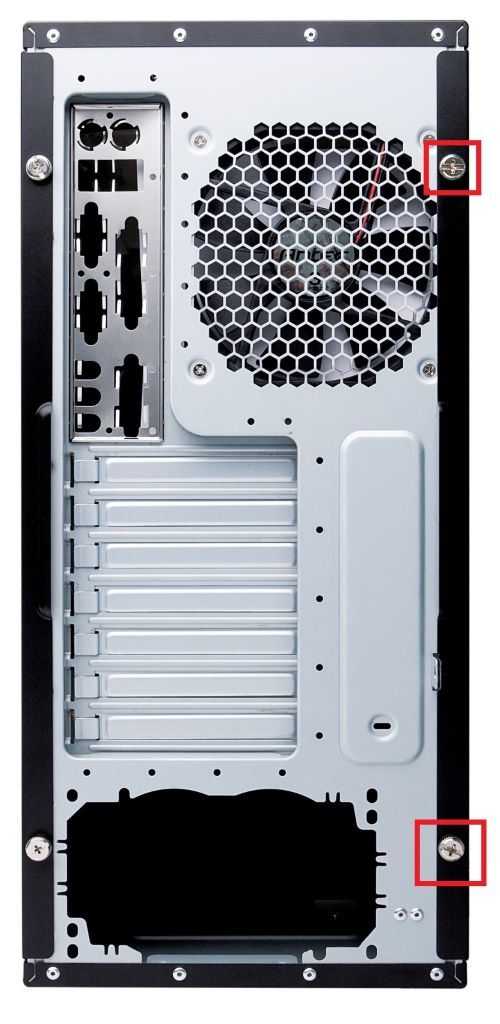
b. Open the side panel of your case by removing the two screws on the back securing it in place.</p><p><br></p><div class="embedExternal embedImage display-large float-none"> <div class="embedExternal-content"> <a class="embedImage-link" href="https://us.v-cdn.net/6031942/uploads/SKGH1YGGZ9RL/image2.jpg" rel="nofollow noreferrer noopener ugc" target="_blank"> <img class="embedImage-img" src="https://us.v-cdn.net/6031942/uploads/SKGH1YGGZ9RL/image2.jpg" alt="Image2.jpg"></img></a> </div> </div> <p><br></p><p>c. Use a can of compressed air (often sold as an Air Duster) to blow the dust out of the case. Keep the nozzle a few inches away from the parts you are dusting and do not tip the can upside down. </p><p> i. Be careful blowing the fans as they can generate a charge by spinning. Blow air in short bursts to minimize fan spin. If possible, hold the fan blades to prevent spinning entirely</p><p> ii. It is advisable to perform this step outside, in a well-ventilated area.</p><p><br></p><p>d. Be sure to use the Air Duster to get dust out of the power supply.</p><div class="embedExternal embedImage display-large float-none"> <div class="embedExternal-content"> <a class="embedImage-link" href="https://us.v-cdn.net/6031942/uploads/Q54XW55RCGON/image3.jpg" rel="nofollow noreferrer noopener ugc" target="_blank"> <img class="embedImage-img" src="https://us.v-cdn.net/6031942/uploads/Q54XW55RCGON/image3.jpg" alt="Image3.jpg"></img></a> </div> </div> <p><br></p><p>e. Close and re-secure the side panel.</p><p><br></p><p>2. <strong>Outside of the Case:</strong></p><p>a. Dust the outside of the case with a lint-free cloth like microfiber</p><p>b. Using a cotton swap dipped in isopropyl alcohol, gently clean any vents and openings in the case to remove any accumulated dirt. Dry any areas of dampness that may occur.</p><p><br></p><p>3. <strong>Keyboard:</strong></p><p>a. If you have a mechanical keyboard, remove the key caps. </p><p> i. If you are not sure that your key caps can be safely removed, do not attempt to do so.</p><p>b. Turn the keyboard upside down and gently shake </p><p>c. Blow out remaining dust and particles with an air duster</p><p>d. Run a cotton swab dipped in isopropyl alcohol between the keys</p><p><br></p><p>4. <strong>Mouse:</strong></p><p>a. Dampen a lint-free cloth with isopropyl alcohol and wipe down the exterior of the mouse</p><p>b. Using an air duster, blow out any particles in the optical sensor.</p><div class="embedExternal embedImage display-large float-none"> <div class="embedExternal-content"> <a class="embedImage-link" href="https://us.v-cdn.net/6031942/uploads/ABSFZAR8DV63/image.png" rel="nofollow noreferrer noopener ugc" target="_blank"> <img class="embedImage-img" src="https://us.v-cdn.net/6031942/uploads/ABSFZAR8DV63/image.png" alt="image.png"></img></a> </div> </div> <p><br></p><p><strong>5. Monitor / Screen: </strong></p><p>a. Lightly dampen a lint-free cloth with water and gently wipe down the screen. Be sure not to leave damp spots or streaks.</p><p> i. Do not clean with Windex or other chemical cleaning solutions.</p> </article> </main>