Computers
Computer Parts
Custom PC Builder
DIY/ Maker
{$smarty.capture.menu}
Activity
Categories
Discussions
Computers
Computer Parts
Custom PC Builder
DIY/ Maker
How to forward or open a Port on a Tenda Router - Micro Center
<main> <article class="userContent"> <p>This article will guide you through the process of forwarding or opening a port on your Tenda router. Port forwarding can be used for many different things - one of the most common is running gaming servers. When setting up port forwarding, you need to know what port is being used and the IP address of the computer or other device that it needs to be forwarded to. Once configured, any traffic that comes in to your network on that assigned port will be directed to the IP address given for that port.</p><p>Here is how to forward or open a port:</p><p>
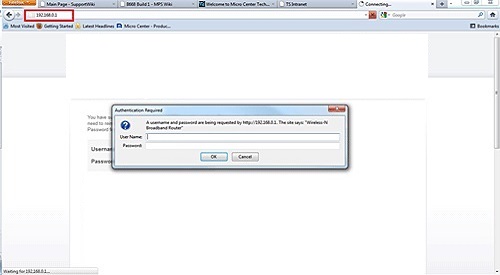
1. Log in to the Tenda router by typing <strong>192.168.0.1</strong> in your web browser address bar. Enter <strong>admin</strong> for the username and password (unless the default username and password have been changed).
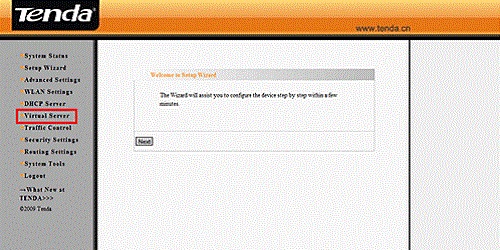
</p><div class="embedExternal embedImage display-large float-none"> <div class="embedExternal-content"> <a class="embedImage-link" href="https://60a99bedadae98078522-a9b6cded92292ef3bace063619038eb1.ssl.cf2.rackcdn.com/images_TechSupportArticlePix_8323Image1.jpg" rel="nofollow noreferrer noopener ugc" target="_blank"> <img class="embedImage-img" src="https://60a99bedadae98078522-a9b6cded92292ef3bace063619038eb1.ssl.cf2.rackcdn.com/images_TechSupportArticlePix_8323Image1.jpg" alt="Browser Authentication" height="180" width="320" loading="lazy"></img></a> </div> </div> <p></p><p><br></p><p>2. Select <strong>Virtual Server</strong> from the menu on the left.</p><div class="embedExternal embedImage display-large float-none"> <div class="embedExternal-content"> <a class="embedImage-link" href="https://60a99bedadae98078522-a9b6cded92292ef3bace063619038eb1.ssl.cf2.rackcdn.com/images_TechSupportArticlePix_8323Image2.jpg" rel="nofollow noreferrer noopener ugc" target="_blank"> <img class="embedImage-img" src="https://60a99bedadae98078522-a9b6cded92292ef3bace063619038eb1.ssl.cf2.rackcdn.com/images_TechSupportArticlePix_8323Image2.jpg" alt="Tenda Router Settings" height="180" width="320" loading="lazy"></img></a> </div> </div> <p></p><p><br></p><p>3. Next, select <strong>Port Range Forwarding</strong> under <strong>Virtual Server</strong>.</p><p>
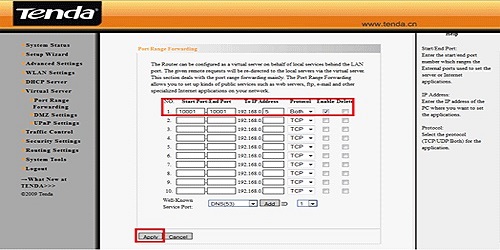
Enter the ports to be forwarded. If it's only one port, you can enter it in both the <strong>Start Port</strong> and <strong>End Port</strong>.</p><div class="embedExternal embedImage display-large float-none"> <div class="embedExternal-content"> <a class="embedImage-link" href="https://60a99bedadae98078522-a9b6cded92292ef3bace063619038eb1.ssl.cf2.rackcdn.com/images_TechSupportArticlePix_8323Image3.jpg" rel="nofollow noreferrer noopener ugc" target="_blank"> <img class="embedImage-img" src="https://60a99bedadae98078522-a9b6cded92292ef3bace063619038eb1.ssl.cf2.rackcdn.com/images_TechSupportArticlePix_8323Image3.jpg" alt="Tenda Router Settings" height="180" width="320" loading="lazy"></img></a> </div> </div> <p></p><p><br></p><p>
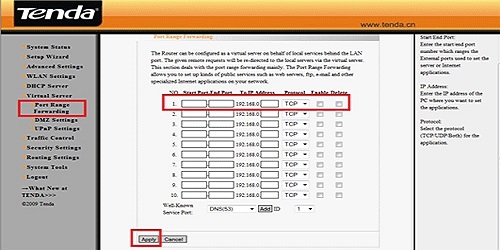
4. Next, you will setup the IP address. This is where the ports will be forwarded to. Under <strong>Protocol</strong>, select the option <strong>Both</strong> (this allows for both protocols to be forward just to be safe). Place a check mark in <strong>Enable</strong>. Once all of the information has been entered, click on <strong>Apply</strong>.</p><div class="embedExternal embedImage display-large float-none"> <div class="embedExternal-content"> <a class="embedImage-link" href="https://60a99bedadae98078522-a9b6cded92292ef3bace063619038eb1.ssl.cf2.rackcdn.com/images_TechSupportArticlePix_8323Image4.jpg" rel="nofollow noreferrer noopener ugc" target="_blank"> <img class="embedImage-img" src="https://60a99bedadae98078522-a9b6cded92292ef3bace063619038eb1.ssl.cf2.rackcdn.com/images_TechSupportArticlePix_8323Image4.jpg" alt="Tenda Router Settings" height="180" width="320" loading="lazy"></img></a> </div> </div> <p><br></p> </article> </main>