Computers
Computer Parts
Custom PC Builder
DIY/ Maker
{$smarty.capture.menu}
Activity
Categories
Discussions
Computers
Computer Parts
Custom PC Builder
DIY/ Maker
How to view Files while using the Inland Dual Bay Docking Station - Micro Center
<main> <article class="userContent"> <p>This article will show how to view files with the Inland Dual Bay Docking Station via a USB connection to your computer. The use of this feature for this device is very similar to an external enclosure minus the hassle of installing it.</p><p><br></p><p>
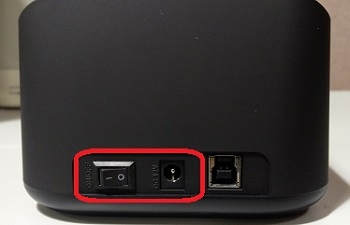
1. Plug the docking station into the wall and turn the power on using the switch on the back. A <strong>green light</strong> will appear on the front indicating that the station is on and ready to go.
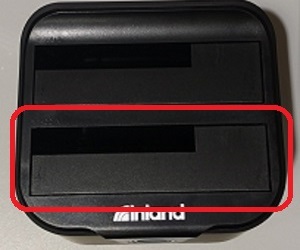
</p><div class="embedExternal embedImage display-large float-none"> <div class="embedExternal-content"> <a class="embedImage-link" href="https://60a99bedadae98078522-a9b6cded92292ef3bace063619038eb1.ssl.cf2.rackcdn.com/images_TechSupportArticlePix_9178Image1.jpg" rel="nofollow noreferrer noopener ugc" target="_blank"> <img class="embedImage-img" src="https://60a99bedadae98078522-a9b6cded92292ef3bace063619038eb1.ssl.cf2.rackcdn.com/images_TechSupportArticlePix_9178Image1.jpg" alt="Inland Docking Station, Power Button" height="180" width="320" loading="lazy"></img></a> </div> </div> <p></p><p><br></p><div class="embedExternal embedImage display-large float-none"> <div class="embedExternal-content"> <a class="embedImage-link" href="https://60a99bedadae98078522-a9b6cded92292ef3bace063619038eb1.ssl.cf2.rackcdn.com/images_TechSupportArticlePix_9178Image2.jpg" rel="nofollow noreferrer noopener ugc" target="_blank"> <img class="embedImage-img" src="https://60a99bedadae98078522-a9b6cded92292ef3bace063619038eb1.ssl.cf2.rackcdn.com/images_TechSupportArticlePix_9178Image2.jpg" alt="Inland Docking Station, Green Power Light" height="180" width="320" loading="lazy"></img></a> </div> </div> <p></p><p><br></p><p>2. Install the hard drive in the <strong>first bay</strong> closest to the front of the device.</p><div class="embedExternal embedImage display-large float-none"> <div class="embedExternal-content"> <a class="embedImage-link" href="https://60a99bedadae98078522-a9b6cded92292ef3bace063619038eb1.ssl.cf2.rackcdn.com/images_TechSupportArticlePix_9178Image3.jpg" rel="nofollow noreferrer noopener ugc" target="_blank"> <img class="embedImage-img" src="https://60a99bedadae98078522-a9b6cded92292ef3bace063619038eb1.ssl.cf2.rackcdn.com/images_TechSupportArticlePix_9178Image3.jpg" alt="Inland Docking Station, Front Bay" height="180" width="320" loading="lazy"></img></a> </div> </div> <p></p><p><br></p><p>3. Plug one end of the USB cable into the computer and the end into the Dock.
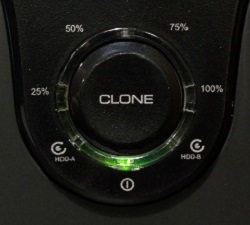
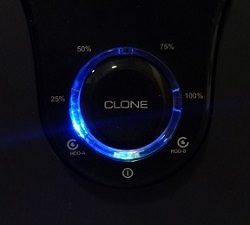
</p><div class="embedExternal embedImage display-large float-none"> <div class="embedExternal-content"> <a class="embedImage-link" href="https://60a99bedadae98078522-a9b6cded92292ef3bace063619038eb1.ssl.cf2.rackcdn.com/images_TechSupportArticlePix_9178Image4.jpg" rel="nofollow noreferrer noopener ugc" target="_blank"> <img class="embedImage-img" src="https://60a99bedadae98078522-a9b6cded92292ef3bace063619038eb1.ssl.cf2.rackcdn.com/images_TechSupportArticlePix_9178Image4.jpg" alt="Inland Docking Station, USB Connection" height="180" width="320" loading="lazy"></img></a> </div> </div> <p></p><p><br></p><p>4. The dock will now emit a <strong>blue light</strong> and the computer will detect the drive that is plugged in. Note: if the dock doesn’t light up blue immediately, turn the dock off and back on, and the blue light should come on.
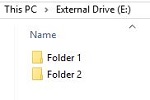
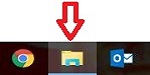
</p><div class="embedExternal embedImage display-large float-none"> <div class="embedExternal-content"> <a class="embedImage-link" href="https://60a99bedadae98078522-a9b6cded92292ef3bace063619038eb1.ssl.cf2.rackcdn.com/images_TechSupportArticlePix_9178Image5.jpg" rel="nofollow noreferrer noopener ugc" target="_blank"> <img class="embedImage-img" src="https://60a99bedadae98078522-a9b6cded92292ef3bace063619038eb1.ssl.cf2.rackcdn.com/images_TechSupportArticlePix_9178Image5.jpg" alt="Inland Docking Station, Blue Light indicator" height="180" width="320" loading="lazy"></img></a> </div> </div> <p></p><p><br></p><p>5. Open the <strong>File Explorer</strong> icon at the bottom of the screen.</p><div class="embedExternal embedImage display-large float-none"> <div class="embedExternal-content"> <a class="embedImage-link" href="https://60a99bedadae98078522-a9b6cded92292ef3bace063619038eb1.ssl.cf2.rackcdn.com/images_TechSupportArticlePix_9178Image6.jpg" rel="nofollow noreferrer noopener ugc" target="_blank"> <img class="embedImage-img" src="https://60a99bedadae98078522-a9b6cded92292ef3bace063619038eb1.ssl.cf2.rackcdn.com/images_TechSupportArticlePix_9178Image6.jpg" alt="Windows 10, File Explorer" height="180" width="320" loading="lazy"></img></a> </div> </div> <p></p><p><br></p><p>6. Open the hard drive icon that is installed in the docking station.</p><div class="embedExternal embedImage display-large float-none"> <div class="embedExternal-content"> <a class="embedImage-link" href="https://60a99bedadae98078522-a9b6cded92292ef3bace063619038eb1.ssl.cf2.rackcdn.com/images_TechSupportArticlePix_9178Image7.jpg" rel="nofollow noreferrer noopener ugc" target="_blank"> <img class="embedImage-img" src="https://60a99bedadae98078522-a9b6cded92292ef3bace063619038eb1.ssl.cf2.rackcdn.com/images_TechSupportArticlePix_9178Image7.jpg" alt="Windows 10, File Explorer" height="180" width="320" loading="lazy"></img></a> </div> </div> <p></p><p><br></p><p>
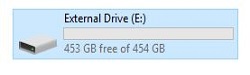
7. The drive's files will now be viewable to delete, save or alter files.</p><div class="embedExternal embedImage display-large float-none"> <div class="embedExternal-content"> <a class="embedImage-link" href="https://60a99bedadae98078522-a9b6cded92292ef3bace063619038eb1.ssl.cf2.rackcdn.com/images_TechSupportArticlePix_9178Image8.jpg" rel="nofollow noreferrer noopener ugc" target="_blank"> <img class="embedImage-img" src="https://60a99bedadae98078522-a9b6cded92292ef3bace063619038eb1.ssl.cf2.rackcdn.com/images_TechSupportArticlePix_9178Image8.jpg" alt="Windows 10, External Drive" height="180" width="320" loading="lazy"></img></a> </div> </div> <p><br></p> </article> </main>