Computers
Computer Parts
Custom PC Builder
DIY/ Maker
{$smarty.capture.menu}
Activity
Categories
Discussions
Computers
Computer Parts
Custom PC Builder
DIY/ Maker
How to set up the Tenda S105 5-port Desktop Switch - Micro Center
<main> <article class="userContent"> <p>This article will show you how to complete the first time setup of a Tenda 5-port S105 Switch.</p><p>Here is how to do the first time setup:</p><p>
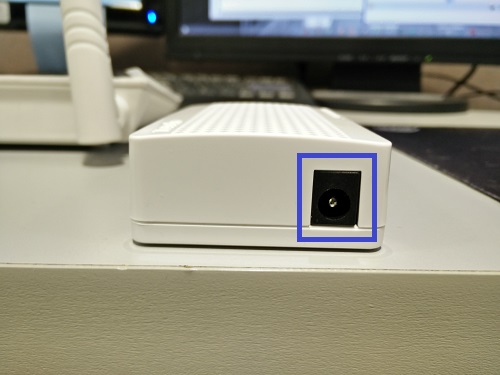
1. Plug in the power adapter into the available AC adapter port as shown below.</p><div class="embedExternal embedImage display-large float-none"> <div class="embedExternal-content"> <a class="embedImage-link" href="https://60a99bedadae98078522-a9b6cded92292ef3bace063619038eb1.ssl.cf2.rackcdn.com/images_TechSupportArticlePix_8204Image1.jpg" rel="nofollow noreferrer noopener ugc" target="_blank"> <img class="embedImage-img" src="https://60a99bedadae98078522-a9b6cded92292ef3bace063619038eb1.ssl.cf2.rackcdn.com/images_TechSupportArticlePix_8204Image1.jpg" alt="Tenda Switch Power Plug" height="180" width="320" loading="lazy"></img></a> </div> </div> <p></p><p><br></p><p>
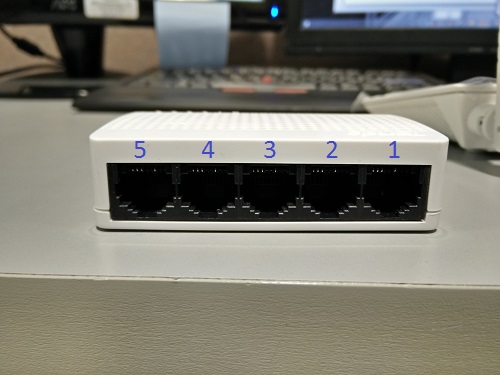
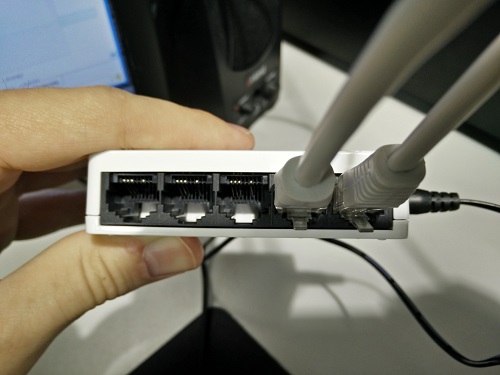
2. Note that the ports are numbered from 1-5 from right to left.</p><div class="embedExternal embedImage display-large float-none"> <div class="embedExternal-content"> <a class="embedImage-link" href="https://60a99bedadae98078522-a9b6cded92292ef3bace063619038eb1.ssl.cf2.rackcdn.com/images_TechSupportArticlePix_8204Image2.jpg" rel="nofollow noreferrer noopener ugc" target="_blank"> <img class="embedImage-img" src="https://60a99bedadae98078522-a9b6cded92292ef3bace063619038eb1.ssl.cf2.rackcdn.com/images_TechSupportArticlePix_8204Image2.jpg" alt="Tenda Switch Ports" height="180" width="320" loading="lazy"></img></a> </div> </div> <p></p><p><br></p><p>3. Connect the router that will manage the switch to a modem that is connected to the internet. Plug another Ethernet cable into the router - this will be connected to the switch.</p><div class="embedExternal embedImage display-large float-none"> <div class="embedExternal-content"> <a class="embedImage-link" href="https://60a99bedadae98078522-a9b6cded92292ef3bace063619038eb1.ssl.cf2.rackcdn.com/images_TechSupportArticlePix_8204Image3.jpg" rel="nofollow noreferrer noopener ugc" target="_blank"> <img class="embedImage-img" src="https://60a99bedadae98078522-a9b6cded92292ef3bace063619038eb1.ssl.cf2.rackcdn.com/images_TechSupportArticlePix_8204Image3.jpg" alt="Tenda Router with Plugs Labeled" height="180" width="320" loading="lazy"></img></a> </div> </div> <p></p><p><br></p><p>
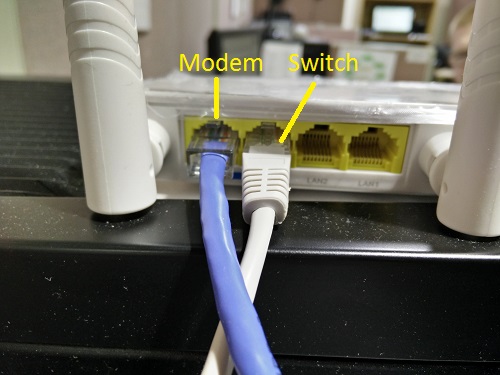
4. Plug the other end of the Ethernet cable on the second port of the router to port 1 on the switch.</p><div class="embedExternal embedImage display-large float-none"> <div class="embedExternal-content"> <a class="embedImage-link" href="https://60a99bedadae98078522-a9b6cded92292ef3bace063619038eb1.ssl.cf2.rackcdn.com/images_TechSupportArticlePix_8204Image4.jpg" rel="nofollow noreferrer noopener ugc" target="_blank"> <img class="embedImage-img" src="https://60a99bedadae98078522-a9b6cded92292ef3bace063619038eb1.ssl.cf2.rackcdn.com/images_TechSupportArticlePix_8204Image4.jpg" alt="Tenda Switch" height="180" width="320" loading="lazy"></img></a> </div> </div> <p></p><p><br></p><p>
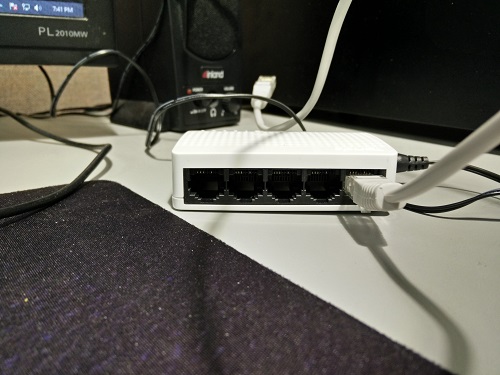
5. Plug in an Ethernet cable to port 2 on the switch.</p><div class="embedExternal embedImage display-large float-none"> <div class="embedExternal-content"> <a class="embedImage-link" href="https://60a99bedadae98078522-a9b6cded92292ef3bace063619038eb1.ssl.cf2.rackcdn.com/images_TechSupportArticlePix_8204Image5.jpg" rel="nofollow noreferrer noopener ugc" target="_blank"> <img class="embedImage-img" src="https://60a99bedadae98078522-a9b6cded92292ef3bace063619038eb1.ssl.cf2.rackcdn.com/images_TechSupportArticlePix_8204Image5.jpg" alt="Ethernet Cable to Port 2" height="180" width="320" loading="lazy"></img></a> </div> </div> <p></p><p><br></p><p>
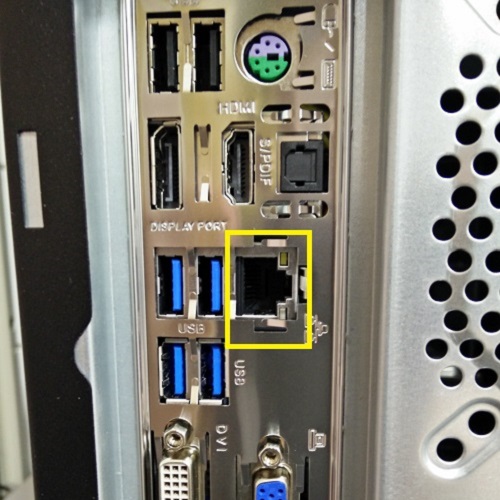
6. Plug the other end of the Ethernet cable running from port 2 on the switch to the device to be networked. This picture shows the back of a desktop computer. The port layout on the computer being used may differ slightly than what’s pictured. The Ethernet port is shown in yellow.</p><div class="embedExternal embedImage display-large float-none"> <div class="embedExternal-content"> <a class="embedImage-link" href="https://60a99bedadae98078522-a9b6cded92292ef3bace063619038eb1.ssl.cf2.rackcdn.com/images_TechSupportArticlePix_8204Image6.jpg" rel="nofollow noreferrer noopener ugc" target="_blank"> <img class="embedImage-img" src="https://60a99bedadae98078522-a9b6cded92292ef3bace063619038eb1.ssl.cf2.rackcdn.com/images_TechSupportArticlePix_8204Image6.jpg" alt="Ethernet Port on Back of Computer" height="180" width="320" loading="lazy"></img></a> </div> </div> <p></p><p><br></p><p>7. The switch is now set up and the devices connected to it will be connected to the local area network automatically.</p> </article> </main>