Computers
Computer Parts
Custom PC Builder
DIY/ Maker
{$smarty.capture.menu}
Activity
Categories
Discussions
Computers
Computer Parts
Custom PC Builder
DIY/ Maker
How to add RAM to a PowerSpec with a Cooler Master Hyper 212 EVO CPU Cooler - Micro Center
<main> <article class="userContent"> <p>This article will show you how to install RAM in PowerSpec Computers that ship with the Cooler Master Hyper 212 CPU cooler. To do so, the fan on the cooler will need to be temporarily removed. The fan on the cooler partially blocks the memory slot closest to the CPU.</p><p>Here is how to do this:</p><p>1. Ensure that the system is turned off and unplugged from any AC power source.</p><p>2. Ensure that proper precautions are taken to ground yourself to eliminate ESD. (A properly connected grounding strap is recommended.)
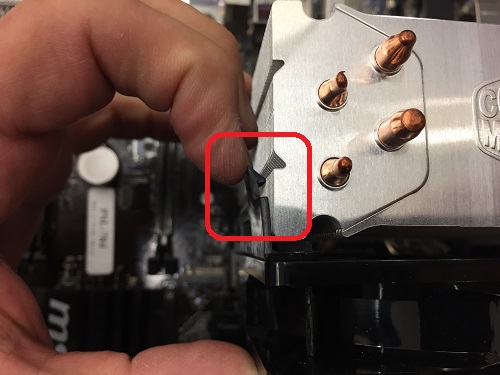
</p><p>3. <strong>Carefully</strong> remove the fan from the cooler by <strong>gently</strong> lifting the tabs away and then pulling the fan off of the cooler. <strong>Use caution as the cooler fins are sharp</strong>.</p><div class="embedExternal embedImage display-large float-none"> <div class="embedExternal-content"> <a class="embedImage-link" href="https://60a99bedadae98078522-a9b6cded92292ef3bace063619038eb1.ssl.cf2.rackcdn.com/images_TechSupportArticlePix_9797Image1.jpg" rel="nofollow noreferrer noopener ugc" target="_blank"> <img class="embedImage-img" src="https://60a99bedadae98078522-a9b6cded92292ef3bace063619038eb1.ssl.cf2.rackcdn.com/images_TechSupportArticlePix_9797Image1.jpg" alt="Hyper 212 Cooler, Remove Fan" height="180" width="320" loading="lazy"></img></a> </div> </div> <p></p><p><br></p><p>
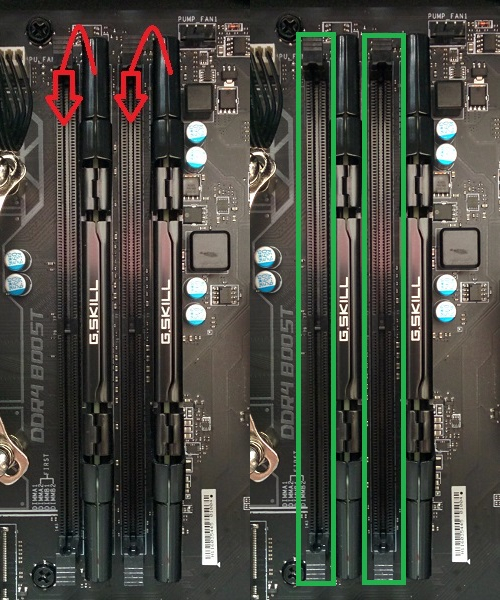
4. If the new memory modules are too tall, move <strong>both</strong> pre-installed memory modules to the empty slots on the motherboard (shown on the left side of the image), and wait to install the new memory until after re-attaching the fan. Otherwise, install the new RAM into the empty slots on the motherboard (shown on the right side of the image).</p><div class="embedExternal embedImage display-large float-none"> <div class="embedExternal-content"> <a class="embedImage-link" href="https://60a99bedadae98078522-a9b6cded92292ef3bace063619038eb1.ssl.cf2.rackcdn.com/images_TechSupportArticlePix_9797Image2.jpg" rel="nofollow noreferrer noopener ugc" target="_blank"> <img class="embedImage-img" src="https://60a99bedadae98078522-a9b6cded92292ef3bace063619038eb1.ssl.cf2.rackcdn.com/images_TechSupportArticlePix_9797Image2.jpg" alt="Side By Side Motherboard, Moving RAM to other slots or Allowing RAM to install" height="180" width="320" loading="lazy"></img></a> </div> </div> <p></p><p><br></p><p>
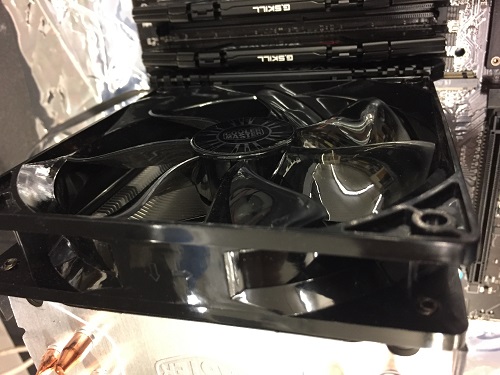
5. Re-attach the fan to the cooler. Note that the fan may install a few millimeters higher on the cooler depending on the memory used.</p><div class="embedExternal embedImage display-large float-none"> <div class="embedExternal-content"> <a class="embedImage-link" href="https://60a99bedadae98078522-a9b6cded92292ef3bace063619038eb1.ssl.cf2.rackcdn.com/images_TechSupportArticlePix_9797Image3.jpg" rel="nofollow noreferrer noopener ugc" target="_blank"> <img class="embedImage-img" src="https://60a99bedadae98078522-a9b6cded92292ef3bace063619038eb1.ssl.cf2.rackcdn.com/images_TechSupportArticlePix_9797Image3.jpg" alt="Hyper 212 Cooler, Fan Attached" height="180" width="320" loading="lazy"></img></a> </div> </div> <p></p><p><br></p><p>6. If the original memory needed to be moved in step 4, the new memory can now be installed into the empty RAM slots on the motherboard.</p><div class="embedExternal embedImage display-large float-none"> <div class="embedExternal-content"> <a class="embedImage-link" href="https://60a99bedadae98078522-a9b6cded92292ef3bace063619038eb1.ssl.cf2.rackcdn.com/images_TechSupportArticlePix_9797Image4.jpg" rel="nofollow noreferrer noopener ugc" target="_blank"> <img class="embedImage-img" src="https://60a99bedadae98078522-a9b6cded92292ef3bace063619038eb1.ssl.cf2.rackcdn.com/images_TechSupportArticlePix_9797Image4.jpg" alt="Motherboard, New RAM Installed" height="180" width="320" loading="lazy"></img></a> </div> </div> <p><br></p> </article> </main>