Computers
Computer Parts
Custom PC Builder
DIY/ Maker
{$smarty.capture.menu}
Activity
Categories
Discussions
Computers
Computer Parts
Custom PC Builder
DIY/ Maker
How to install a hard drive in a WinBook DVR D6008DV - Micro Center
<main> <article class="userContent"> <p>Here is how to install a 3.5" SATA hard drive into your WinBook DVR model D6008DV.</p><p><strong>Note:</strong> Make sure the DVR unit is unplugged while doing this procedure.</p><p><br></p><p>1. First, remove the screws from the unit and remove the top base, exposing the inside of the DVR.</p><p>2. Next, line up the hard drive with the premade holes on the bottom of the unit.</p><p><br></p><div class="embedExternal embedImage display-large float-none"> <div class="embedExternal-content"> <a class="embedImage-link" href="https://www.microcenter.com/Content/Content%20Graphic/Images/7612_HOW6002601B-001.gif" rel="nofollow noreferrer noopener ugc" target="_blank"> <img class="embedImage-img" src="https://www.microcenter.com/Content/Content%20Graphic/Images/7612_HOW6002601B-001.gif" alt="7612_HOW6002601B-001.gif" height="180" width="320" loading="lazy"></img></a> </div> </div> <p></p><p><br></p><p>
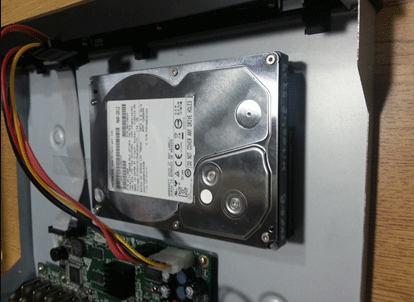
3. Turn the unit on its side while holding the hard drive in place - take the screws that came in the DVR's packaging and screw the hard drive in place.</p><p><br></p><div class="embedExternal embedImage display-large float-none"> <div class="embedExternal-content"> <a class="embedImage-link" href="https://www.microcenter.com/Content/Content%20Graphic/Images/7613_HOW6002601B-002.gif" rel="nofollow noreferrer noopener ugc" target="_blank"> <img class="embedImage-img" src="https://www.microcenter.com/Content/Content%20Graphic/Images/7613_HOW6002601B-002.gif" alt="7613_HOW6002601B-002.gif" height="180" width="320" loading="lazy"></img></a> </div> </div> <p></p><p><br></p><p>4. Take the SATA Power and SATA cable, connecting both to the hard drive.</p><div class="embedExternal embedImage display-large float-none"> <div class="embedExternal-content"> <a class="embedImage-link" href="https://www.microcenter.com/Content/Content%20Graphic/Images/7614_HOW6002601B-003.gif" rel="nofollow noreferrer noopener ugc" target="_blank"> <img class="embedImage-img" src="https://www.microcenter.com/Content/Content%20Graphic/Images/7614_HOW6002601B-003.gif" alt="7614_HOW6002601B-003.gif" height="180" width="320" loading="lazy"></img></a> </div> </div> <p></p><p><br></p><p>5. The hard drive is now properly connected, place the top half back on the unit and screw the screws back in - you're good to go!</p> </article> </main>