Computers
Computer Parts
Custom PC Builder
DIY/ Maker
{$smarty.capture.menu}
Activity
Categories
Discussions
Computers
Computer Parts
Custom PC Builder
DIY/ Maker
How to turn on DLNA on a Tenda AC15 Router - Micro Center
<main> <article class="userContent"> <p>This article will show how to to turn on DLNA on the Tenda AC15 AC1900 wireless router, which will allow other DLNA-capable devices to easily access USB devices that can be plugged in to the USB 3.0 port on the back of the router. DLNA is a way for multimedia devices to communicate with each other on a local network.</p><p><br></p><p>1. First, to change the settings of the Tenda AC15 AC1900 router, connect to the router by going to its default address <strong>192.168.1.1</strong> in your browser address bar. Here the default router password will be needed to sign in to change settings.</p><div class="embedExternal embedImage display-large float-none"> <div class="embedExternal-content"> <a class="embedImage-link" href="https://60a99bedadae98078522-a9b6cded92292ef3bace063619038eb1.ssl.cf2.rackcdn.com/images_TechSupportArticlePix_8720Image1.jpg" rel="nofollow noreferrer noopener ugc" target="_blank"> <img class="embedImage-img" src="https://60a99bedadae98078522-a9b6cded92292ef3bace063619038eb1.ssl.cf2.rackcdn.com/images_TechSupportArticlePix_8720Image1.jpg" alt="Browser Address Bar" height="180" width="320" loading="lazy"></img></a> </div> </div> <p></p><p><br></p><p>
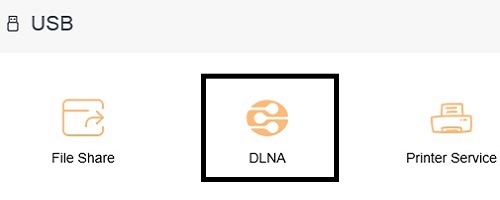
2. Once signed in to the router, a list of options will appear on the left. Select <strong>USB Application</strong>.</p><div class="embedExternal embedImage display-large float-none"> <div class="embedExternal-content"> <a class="embedImage-link" href="https://60a99bedadae98078522-a9b6cded92292ef3bace063619038eb1.ssl.cf2.rackcdn.com/images_TechSupportArticlePix_8720Image2.jpg" rel="nofollow noreferrer noopener ugc" target="_blank"> <img class="embedImage-img" src="https://60a99bedadae98078522-a9b6cded92292ef3bace063619038eb1.ssl.cf2.rackcdn.com/images_TechSupportArticlePix_8720Image2.jpg" alt="Tenda Router Menu, USB Application" height="180" width="320" loading="lazy"></img></a> </div> </div> <p></p><p><br></p><p>3. Options to the right will now update. Select <strong>DLNA</strong>.</p><div class="embedExternal embedImage display-large float-none"> <div class="embedExternal-content"> <a class="embedImage-link" href="https://60a99bedadae98078522-a9b6cded92292ef3bace063619038eb1.ssl.cf2.rackcdn.com/images_TechSupportArticlePix_8720Image3.jpg" rel="nofollow noreferrer noopener ugc" target="_blank"> <img class="embedImage-img" src="https://60a99bedadae98078522-a9b6cded92292ef3bace063619038eb1.ssl.cf2.rackcdn.com/images_TechSupportArticlePix_8720Image3.jpg" alt="Tenda USB Settings, DLNA" height="180" width="320" loading="lazy"></img></a> </div> </div> <p></p><p><br></p><p>
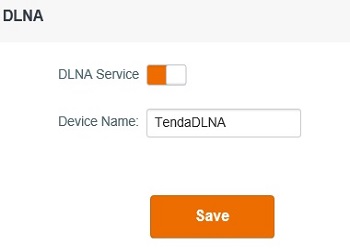
4. A new window will appear. By default, DLNA will be turned off. Click to the right side of the slider to turn the DLNA ability on.</p><div class="embedExternal embedImage display-large float-none"> <div class="embedExternal-content"> <a class="embedImage-link" href="https://60a99bedadae98078522-a9b6cded92292ef3bace063619038eb1.ssl.cf2.rackcdn.com/images_TechSupportArticlePix_8720Image4.jpg" rel="nofollow noreferrer noopener ugc" target="_blank"> <img class="embedImage-img" src="https://60a99bedadae98078522-a9b6cded92292ef3bace063619038eb1.ssl.cf2.rackcdn.com/images_TechSupportArticlePix_8720Image4.jpg" alt="Tenda DLNA Toggle On Off" height="180" width="320" loading="lazy"></img></a> </div> </div> <p></p><p><br></p><p>5. The updated window will show that the DLNA service is now on, along with being able to assign the DLNA service name.</p><div class="embedExternal embedImage display-large float-none"> <div class="embedExternal-content"> <a class="embedImage-link" href="https://60a99bedadae98078522-a9b6cded92292ef3bace063619038eb1.ssl.cf2.rackcdn.com/images_TechSupportArticlePix_8720Image5.jpg" rel="nofollow noreferrer noopener ugc" target="_blank"> <img class="embedImage-img" src="https://60a99bedadae98078522-a9b6cded92292ef3bace063619038eb1.ssl.cf2.rackcdn.com/images_TechSupportArticlePix_8720Image5.jpg" alt="Tenda DLNA Configure and Save" height="180" width="320" loading="lazy"></img></a> </div> </div> <p><br></p> </article> </main>