Computers
Computer Parts
Custom PC Builder
DIY/ Maker
{$smarty.capture.menu}
Activity
Categories
Discussions
Computers
Computer Parts
Custom PC Builder
DIY/ Maker
How to change the Wireless Key on a Tenda AC15 Router - Micro Center
<main> <article class="userContent"> <p>This article will show how to change the network security key on a Tenda AC15 AC1900 wireless router.</p><p>Here is how to do this:</p><p>
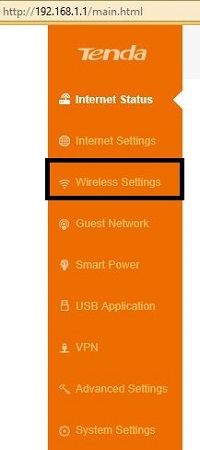
1. To get to the settings of the Tenda AC1900 to change the network security key, connect to the router by going to <strong>192.168.1.1</strong> in your browser. Sign in here with the current router password to sign in.</p><div class="embedExternal embedImage display-large float-none"> <div class="embedExternal-content"> <a class="embedImage-link" href="https://60a99bedadae98078522-a9b6cded92292ef3bace063619038eb1.ssl.cf2.rackcdn.com/images_TechSupportArticlePix_8672Image1.jpg" rel="nofollow noreferrer noopener ugc" target="_blank"> <img class="embedImage-img" src="https://60a99bedadae98078522-a9b6cded92292ef3bace063619038eb1.ssl.cf2.rackcdn.com/images_TechSupportArticlePix_8672Image1.jpg" alt="Browser Address Bar" height="180" width="320" loading="lazy"></img></a> </div> </div> <p></p><p><br></p><p>2. Once signed into the router, a menu will appear on the left side of the screen. Select <strong>Wireless Settings</strong>.</p><div class="embedExternal embedImage display-large float-none"> <div class="embedExternal-content"> <a class="embedImage-link" href="https://60a99bedadae98078522-a9b6cded92292ef3bace063619038eb1.ssl.cf2.rackcdn.com/images_TechSupportArticlePix_8672Image2.jpg" rel="nofollow noreferrer noopener ugc" target="_blank"> <img class="embedImage-img" src="https://60a99bedadae98078522-a9b6cded92292ef3bace063619038eb1.ssl.cf2.rackcdn.com/images_TechSupportArticlePix_8672Image2.jpg" alt="Tenda Router Menu, Wireless Settings" height="180" width="320" loading="lazy"></img></a> </div> </div> <p></p><p><br></p><p>
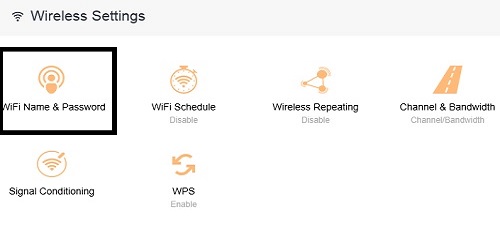
3. To the right of the menu, this screen will now update to show new options. Select <strong>Wi-Fi Name and Password</strong>.</p><div class="embedExternal embedImage display-large float-none"> <div class="embedExternal-content"> <a class="embedImage-link" href="https://60a99bedadae98078522-a9b6cded92292ef3bace063619038eb1.ssl.cf2.rackcdn.com/images_TechSupportArticlePix_8672Image3.jpg" rel="nofollow noreferrer noopener ugc" target="_blank"> <img class="embedImage-img" src="https://60a99bedadae98078522-a9b6cded92292ef3bace063619038eb1.ssl.cf2.rackcdn.com/images_TechSupportArticlePix_8672Image3.jpg" alt="Tenda Wireless Settings, WiFi Name and Password" height="180" width="320" loading="lazy"></img></a> </div> </div> <p></p><p><br></p><p>4. This option will bring up a new menu, which will list the current Wi-Fi name and password of the router.</p><p>The default settings for both of these settings can be found on a sticker on the back of the router.
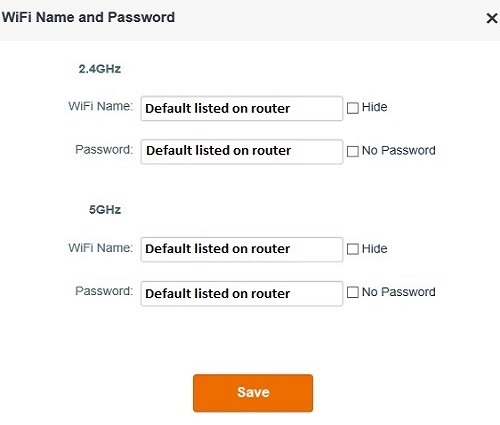
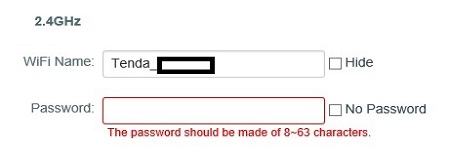
</p><div class="embedExternal embedImage display-large float-none"> <div class="embedExternal-content"> <a class="embedImage-link" href="https://60a99bedadae98078522-a9b6cded92292ef3bace063619038eb1.ssl.cf2.rackcdn.com/images_TechSupportArticlePix_8672Image4.jpg" rel="nofollow noreferrer noopener ugc" target="_blank"> <img class="embedImage-img" src="https://60a99bedadae98078522-a9b6cded92292ef3bace063619038eb1.ssl.cf2.rackcdn.com/images_TechSupportArticlePix_8672Image4.jpg" alt="WiFi Name and Password" height="180" width="320" loading="lazy"></img></a> </div> </div> <p></p><p><br></p><p>5. To change the password, <strong>clear the current password</strong> and <strong>enter a new one</strong>. The router will require this password to be at least 8 characters.</p><div class="embedExternal embedImage display-large float-none"> <div class="embedExternal-content"> <a class="embedImage-link" href="https://60a99bedadae98078522-a9b6cded92292ef3bace063619038eb1.ssl.cf2.rackcdn.com/images_TechSupportArticlePix_8672Image5.jpg" rel="nofollow noreferrer noopener ugc" target="_blank"> <img class="embedImage-img" src="https://60a99bedadae98078522-a9b6cded92292ef3bace063619038eb1.ssl.cf2.rackcdn.com/images_TechSupportArticlePix_8672Image5.jpg" alt="WiFi Name and Password, Change" height="180" width="320" loading="lazy"></img></a> </div> </div> <p></p><p><br></p><p>6. Another setting option is to have no password. This will allow anyone to connect to your network just by simply selecting it on a wireless-capable device.</p><div class="embedExternal embedImage display-large float-none"> <div class="embedExternal-content"> <a class="embedImage-link" href="https://60a99bedadae98078522-a9b6cded92292ef3bace063619038eb1.ssl.cf2.rackcdn.com/images_TechSupportArticlePix_8672Image6.jpg" rel="nofollow noreferrer noopener ugc" target="_blank"> <img class="embedImage-img" src="https://60a99bedadae98078522-a9b6cded92292ef3bace063619038eb1.ssl.cf2.rackcdn.com/images_TechSupportArticlePix_8672Image6.jpg" alt="WiFi Name and Password, No Password" height="180" width="320" loading="lazy"></img></a> </div> </div> <p></p><p><br></p><p>7. When changes are complete, click <strong>Save</strong> and a <strong>Saving...</strong> window will appear. Once finished, the router will need to reboot and any wireless devices will need to enter in the new password (if necessary) to connect again.</p><div class="embedExternal embedImage display-large float-none"> <div class="embedExternal-content"> <a class="embedImage-link" href="https://60a99bedadae98078522-a9b6cded92292ef3bace063619038eb1.ssl.cf2.rackcdn.com/images_TechSupportArticlePix_8672Image7.jpg" rel="nofollow noreferrer noopener ugc" target="_blank"> <img class="embedImage-img" src="https://60a99bedadae98078522-a9b6cded92292ef3bace063619038eb1.ssl.cf2.rackcdn.com/images_TechSupportArticlePix_8672Image7.jpg" alt="Saving Changes" height="180" width="320" loading="lazy"></img></a> </div> </div> <p><br></p> </article> </main>