Computers
Computer Parts
Custom PC Builder
DIY/ Maker
{$smarty.capture.menu}
Activity
Categories
Discussions
Computers
Computer Parts
Custom PC Builder
DIY/ Maker
How to adjust Fan Speed on Desktops equipped with ASRock Motherboards - Micro Center
<main> <article class="userContent"> <p>This article will show you how to adjust the fan speed of desktop computers using ASRock motherboards from within the BIOS.</p><p>Here is how to do this:</p><p>
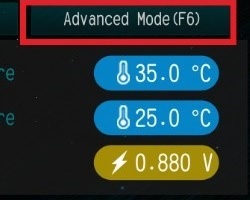
1. Enter your system BIOS by tapping the <strong>DEL</strong> key on your keyboard when you first power on the system.
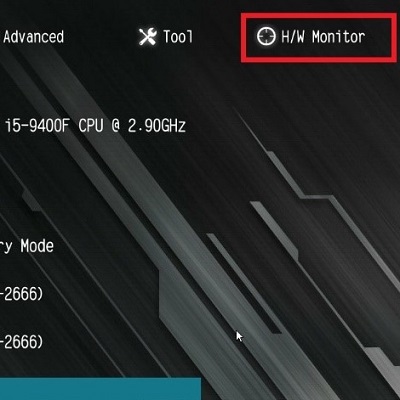
</p><p>2. Access <strong>Advanced options</strong> by pressing or selecting the <strong>Advanced</strong> button in the top right corner.</p><div class="embedExternal embedImage display-large float-none"> <div class="embedExternal-content"> <a class="embedImage-link" href="https://60a99bedadae98078522-a9b6cded92292ef3bace063619038eb1.ssl.cf2.rackcdn.com/11288Image1.jpg" rel="nofollow noreferrer noopener ugc" target="_blank"> <img class="embedImage-img" src="https://60a99bedadae98078522-a9b6cded92292ef3bace063619038eb1.ssl.cf2.rackcdn.com/11288Image1.jpg" alt="BIOS EZ Mode, Information Page" height="180" width="320" loading="lazy"></img></a> </div> </div> <p></p><p><br></p><p>3. Navigate to the <strong>H/W Monitor</strong> tab using the arrow keys on your keyboard or by selecting H/W Monitor.</p><div class="embedExternal embedImage display-large float-none"> <div class="embedExternal-content"> <a class="embedImage-link" href="https://60a99bedadae98078522-a9b6cded92292ef3bace063619038eb1.ssl.cf2.rackcdn.com/11288Image2.jpg" rel="nofollow noreferrer noopener ugc" target="_blank"> <img class="embedImage-img" src="https://60a99bedadae98078522-a9b6cded92292ef3bace063619038eb1.ssl.cf2.rackcdn.com/11288Image2.jpg" alt="BIOS Advanced Mode, Main Page" height="180" width="320" loading="lazy"></img></a> </div> </div> <p></p><p><br></p><p>4. Scroll down until you see the settings for each of your fans. You may see multiple CPU or Chassis fans depending on your exact motherboard.</p><div class="embedExternal embedImage display-large float-none"> <div class="embedExternal-content"> <a class="embedImage-link" href="https://60a99bedadae98078522-a9b6cded92292ef3bace063619038eb1.ssl.cf2.rackcdn.com/11288Image3.jpg" rel="nofollow noreferrer noopener ugc" target="_blank"> <img class="embedImage-img" src="https://60a99bedadae98078522-a9b6cded92292ef3bace063619038eb1.ssl.cf2.rackcdn.com/11288Image3.jpg" alt="BIOS Advanced Mode, H/W Monitor" height="180" width="320" loading="lazy"></img></a> </div> </div> <p></p><p><br></p><p>
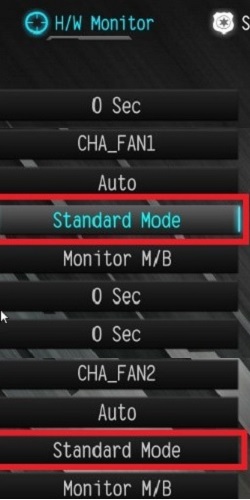
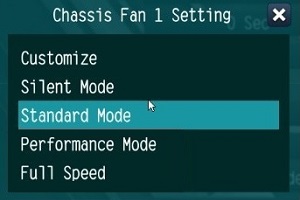
5. Highlight the fan you wish to adjust. Press the <strong>Enter</strong> key or choose the current fan setting to bring up a list of available fan modes. Select your desired fan mode by highlighting the fan mode with the arrow keys and pressing enter, or by selecting the fan mode of your choice.</p><div class="embedExternal embedImage display-large float-none"> <div class="embedExternal-content"> <a class="embedImage-link" href="https://60a99bedadae98078522-a9b6cded92292ef3bace063619038eb1.ssl.cf2.rackcdn.com/11288Image4.jpg" rel="nofollow noreferrer noopener ugc" target="_blank"> <img class="embedImage-img" src="https://60a99bedadae98078522-a9b6cded92292ef3bace063619038eb1.ssl.cf2.rackcdn.com/11288Image4.jpg" alt="H/W Monitor, Fan Setting Menu" height="180" width="320" loading="lazy"></img></a> </div> </div> <p></p><p><br></p><p>6. To apply your adjustments, press <strong>F10</strong> on the keyboard or navigate to the Exit tab at the top right corner of the BIOS and choose <strong>Save & Exit</strong>.</p><div class="embedExternal embedImage display-large float-none"> <div class="embedExternal-content"> <a class="embedImage-link" href="https://60a99bedadae98078522-a9b6cded92292ef3bace063619038eb1.ssl.cf2.rackcdn.com/11288Image5.jpg" rel="nofollow noreferrer noopener ugc" target="_blank"> <img class="embedImage-img" src="https://60a99bedadae98078522-a9b6cded92292ef3bace063619038eb1.ssl.cf2.rackcdn.com/11288Image5.jpg" alt="BIOS Advanced Mode, Exit Page" height="180" width="320" loading="lazy"></img></a> </div> </div> <p><br></p> </article> </main>