Computers
Computer Parts
Custom PC Builder
DIY/ Maker
{$smarty.capture.menu}
Activity
Categories
Discussions
Computers
Computer Parts
Custom PC Builder
DIY/ Maker
How to Perform a Clean Install of Windows 10 - Micro Center
<main> <article class="userContent"> <p>A "clean installation" of Windows 10 means wiping your drive and doing a fresh reinstall of the operating system from installation/recovery media. Like with resetting/refreshing Windows 10 (<a href="https://community.microcenter.com/kb/articles/64-how-to-reset-refresh-windows-10" rel="nofollow noreferrer ugc"><strong>Click here</strong></a> if you want to learn how to do that!), a clean install is a reliable way to troubleshoot issues that are hard to track down or fix after you've tried other solutions unsuccessfully. Crashing, slowness, internet connectivity, Windows apps and features not opening; these are some examples of potential problems that can be hard to nail down. That said, a clean install is something of a last resort for troubleshooting, but if it's a software or Windows problem a clean install will almost always fix it. If issues persist after a clean install, there’s either a hardware or compatibility issue. </p><p><strong>Disclaimer: the clean install process will erase any data that is on your drive</strong> <strong>so ensure you have backups if there’s anything you can’t lose.</strong><p><br></p></p><p>I should also mention that viruses are a unique case where a clean install really is the best option available to get rid of them. While anti-virus and anti-malware software can often detect and remove threats on your computer, they are not perfect and can't cover everything. If antivirus programs aren’t doing the trick, the only 100% guaranteed method of removing an infection from Windows is wiping it clean and doing a fresh installation. <p><br></p></p><p>Here's how to perform a clean install:</p><p>1. <a href="https://www.microsoft.com/en-us/software-download/windows10" rel="nofollow noreferrer ugc">Download the Media Creation Tool from Microsoft's website.</a> This tool will let you create a Windows 10 installation USB or download the ISO file to create a DVD. If you already have installation media, skip to step 7. </p><p>2. Run the <strong>MediaCreationTool exe </strong>file and follow the prompts. If it asks you to make changes to your computer click <strong>yes.</strong></p><p>3. Select <strong>Create installation media for another PC </strong>and click <strong>Next</strong></p><div class="embedExternal embedImage display-large float-none"> <div class="embedExternal-content"> <a class="embedImage-link" href="https://us.v-cdn.net/6031942/uploads/editor/6w/rnwlllrgnmog.jpg" rel="nofollow noreferrer noopener ugc" target="_blank"> <img class="embedImage-img" src="https://us.v-cdn.net/6031942/uploads/editor/6w/rnwlllrgnmog.jpg" alt="rnwlllrgnmog.jpg"/> </a> </div> </div> <p><p><br></p></p><p>4. Choose your language, edition and architecture for Windows to match the version for the computer you’re reinstalling on. <strong>Use the recommended options for this PC</strong> will auto-detect the settings for the current computer. Uncheck it if you're making installation media for a different system with a different version of Windows 10. Then click <strong>Next.</strong></p><div class="embedExternal embedImage display-large float-none"> <div class="embedExternal-content"> <a class="embedImage-link" href="https://us.v-cdn.net/6031942/uploads/editor/7c/wnwk9f97bi5z.jpg" rel="nofollow noreferrer noopener ugc" target="_blank"> <img class="embedImage-img" src="https://us.v-cdn.net/6031942/uploads/editor/7c/wnwk9f97bi5z.jpg" alt="wnwk9f97bi5z.jpg"/> </a> </div> </div> <p><p><br></p></p><p>5. Select <strong>USB Flash drive </strong>if using a USB. If you want to create a DVD, choose ISO file, which you can burn to a blank DVD later.</p><div class="embedExternal embedImage display-large float-none"> <div class="embedExternal-content"> <a class="embedImage-link" href="https://us.v-cdn.net/6031942/uploads/editor/eu/c6xb51alnoai.jpg" rel="nofollow noreferrer noopener ugc" target="_blank"> <img class="embedImage-img" src="https://us.v-cdn.net/6031942/uploads/editor/eu/c6xb51alnoai.jpg" alt="c6xb51alnoai.jpg"/> </a> </div> </div> <p><p><br></p></p><p>6. Select the drive you want to use and click <strong>Next</strong></p><p>7. Let the tool load Windows onto the drive, it will probably take a few minutes. Once it’s done, close out of the tool and you now have a bootable Windows 10 USB.</p><p>8. Now you need to boot from the USB flash drive. Shut down the system and turn it back on, during initial startup you’ll need to press a key on your keyboard to go into <strong>BIOS</strong> or the <strong>boot menu.</strong> Every manufacturer uses different keys, some common options are <strong>DEL</strong>, <strong>F2</strong>, <strong>F8</strong> and <strong>F10</strong>. You can look up exactly which ones for your computer online. Once in the BIOS/Boot menu, set your USB drive as the main boot device and it will launch into the Windows installation screen.</p><p>9. Select your language and click <strong>Next, </strong>then click <strong>Install now</strong></p><div class="embedExternal embedImage display-large float-none"> <div class="embedExternal-content"> <a class="embedImage-link" href="https://us.v-cdn.net/6031942/uploads/editor/tn/x8wd44mogrrc.jpg" rel="nofollow noreferrer noopener ugc" target="_blank"> <img class="embedImage-img" src="https://us.v-cdn.net/6031942/uploads/editor/tn/x8wd44mogrrc.jpg" alt="x8wd44mogrrc.jpg"/> </a> </div> </div> <p><p><br></p></p><div class="embedExternal embedImage display-large float-none"> <div class="embedExternal-content"> <a class="embedImage-link" href="https://us.v-cdn.net/6031942/uploads/editor/kv/jpwwrmsjec0r.jpg" rel="nofollow noreferrer noopener ugc" target="_blank"> <img class="embedImage-img" src="https://us.v-cdn.net/6031942/uploads/editor/kv/jpwwrmsjec0r.jpg" alt="jpwwrmsjec0r.jpg"/> </a> </div> </div> <p><p><br></p></p><p>
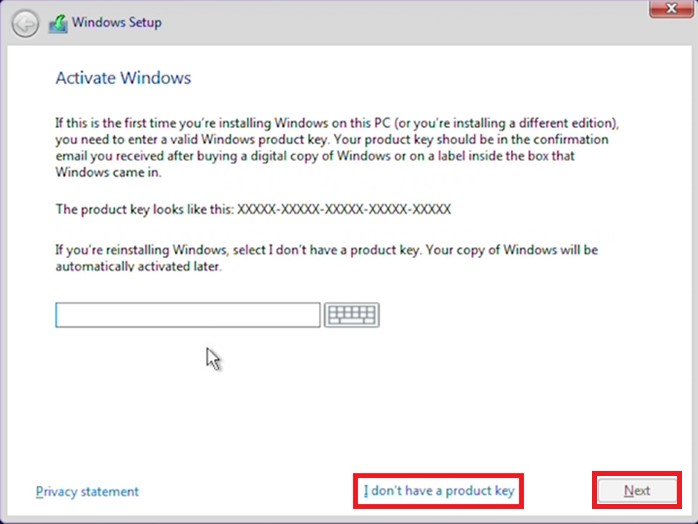
10. You’ll be prompted to activate Windows. Since this is a reinstall, your product key is already stored digitally by the motherboard. Select <strong>I don’t have a product key</strong> and proceed with installation. Windows should automatically re-activate after you’re finished, but it’s still advisable to have your product key on hand if there are activation issues for some reason.</p><div class="embedExternal embedImage display-large float-none"> <div class="embedExternal-content"> <a class="embedImage-link" href="https://us.v-cdn.net/6031942/uploads/editor/3j/puco0eubhrwq.jpg" rel="nofollow noreferrer noopener ugc" target="_blank"> <img class="embedImage-img" src="https://us.v-cdn.net/6031942/uploads/editor/3j/puco0eubhrwq.jpg" alt="puco0eubhrwq.jpg"/> </a> </div> </div> <p><p><br></p></p><p>11. Select the version of Windows you need to install then click <strong>Next</strong></p><div class="embedExternal embedImage display-large float-none"> <div class="embedExternal-content"> <a class="embedImage-link" href="https://us.v-cdn.net/6031942/uploads/editor/9t/tov3nlkr54yo.jpg" rel="nofollow noreferrer noopener ugc" target="_blank"> <img class="embedImage-img" src="https://us.v-cdn.net/6031942/uploads/editor/9t/tov3nlkr54yo.jpg" alt="tov3nlkr54yo.jpg"/> </a> </div> </div> <p><p><br></p></p><p>12. Accept the license terms and click <strong>Next</strong></p><div class="embedExternal embedImage display-large float-none"> <div class="embedExternal-content"> <a class="embedImage-link" href="https://us.v-cdn.net/6031942/uploads/editor/f1/kypoe3o1m1ok.jpg" rel="nofollow noreferrer noopener ugc" target="_blank"> <img class="embedImage-img" src="https://us.v-cdn.net/6031942/uploads/editor/f1/kypoe3o1m1ok.jpg" alt="kypoe3o1m1ok.jpg"/> </a> </div> </div> <p><p><br></p></p><p>13. Click the <strong>Custom Install </strong>option</p><div class="embedExternal embedImage display-large float-none"> <div class="embedExternal-content"> <a class="embedImage-link" href="https://us.v-cdn.net/6031942/uploads/editor/xc/eiucmm6b36jj.jpg" rel="nofollow noreferrer noopener ugc" target="_blank"> <img class="embedImage-img" src="https://us.v-cdn.net/6031942/uploads/editor/xc/eiucmm6b36jj.jpg" alt="eiucmm6b36jj.jpg"/> </a> </div> </div> <p><p><br></p></p><p>14. You’ll be presented a list of drives and partitions. If you have multiple drives (Drive 0, Drive 1, etc...) identify which drive is the one you need to install Windows on and <strong>delete all the partitions for that drive</strong>. This will completely erase the drive and leave it with unallocated space leftover. Select it and click <strong>Next</strong>.</p><p><strong>Disclaimer</strong>: Be very careful with this step if multiple drives are attached. If you erase the wrong drive with information on it you can’t lose, there’s no guarantee you can recover the lost data. If want to minimize the risk as much as possible, disconnect any extra drives from the system. </p><div class="embedExternal embedImage display-large float-none"> <div class="embedExternal-content"> <a class="embedImage-link" href="https://us.v-cdn.net/6031942/uploads/editor/rh/6d1fvj3lmd1n.jpg" rel="nofollow noreferrer noopener ugc" target="_blank"> <img class="embedImage-img" src="https://us.v-cdn.net/6031942/uploads/editor/rh/6d1fvj3lmd1n.jpg" alt="6d1fvj3lmd1n.jpg"/> </a> </div> </div> <p><p><br></p></p><div class="embedExternal embedImage display-large float-none"> <div class="embedExternal-content"> <a class="embedImage-link" href="https://us.v-cdn.net/6031942/uploads/editor/aa/0qiby499orda.jpg" rel="nofollow noreferrer noopener ugc" target="_blank"> <img class="embedImage-img" src="https://us.v-cdn.net/6031942/uploads/editor/aa/0qiby499orda.jpg" alt="0qiby499orda.jpg"/> </a> </div> </div> <p><p><br></p></p><p>15. Windows will now begin installation! It will take a little bit to finish, once it’s done you’ll have a completely clean copy of Windows on your system.</p> </article> </main>