Computers
Computer Parts
Custom PC Builder
DIY/ Maker
{$smarty.capture.menu}
Activity
Categories
Discussions
Computers
Computer Parts
Custom PC Builder
DIY/ Maker
How to Create a Windows 10 Installation Flash Drive from a Windows 10 PC - Micro Center
<main> <article class="userContent"> <p>For better or worse, you've encountered a situation where you need to install Windows using external media. Could be you're putting together a new build, or maybe your hard drive just failed and a Windows Reset isn't an option.</p><p>Fortunately, it's easy to create an installer for Windows 10, you just need a working computer (you can even borrow one) and a 8 GB or larger flash drive. Once you have these two things, follow the steps below to create your Windows 10 installation flash drive:<p><br></p></p><p>1. Open any web browser and go to Microsoft's website to download Windows 10 at: <a href="https://www.microsoft.com/en-us/software-download/windows10" rel="nofollow noreferrer ugc">https://www.microsoft.com/en-us/software-download/windows10</a></p><p>2. Since we are making media, select the 2nd option here and click on <strong>Download tool now</strong></p><div class="embedExternal embedImage display-large float-none"> <div class="embedExternal-content"> <a class="embedImage-link" href="https://us.v-cdn.net/6031942/uploads/editor/7u/n6agjj01etx7.png" rel="nofollow noreferrer noopener ugc" target="_blank"> <img class="embedImage-img" src="https://us.v-cdn.net/6031942/uploads/editor/7u/n6agjj01etx7.png" alt="n6agjj01etx7.png"/> </a> </div> </div> <p><p><br></p></p><p>3. Choose what to do with the file. In case you need to run the tool more than once, or restart at any point, it is best to select <strong>Save File, </strong>as opening it will not save a copy, it will just run the file one time for you.<p><br></p></p><div class="embedExternal embedImage display-large float-none"> <div class="embedExternal-content"> <a class="embedImage-link" href="https://us.v-cdn.net/6031942/uploads/editor/hm/1nfmajl11zcn.jpg" rel="nofollow noreferrer noopener ugc" target="_blank"> <img class="embedImage-img" src="https://us.v-cdn.net/6031942/uploads/editor/hm/1nfmajl11zcn.jpg" alt="1nfmajl11zcn.jpg"/> </a> </div> </div> <p><p><br></p></p><div class="embedExternal embedImage display-large float-none"> <div class="embedExternal-content"> <a class="embedImage-link" href="https://us.v-cdn.net/6031942/uploads/editor/nr/k9xkgi89f8wh.jpg" rel="nofollow noreferrer noopener ugc" target="_blank"> <img class="embedImage-img" src="https://us.v-cdn.net/6031942/uploads/editor/nr/k9xkgi89f8wh.jpg" alt="k9xkgi89f8wh.jpg"/> </a> </div> </div> <p><p><br></p></p><p>4. Open your Downloads folder on your computer and run the <strong>MediaCreationTool file.</strong></p><p>A quick way to get there is to press the Windows key and the letter 'E' on your keyboard at the same time to open File Explorer, then click on <strong>Downloads</strong>.<p><br></p></p><div class="embedExternal embedImage display-large float-none"> <div class="embedExternal-content"> <a class="embedImage-link" href="https://us.v-cdn.net/6031942/uploads/editor/ub/vmmqrlop3mx9.jpg" rel="nofollow noreferrer noopener ugc" target="_blank"> <img class="embedImage-img" src="https://us.v-cdn.net/6031942/uploads/editor/ub/vmmqrlop3mx9.jpg" alt="vmmqrlop3mx9.jpg"/> </a> </div> </div> <p><p><br></p></p><p>5. When prompted after opening the file, click <strong>Yes</strong> or <strong>OK</strong> to allow the program to make changes.</p><div class="embedExternal embedImage display-large float-none"> <div class="embedExternal-content"> <a class="embedImage-link" href="https://us.v-cdn.net/6031942/uploads/editor/l8/l8ja2ayzc39y.jpg" rel="nofollow noreferrer noopener ugc" target="_blank"> <img class="embedImage-img" src="https://us.v-cdn.net/6031942/uploads/editor/l8/l8ja2ayzc39y.jpg" alt="l8ja2ayzc39y.jpg"/> </a> </div> </div> <p><p><br></p></p><p>6. The first screen will be a terms and conditions page, once ready, agree to the terms of use to continue by clicking <strong>Accept</strong>.</p><div class="embedExternal embedImage display-large float-none"> <div class="embedExternal-content"> <a class="embedImage-link" href="https://us.v-cdn.net/6031942/uploads/editor/5a/cdph1wczghew.jpg" rel="nofollow noreferrer noopener ugc" target="_blank"> <img class="embedImage-img" src="https://us.v-cdn.net/6031942/uploads/editor/5a/cdph1wczghew.jpg" alt="cdph1wczghew.jpg"/> </a> </div> </div> <p><p><br></p></p><p>7. The tool will spend several minutes “Getting a few things ready”. If you see a spinning wheel, that will indicate the program is still working and will be ready as soon as possible for the next steps.</p><div class="embedExternal embedImage display-large float-none"> <div class="embedExternal-content"> <a class="embedImage-link" href="https://us.v-cdn.net/6031942/uploads/editor/dm/4rzqi9c0uxof.jpg" rel="nofollow noreferrer noopener ugc" target="_blank"> <img class="embedImage-img" src="https://us.v-cdn.net/6031942/uploads/editor/dm/4rzqi9c0uxof.jpg" alt="4rzqi9c0uxof.jpg"/> </a> </div> </div> <p><p><br></p></p><p>8. The tool has 2 options. Select the option to <strong>Create installation media</strong>. The other option is to immediately install Windows 10 on the computer you are using.</p><p>Select <strong>Create Installation Media</strong> and then click on <strong>Next</strong>.</p><div class="embedExternal embedImage display-large float-none"> <div class="embedExternal-content"> <a class="embedImage-link" href="https://us.v-cdn.net/6031942/uploads/editor/ty/appoum4f3fp7.jpg" rel="nofollow noreferrer noopener ugc" target="_blank"> <img class="embedImage-img" src="https://us.v-cdn.net/6031942/uploads/editor/ty/appoum4f3fp7.jpg" alt="appoum4f3fp7.jpg"/> </a> </div> </div> <p><p><br></p></p><p>9. Uncheck the box to “<strong>Use the recommended options for this PC</strong>” and select the settings you want here (language, edition, 64/32bit). Then click on <strong>Next</strong>.</p><div class="embedExternal embedImage display-large float-none"> <div class="embedExternal-content"> <a class="embedImage-link" href="https://us.v-cdn.net/6031942/uploads/editor/a2/z1d2v46ee1r0.jpg" rel="nofollow noreferrer noopener ugc" target="_blank"> <img class="embedImage-img" src="https://us.v-cdn.net/6031942/uploads/editor/a2/z1d2v46ee1r0.jpg" alt="z1d2v46ee1r0.jpg"/> </a> </div> </div> <p><p><br></p></p><p>10. On the next page, choose the option to create a <strong>USB flash drive, </strong>then click on<strong> Next.</strong></p><div class="embedExternal embedImage display-large float-none"> <div class="embedExternal-content"> <a class="embedImage-link" href="https://us.v-cdn.net/6031942/uploads/editor/ka/9qxnobc4jt7c.jpg" rel="nofollow noreferrer noopener ugc" target="_blank"> <img class="embedImage-img" src="https://us.v-cdn.net/6031942/uploads/editor/ka/9qxnobc4jt7c.jpg" alt="9qxnobc4jt7c.jpg"/> </a> </div> </div> <p><p><br></p></p><p>
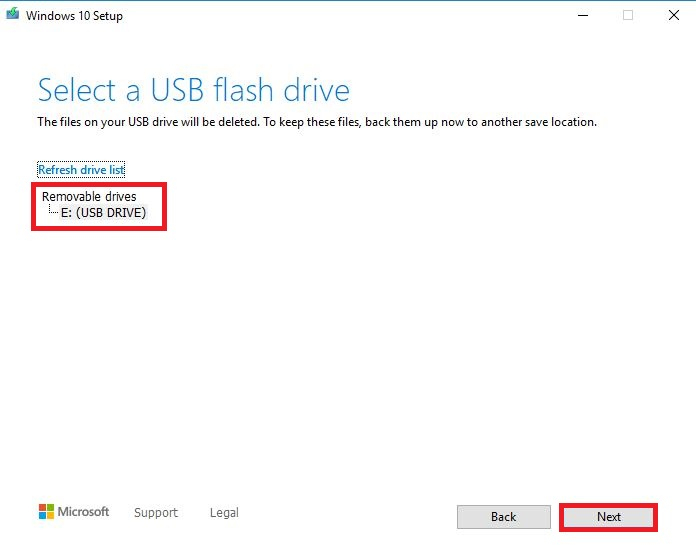
11. Find the flash drive you want to use in the list and select it. If it's the only USB drive you have plugged in, it will be the only option listed.</p><div class="embedExternal embedImage display-large float-none"> <div class="embedExternal-content"> <a class="embedImage-link" href="https://us.v-cdn.net/6031942/uploads/editor/ml/qk4nmss5wmwd.jpg" rel="nofollow noreferrer noopener ugc" target="_blank"> <img class="embedImage-img" src="https://us.v-cdn.net/6031942/uploads/editor/ml/qk4nmss5wmwd.jpg" alt="qk4nmss5wmwd.jpg"/> </a> </div> </div> <p><p><br></p></p><p>12. The tool will now download the installer files to your flash drive.</p><p>Be sure to stay connected to the internet until this completes. Depending on your internet speed, this may take some time to complete.</p><div class="embedExternal embedImage display-large float-none"> <div class="embedExternal-content"> <a class="embedImage-link" href="https://us.v-cdn.net/6031942/uploads/editor/n9/myam9jzwuyor.jpg" rel="nofollow noreferrer noopener ugc" target="_blank"> <img class="embedImage-img" src="https://us.v-cdn.net/6031942/uploads/editor/n9/myam9jzwuyor.jpg" alt="myam9jzwuyor.jpg"/> </a> </div> </div> <p><p><br></p></p><p>13. Once completed you will get a <strong>"Your USB flash drive is read</strong>y" message.</p><p>Click <strong>Finish</strong> and remove the drive. Connect it to the computer you want to install Windows on and power on the device.</p><div class="embedExternal embedImage display-large float-none"> <div class="embedExternal-content"> <a class="embedImage-link" href="https://us.v-cdn.net/6031942/uploads/editor/7q/apc2qg5wpr04.jpg" rel="nofollow noreferrer noopener ugc" target="_blank"> <img class="embedImage-img" src="https://us.v-cdn.net/6031942/uploads/editor/7q/apc2qg5wpr04.jpg" alt="apc2qg5wpr04.jpg"/> </a> </div> </div> <p><br></p> </article> </main>