If you're looking to set up a dual-boot system, but aren't sure how to, you've come to the right place. Dual-booting, if you're unfamiliar, is running 2 operating systems on the same PC. If you have experience with virtual machines, You should note that this, while similar, is not the same thing. On a dual-boot system, the OS will be installed on the boot drive alongside Windows rather than being installed on a virtual drive within Windows. So both your Linux and Windows operating systems would have root/admin access to your system.
What is Linux?
Linux is an open-source operating system originally invented by Linus Torvalds in 1991. Most flavors or spins of the Linux OS are free. You may be familiar with the more popular flavors of Linux like Ubuntu, Red Hat, Kali, or Raspbian. Even the Android operating system was created based off of the Linux kernel.
Linux does offer quite a few features that Windows does not, so it is nice to have both on the same system. This is one of the many reasons I always have a dual-boot setup on either my PC or laptop.
Why Install Linux?
While Windows 10 and Linux are both operating systems. Linux does have it's benefits. For starters, Linux is more secure than Windows 10 as there are fewer forms of malware for Linux. There are also additional layers of security to Linux to help protect against malware. For example, if you are attempting to make an administrator change to the PC, all you have to do in Windows is click 'Yes' on your administrator account. In Linux, you are required to enter your 'sudo' or admin password to make these changes.
Linux also has the ability to read dozens of different filesystems. Windows can only read a few such as NTFS, FAT32, and exFAT. If you have an old Mac that stopped working and you desperately need to recover files from it, you would not be able to do that by connecting the drive to a Windows PC. It will not recognize the drive or any of the files on it. Connecting it to a Linux machine, however, will let you easily view the files on the driver as well as copy and paste them to another drive if needed.
These are just a few reasons to install Linux, either instead of or, as we'll talk about here, with Windows. I strongly believe everyone could benefit from using Linux in some aspect.
What you will need:
- Two 8 GB USB flash drives
- A Windows 10 PC
- Internet Connection (Optional if you already have the Bootable USB)
- The desire to learn Linux
If you find yourself worried about harming your system but still want to run a second OS, then I recommend checking out the article “How to install Linux in a Virtual Machine on Windows 10".
Worst-case scenario, have a Windows 10 install USB handy and you can fix any mistakes with a clean install of Windows. As long as you backed up your data then you have nothing to worry about.
Things you should do before you start:
- Backup your Data & Create a Windows bootable USB
- Create a Linux bootable USB
One more reminder!
Make sure you have backed up your data to the cloud or an external drive. Then create a Windows 10 bootable USB just in case you need to reinstall Windows.
Setting Up Partitions:
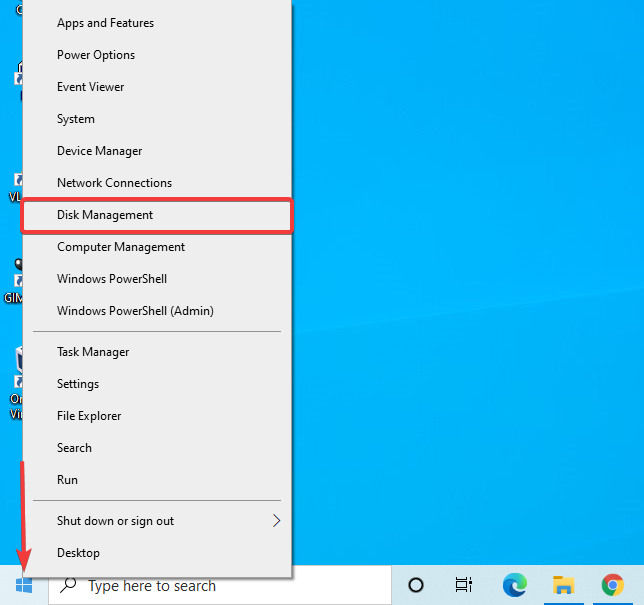
First, You need to set up the partition on your HDD or SSD where you will install Linux. Start by right-clicking on the start button in the bottom left corner. Then click Disk Management.
You will be shrinking the storage space that Windows is currently using to make room for a Linux partition. Right-click the C: Drive

Then click Shrink Volume.

Now you need to select the size for each drive. I strongly recommend allocating more space for the Windows partition, but it is up to you. You can see below I entered 30000 MB (30 GB) for the Linux partition and that leaves roughly 84 GB for my Windows partition. (On a 128 GB SSD).
Once you have set the partition sizes to your liking, click Shrink.

Now you can see it divided our C: Windows partition into two. What is labeled as ‘Unallocated’ will be used for Linux.

With that, your drive is prepared for the dual-boot. You now need to boot to BIOS to change a few settings there.
If you are unsure how to access your BIOS then I recommend using our guide walking you through the process.
BIOS Setup
Your BIOS will look something like this if you have a modern motherboard, but will vary based on your motherboard manufacturer.

Click on the ‘Security’ tab. (If you have an older BIOS, the mouse may be disabled, so you will need to use the arrow and enter keys on your keyboard)
Select ‘Secure Boot’

Disable secure boot, then click the X to close this window

Now click on the ‘Boot’ tab and select "Legacy" or "CSM."

Enable CSM/Legacy Boot
If given the option, set UEFI first. If not just make sure Legacy boot is enabled

Note: This step is not always required - Most modern versions of Linux are UEFI compatible.
Now click the Exit tab. Then Save Changes and Exit
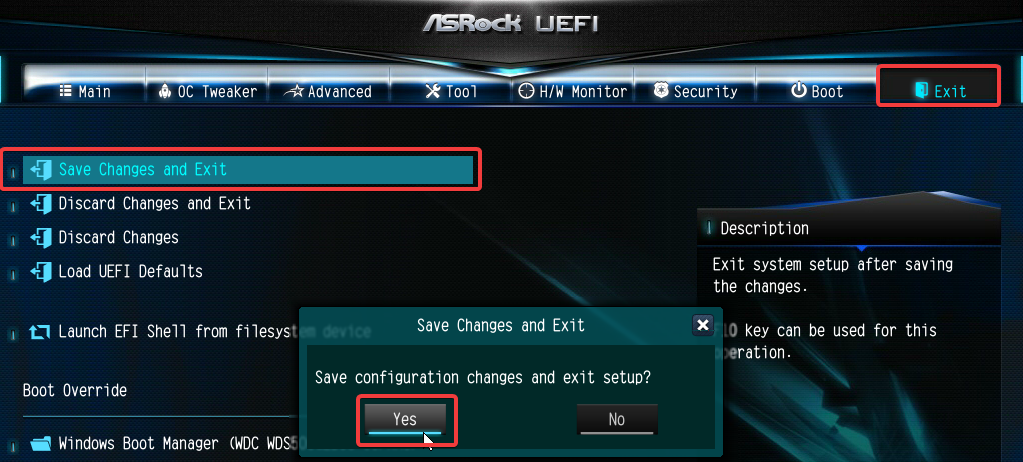
Now you can boot from the Linux USB drive. Insert it in one of the USB ports on the PC while it is powered off, then turn it on. It should boot from the USB automatically.
If you system does not automatically boot, go back into the BIOS and change your boot order so that the USB drive is first on the list.
Installing Linux
Once your computer has booted into your Linux flash drive, you will need to select "Install Linux or Ubuntu" from the first screen using your keyboard. It should be the option at the top of the list (and don’t worry, It is not going to modify your boot drive yet).
Once the OS has loaded, you will have two options: "Try Ubuntu" and "Install Ubuntu." If you just want to try Ubuntu without committing to it, click "Try Ubuntu." If you know you want to have Ubuntu installed, click "Install Ubuntu"
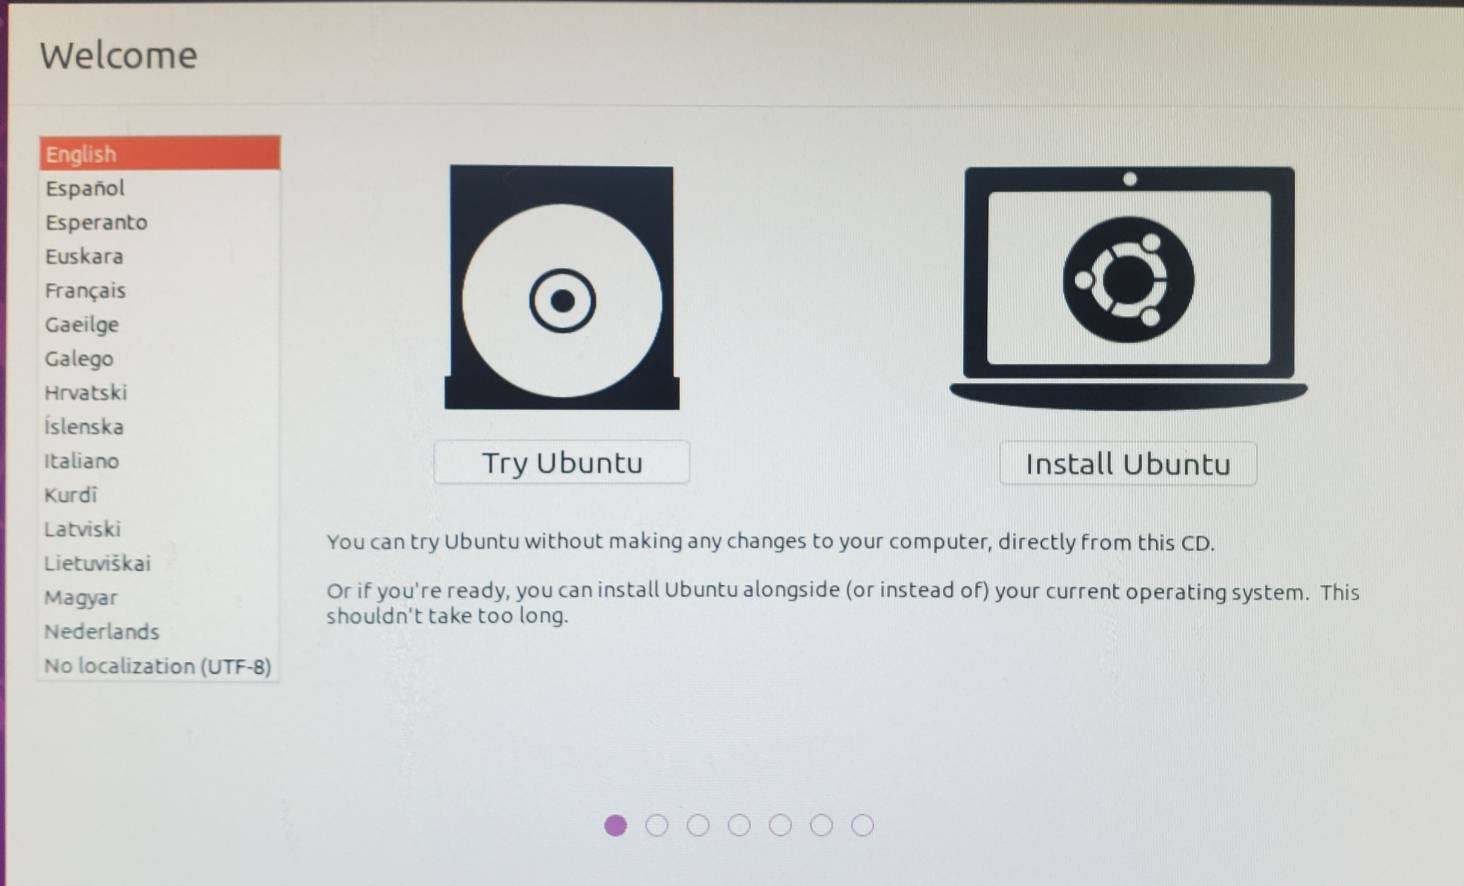
If you clicked ‘Try Ubuntu’. You can double-click this icon on the desktop to install the operating system.

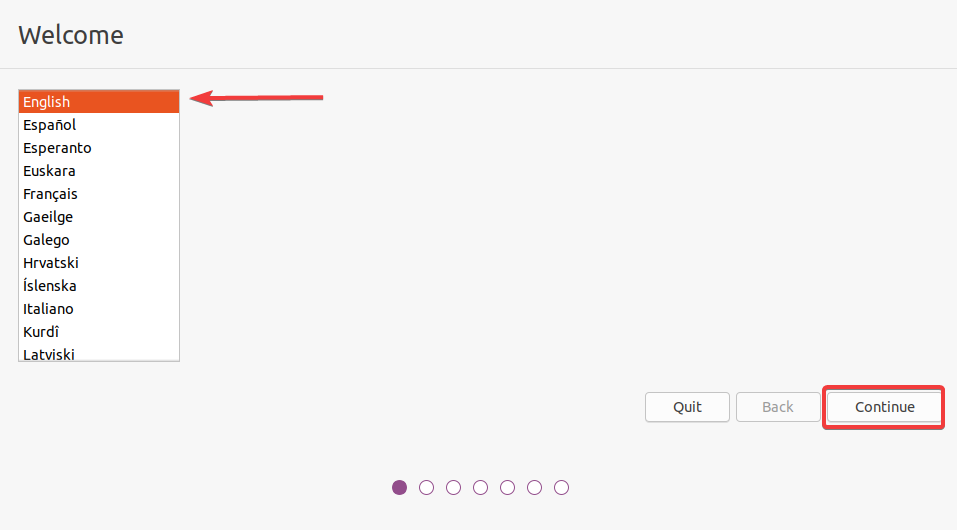
If you clicked "Install Ubuntu" or chose to install Ubuntu from the trial mode, the first step will ask you to select your language. Then click Continue.
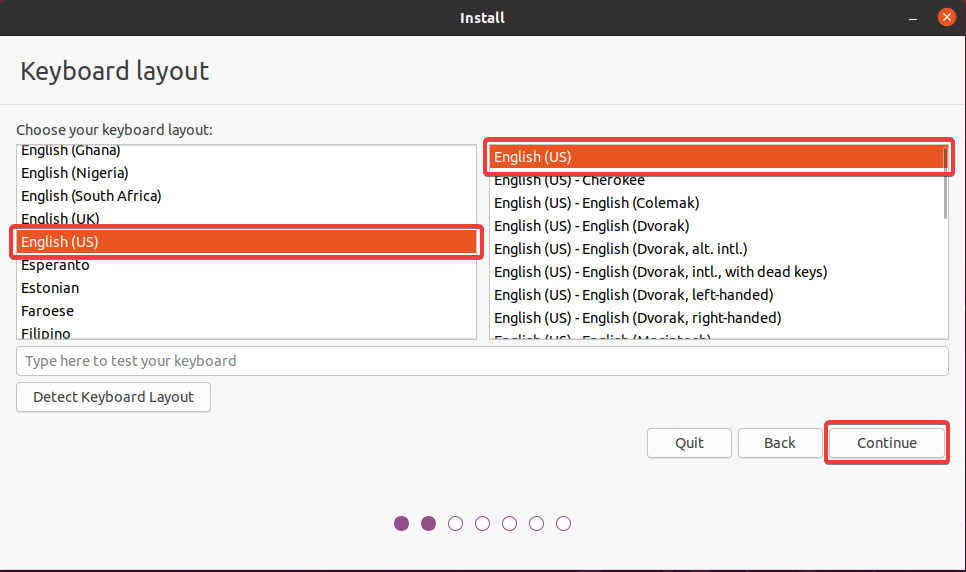
You will then need to select your keyboard layout. Them, click Continue
This step is optional, but I would recommend connecting to the internet now (if you can). Of course, if you do not want to or are not able to, you may skip this step without issue.

If you chose to connect to Wi-Fi, you will need to enter your Wi-Fi password, then click Connect

You may choose between either Normal installation or Minimal installation. I recommend choosing Normal installation to get the best experience, as Minimal installation comes with fewer programs pre-installed.
You will want to check the box next to “Install third-party software for graphics and Wi-Fi hardware and additional media formats” then click Continue

****Very Important Step****
Do NOT select “Erase disk and Install Ubuntu” as it will wipe ALL the data that is currently on your PC. This is why we recommend creating a backup of your data before installing Ubuntu.
Select “Install Ubuntu alongside Windows 10”
If you do not see this listed as an option, I would make sure that the partition is set up correctly. Ensure the ‘unallocated space’ we created earlier is still unallocated.
Once you have this selected, click Install Now

The installer will ask you to confirm the partition tables. Make sure you selected the correct option in the previous step before you click Continue

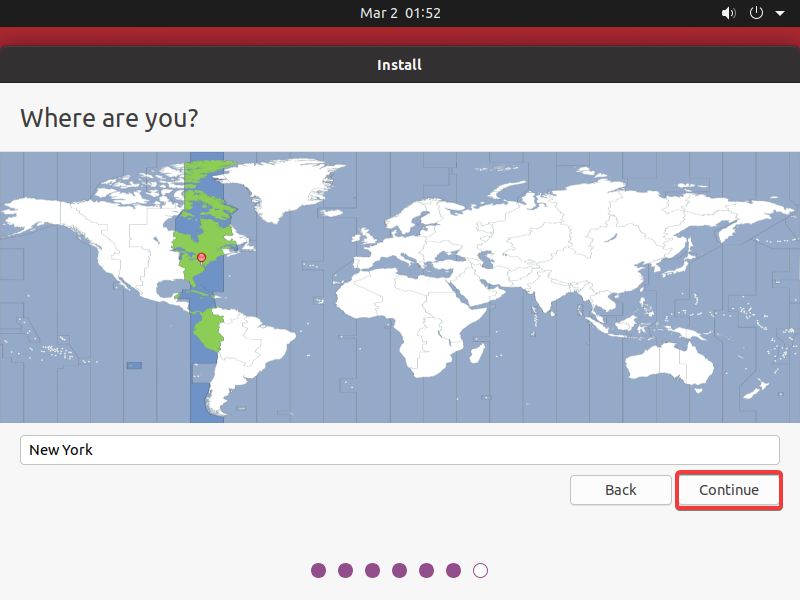
Next, you will need to set your time zone. Then click Continue
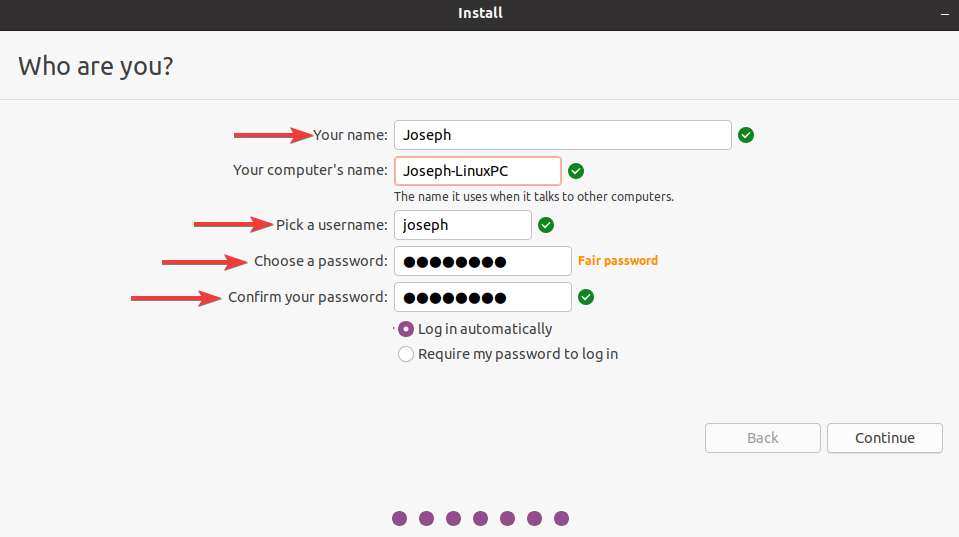
You will be asked to set up your user account. Enter your name, username, and password. Then click Continue
Ubuntu will now start installing the OS alongside Windows.

Once the install is completed, it will require a PC restart. Click "Restart Now"

You will be asked to remove the installation media (the USB drive) and then push any key on the keyboard. Once you do this, the PC will reboot.
Boot into BIOS
For your boot order, set Ubuntu as #1. This will allow you to use the GRUB (GRrand Unified Bootloader). The GRUB is basically the Linux boot menu. This is built-in to the operating system. It will allow you to choose which operating system you want to use every time you turn on or restart the PC. This what the GRUB looks like:

You can use the arrow keys and enter on your keyboard to select which operating system you want to use. If you select the UEFI Firmware settings will take you to BIOS.
Congratulations!!! You are now finished setting up a dual-boot with Linux and Windows on your PC!
I encourage everyone to use Linux as much as possible. You will learn why Linux is so underrated and it is a great OS for nearly any workstation or everyday PC. Of course, you will come across some tasks or issues that work easier on Windows such as driver management, DRM compatibility, and even software availability in general. In that case, you can just restart and boot to Windows or you can invest a little time to figure out how to get it working in Linux since that’s the fun part.
I hope you enjoyed this How-to and have fun with your new dual-boot system.
Written by TS_JosephF