Computer Case Buying Guide


By Lucas Coll

The computer case is essentially the “body” of your PC build (the internal components being the “organs,” so to speak), and as the framework that holds everything together, it’s vital that you choose the right one. If you’re new to the PC building scene, however, concepts like cable management, case sizes, and motherboard compatibility can be intimidating, and the fact that buying the wrong one will make the entire build process much more difficult doesn’t make things any less daunting.
Worry not: Once you nail a few important concepts down, choosing the right computer case for your build is pretty straightforward. You’ve got a lot of options available to you – enough to easily induce decision paralysis – but understanding the different features and design principles will help you narrow things down so you can find the perfect case that will make your build much, much easier. To make things even simpler we’ve put together this handy computer case buying guide that covers all the basics.
What PC Cases are Best for Cable Management?
Aside from size, cable management is easily one of the most important features of a computer case. Poor cable management can make your building process a nightmare and could potentially hinder your hardware’s performance. On the other hand, a case with thoughtfully designed cable management features will make the build much easier and, dare we say, even fun.
The case is what contains all of your hardware components, and all of those components must interface with the motherboard (and with each other) via cables. Good cable management primarily depends on two things: routing, or the availability of channels where the cables can pass through, and space for the cables themselves to sit comfortably without crowding the case. Cable clutter can block airflow and make it difficult for the builder to properly install and organize internal components.
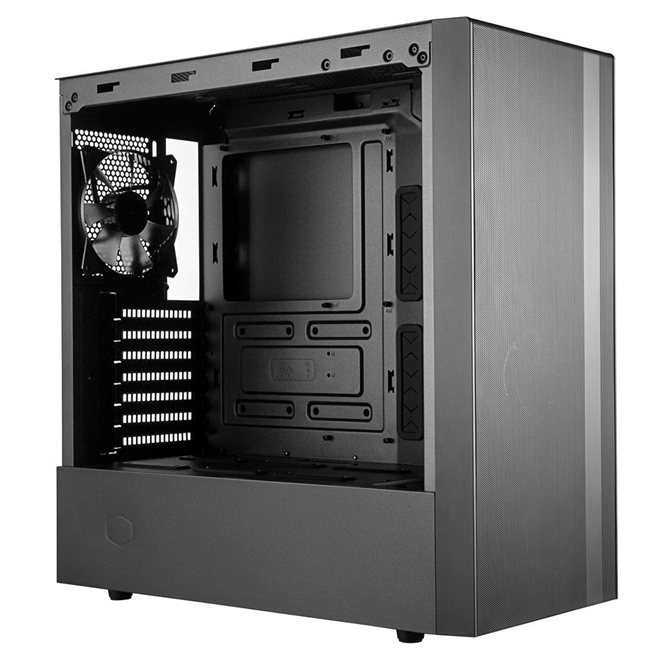
Depending on size and form factor, computer cases typically have allotted space behind the motherboard tray (if you’re looking at the case from the rear, this would be on the left side of the interior of the case). Here, you can rout cables behind and away from the case’s main compartment. Full ATX towers and many ATX mid-towers like the Cooler Master NR600 MasterBox also have a semi-enclosed compartment at the bottom, referred to as the “basement,” where the power supply sits, and there should be some room down here for tucking away unused cables as well. This is especially important if you’re using a non-modular PSU.
Cable management is more than a simple matter of aesthetics: It’s also important for ventilation and airflow, as cables clogging up the case interior can and will affect thermal performance. The best way to determine a case’s cable management capabilities is to look closely at the provided pictures and to read customer reviews and build guides that feature that particular case. A relevant build tip: Plan your cable management before you start assembling everything, not after. Zip ties are also a cheap and easy way to help keep everything tidy.
What’s the difference between Micro ATX, Mini ITX, & Full ATX Cases?
Cases are categorized by motherboard size, your main options being ATX (the most common), Micro ATX, and Mini ITX. Among these, each motherboard type has multiple tower sizes available for it – mini, mid-, full, etc. As the housing for your components, the case is naturally built and sized with those internal parts in mind, all of which interface with the motherboard which is itself anchored inside the case. As the case and motherboard combo create the baseline for your build, it makes sense that tower size is categorized this way.

This is all to say that you’ll need to decide on a motherboard (or at least, a motherboard form factor) before buying a case to make sure the case is compatible with the rest of your build. ATX is the most popular and versatile, especially for a gaming PC case that will have a bulky and hot GPU sitting inside of it. Micro ATX and Mini ITX motherboards, and cases like the Thermaltake Core V21 mini tower, are typically reserved for compact enthusiast PCs by more experienced builders.
Your choice of case size boils down to more than simply how much space you have available for your PC tower. Larger cases may be bulkier, but if you have the room for it, they are almost always easier to work with (that is, you have more physical working room inside the case), offer easier cable management, and allow for more ventilation and superior thermal performance than smaller cases.
Full towers and mid-towers are the most popular, and if space is a concern, ATX mid-towers are an excellent sweet spot. If this is your first-time building, we generally don’t recommend going smaller than a good mid-tower, and there are a ton of great options in this size bracket.
Do windows add anything beyond style?
You’ll see a lot of computer cases that have a window on one side (usually the right side when facing the case from the rear) that lets you see into the case. This is mostly an aesthetic choice, as it allows the builder to show off their components and create a custom ambiance with components, such as cooling fans, that feature RGB LED lighting.
Windows can serve a functional purpose as well, however. Being able to see into the case without opening it up has clear advantages (LED light shows aside), and these glass or plastic panels are sometimes simpler to open than a traditional side panel, allowing easier access to the tower’s internals. Some case designs even feature a hinge that lets the window swing open without having to be completely removed. Others, like the popular Lian Li Lancool II full tower, have swing-out windows on both sides of the case.

One important consideration regarding see-through side panels is that if you opt to go for one, you’ll have to choose between tempered glass and plastic/acrylic. Plastic is more durable – glass can obviously crack or break – but will also show scratches much more easily, which is why builders generally favor tempered glass over acrylic. Glass-paneled cases are also typically found among higher-end towers.
Leave a Comment
Categories
- All Categories
- 1 The Blog
- 1 What's Trending
- 8K The Community
- 3.2K General Discussion
- 147 New Members
- 879 Consumer Tech
- 236 Prebuilt PCs and Laptops
- 171 Software
- 33 Audio/Visual
- 54 Networking & Security
- 4 Home Automation
- 5 Digital Photography
- 14 Content Creators
- 30 Hobby Boards & Projects
- 84 3D Printing
- 83 Retro Arcade/Gaming
- 63 All Other Tech
- 462 PowerSpec
- 2.7K Store Information and Policy
- 152 Off Topic
- 65 Community Ideas & Feedback
- 620 Your Completed Builds
- 4K Build-Your-Own PC
- 3K Help Choosing Parts
- 328 Graphics Cards
- 336 CPUs, Memory, and Motherboards
- 146 Cases and Power Supplies
- 54 Air and Liquid Cooling
- 51 Monitors and Displays
- 93 Peripherals
- 70 All Other Parts
- 65 Featured Categories
We love seeing what our customers build
Submit photos and a description of your PC to our build showcase
Submit NowLooking for a little inspiration?
See other custom PC builds and get some ideas for what can be done
View Build ShowcaseSAME DAY CUSTOM BUILD SERVICE
If You Can Dream it, We Can Build it.

Services starting at $149.99