How to use/useful functions for DiskPart in Windows 10
This discussion has a more recent version.


Diskpart is a very useful command line utility that allows you to manage the various partitions, volumes and disks/drives that are connected to the computer. There are so many things you can do with diskpart that it'd be hard to go through and explain every single one, but there are some functions that are particularly useful for issues that come up often. Many of the functions available in diskpart are also available in Disk Management, but there are some cases where diskpart could be more useful. We'll start with getting into diskpart, and from there we'll go over some of those useful features.
Once command prompt is open, type diskpart and hit enter. Some new lines will display showing you the diskpart version and a new line where you can start typing, you're now using the diskpart utility.

From here there are a number of different commands you can run. In the following sections I'll go over some of the more useful functions, but there are two commands we should get familiar with first: list disk and list volume. These commands are important because within diskpart you first have to list and select the drive or volume you need to manipulate.
List disk will display a list of the drives that are attached to your system. Internal hard drives, external DVD drives, flash drives, SD cards, anything that the computer would consider a "drive" will show up here. Just type list disk then hit enter.
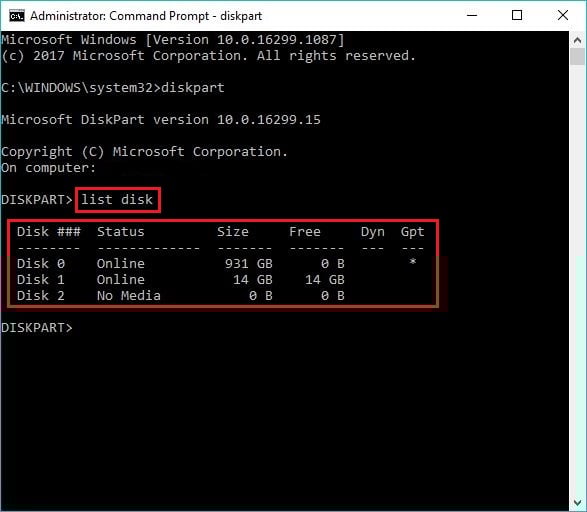
List volume is similar to list disk but rather than showing whole drives, it will give a breakdown of the different partitions and volumes on the drives. You'll see some more detail about the volumes such as drive letters and file systems. Just type list volume and hit enter
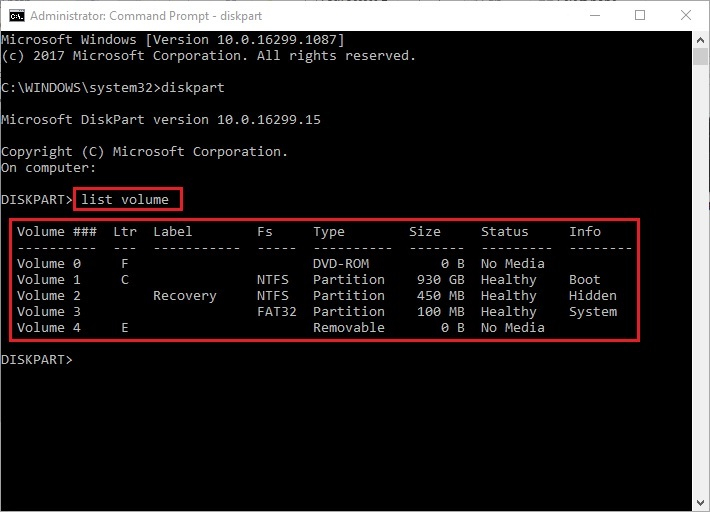
Each command is used depending on what you're actually doing with diskpart. Now that we've got the main stuff out of the way, let's go over some of the most useful options, and don't worry, I'll make sure you know which list command to use.
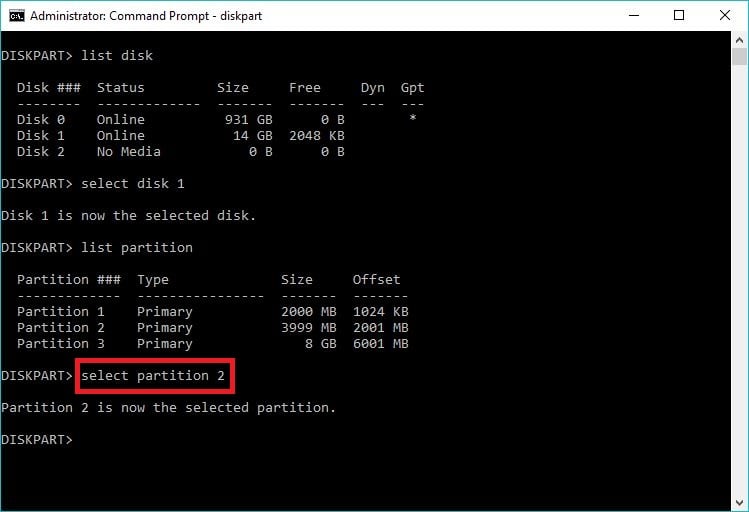
First, we want to list disk. Once you've done that, you need to select the disk you want to clean. In this example, we have a flash drive we want to clean which is showing as Disk 1. Type select disk 1 then hit enter.
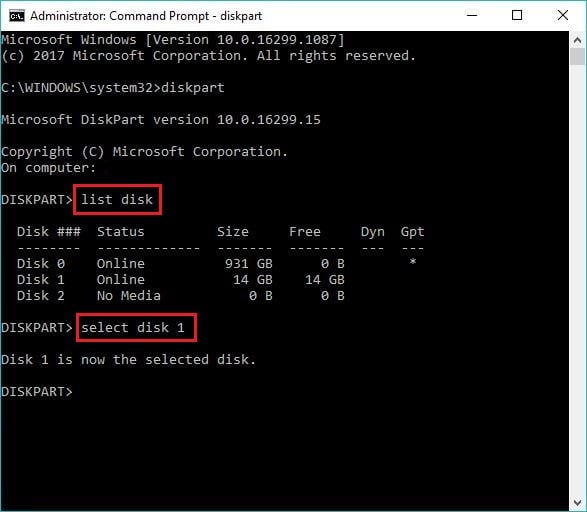
Once you've selected the correct disk, type clean and hit enter.
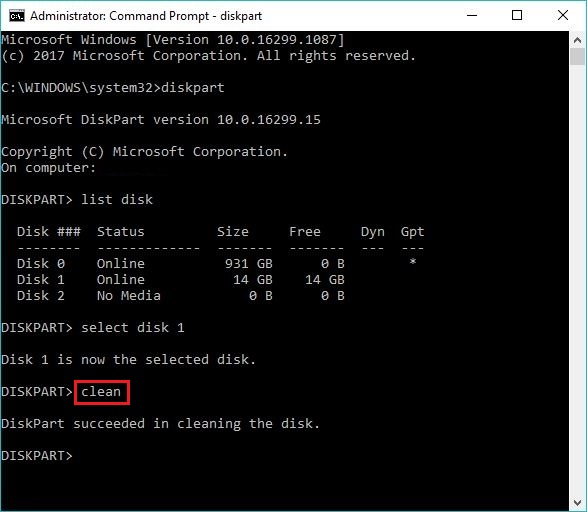
You'll get a confirmation message if it was successful with cleaning the drive. Once it's cleaned the drive will be completely free of any formatting or partitions and you can reformat it as you need. If diskpart cannot clean the drive, there's a good chance it's starting to go bad.
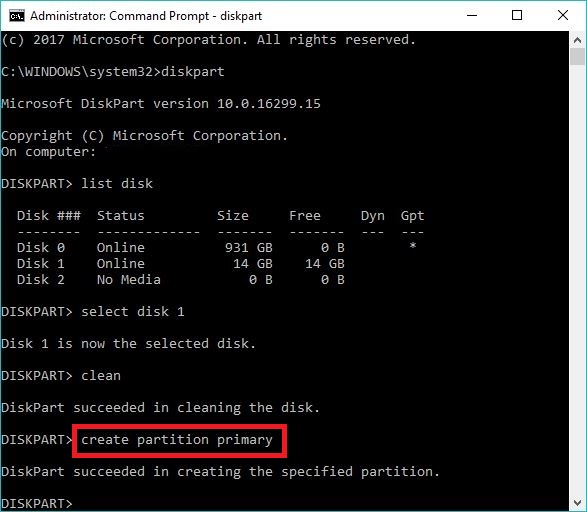
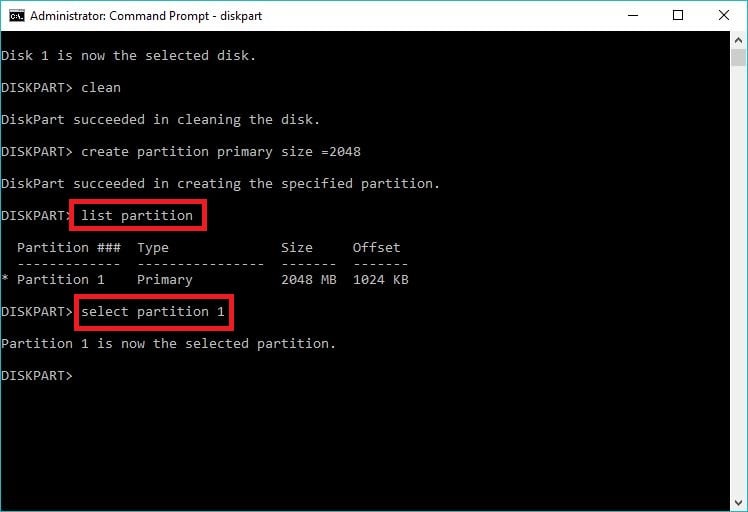
If you want to create a partition that only takes up part of the drive, you can adjust your command to create partition primary size=X, where X is the size in megabytes (1GB = 1024 megabytes). So if we wanted to create a 2GB partition, we'd type create partition primary size=2048.

Once you do that, you then need to type list partition and hit enter, then we need to select it from the list. In our example it's partition 1, so we type select partition 1
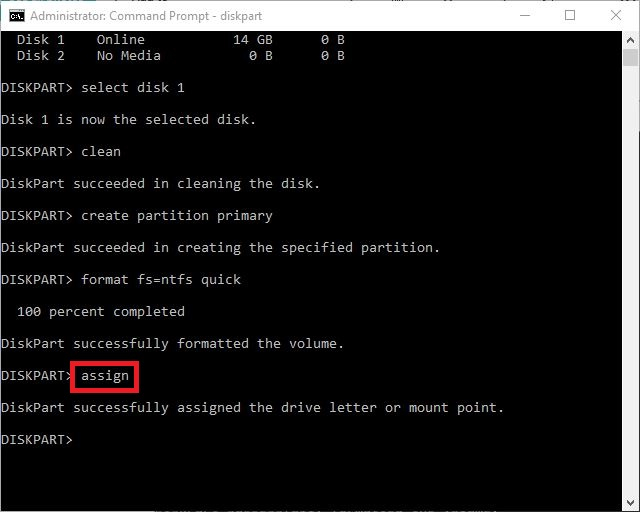
We then need to format the partition. The command is "format fs=(file system here) quick," just replace (file system here) with the desired format. You can use NTFS, exFAT and FAT32. NTFS is Windows' file system, exFAT and FAT32 are typically used for external storage devices like flash drives and SD cards. If you're using the drive with just a Windows machine, choose NTFS. If you're going to use it with more than a Windows machine, choose FAT32 or exFAT. exFAT is usually recommended since FAT32 is an older file system that has limitations on the size of the files you can store on it and the size of the partitions on the drive, but there are some cases where FAT32 may be necessary. We type quick at the end to perform a quick format. If you don't type quick you will perform a full format which will scan the drive for bad sectors (you can use this if you think the drive may be failing), however this takes much longer to run. In our example, we'll be reformatting the drive for use with a Windows computer and we know there's no issues with it, so we type format fs=NTFS quick and hit enter.

Once it's done formatting, type assign and it will automatically assign a drive letter to it, and the drive will now be recognized by your system like normal.
For reassigning drive letters, we want to list volume first and hit enter. Once you've listed the volumes, determine which volume matches the drive letter you want to reassign. In our example it's a USB drive with drive letter D, showing as volume 4, so we type select volume 4 and hit enter.
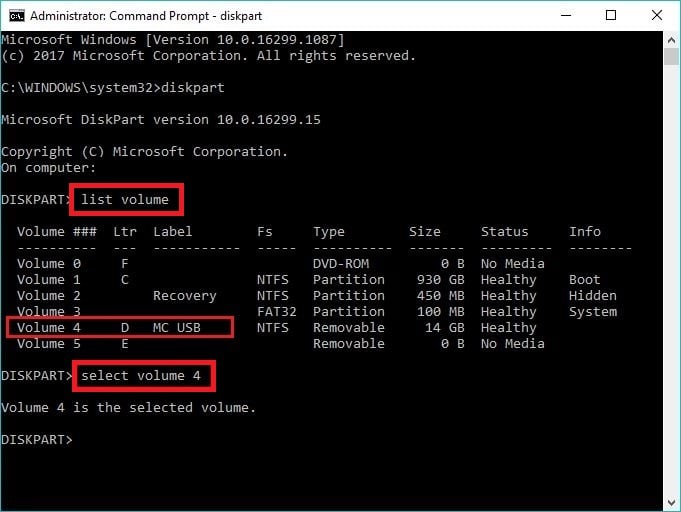
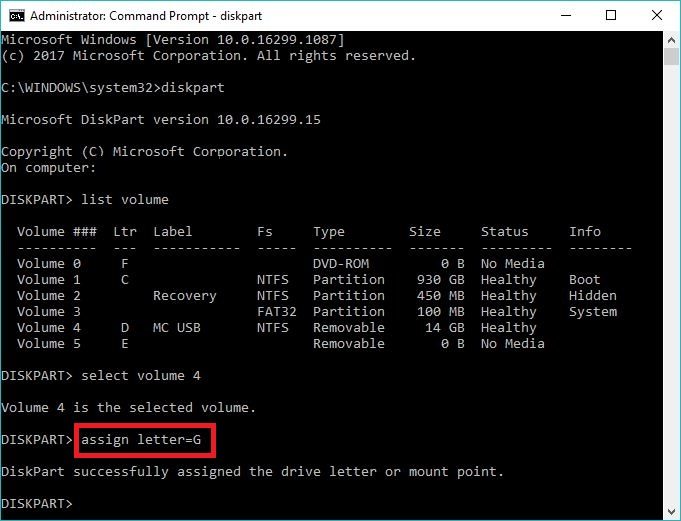
Once the volume is selected, to change the drive letter we type assign letter=(letter), just replace (letter) with whatever you want to use. We'll change it to the G drive, so we type assign letter=G and hit enter.
If you have a drive with multiple partitions, diskpart allows you to select and erase specific one. Under normal circumstances a drive is only going to have one partition unless you manually set it up to have multiple, but if you are in one of those situations this could be a useful tool. For example, if you have multiple partitions on a drive and are trying to merge them without doing a complete reformat, you can erase the extra partition and then extend the main one into it to combine them into one. You can only extend a partition into another one that is unformatted, which is why we have to delete the partition first.
One thing to note is that partitions can only be extended in a specific order, "left to right." If you open Disk Management on your PC (right-click your Windows 10 start button, then click disk management), you can view the arrangement of the partitions. Notice Disk 1 in the following picture:
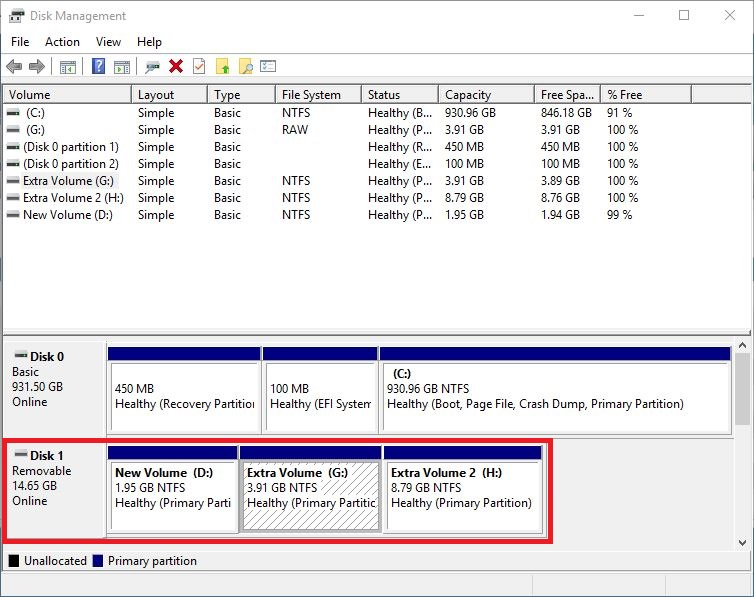
Disk 1 is a flash drive with three partitions on it. If we want to extend New Volume D, we have to erase and use Extra Volume G to do so, because it is to the immediate right. We cannot erase G and extend H into it from right to left, nor can we erase H and then extend D into it because G would be in the way. You can only extend left-to-right, into unallocated space. If you check the order of your partitions and you can't extend them because of the order they're in, there are third-party tools/software you can use to rearrange partitions, but there is some risk involved with those to where you could damage/corrupt a partition and potentially lose data on the drive. We won't go into those here.
Once you've determined your partitions are in the right order, first we want to list disk. Then, select the disk that has multiple partitions. In our example it's a flash drive showing as disk 1, so we select disk 1. Once you've selected the correct disk, type list partition and hit enter. This will give a breakdown of all the partitions that are listed on the drive.
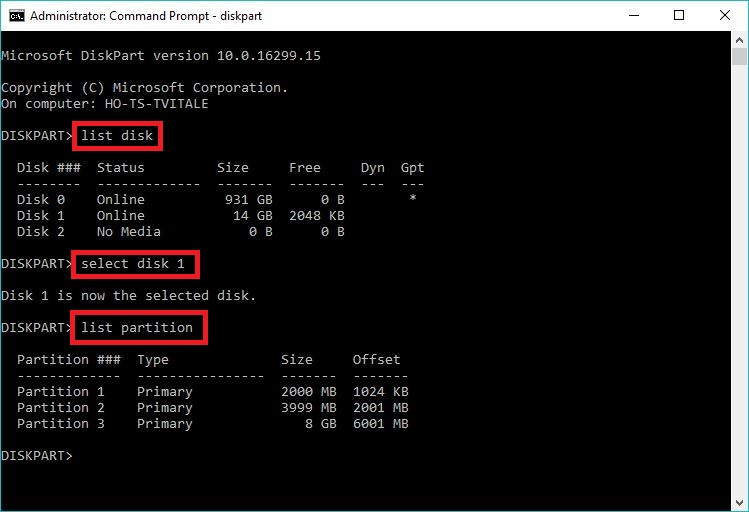
We then need to select the partition we want to delete. Our partitions are showing in numerical order as they're arranged left to right, and we want to extend our first partition, so the partition we need to delete is partition 2. Type select partition 2 and hit enter.
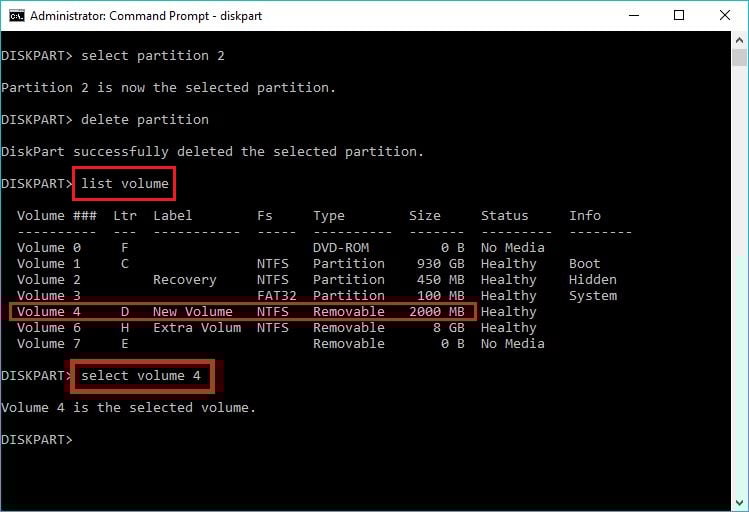
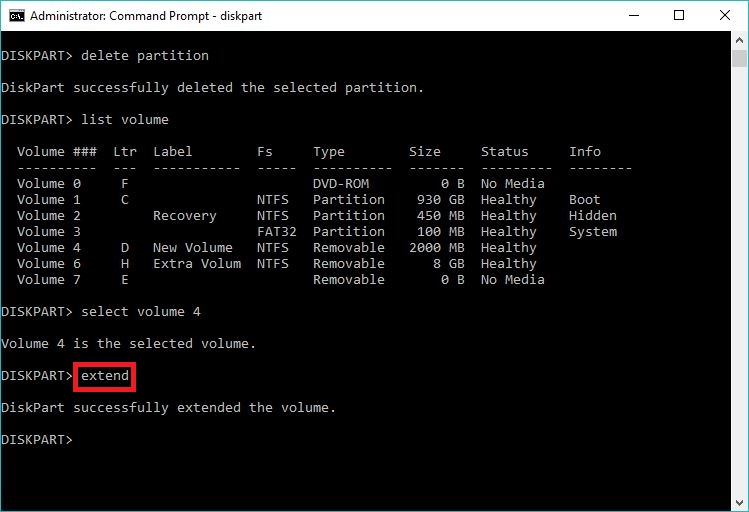
Once you've selected the right partition, type delete partition and hit enter. This will erase that specific partition from any formatting/data on it.

Now that we've deleted the partition, we can extend it, but first we have to list volume and select the correct one. The partition we just deleted won't show up in this list, but that's fine. In our case we're extending the 2000MB partition on our flash drive which is listed as the D drive, showing as Volume 4, so w type select volume 4 and hit enter.
Last, we type extend and hit enter. This will combine the space from the D partition into the unallocated space we created in the previous steps.
There are a lot of other things you can do with diskpart beyond this, but these are some of the more common options you may find useful.
How to open DiskPart
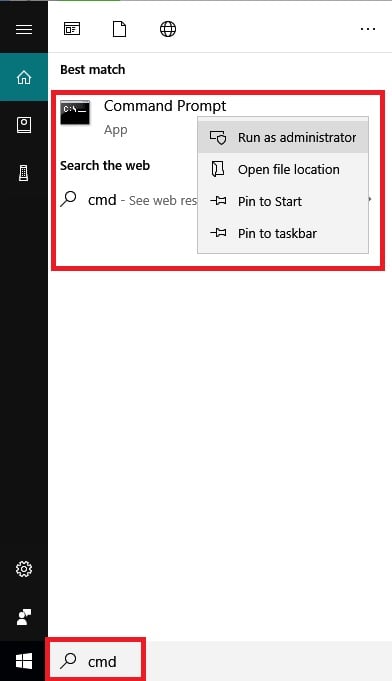
First, we need to open an administrative command prompt. Click on the search-bar next to your start button and type cmd. Right click Command Prompt at the top of the menu and select Run as administrator. If it asks "Do you want to allow this app to make changes to your device?" click yes.Once command prompt is open, type diskpart and hit enter. Some new lines will display showing you the diskpart version and a new line where you can start typing, you're now using the diskpart utility.
From here there are a number of different commands you can run. In the following sections I'll go over some of the more useful functions, but there are two commands we should get familiar with first: list disk and list volume. These commands are important because within diskpart you first have to list and select the drive or volume you need to manipulate.
List disk will display a list of the drives that are attached to your system. Internal hard drives, external DVD drives, flash drives, SD cards, anything that the computer would consider a "drive" will show up here. Just type list disk then hit enter.
List volume is similar to list disk but rather than showing whole drives, it will give a breakdown of the different partitions and volumes on the drives. You'll see some more detail about the volumes such as drive letters and file systems. Just type list volume and hit enter
Each command is used depending on what you're actually doing with diskpart. Now that we've got the main stuff out of the way, let's go over some of the most useful options, and don't worry, I'll make sure you know which list command to use.
Clean a drive
Clean is one of the best tools that diskpart has to offer: it completely erases a drive. While you can reformat a drive through File Explorer and Disk Management, sometimes a drive can have issues that will prevent those methods from working properly. Diskpart will usually be able to clean the drive even in those cases. Corruptions or errors in the formatting can cause all sorts of strange issues with a drive, like all the space not being available or being unable to read/write to it consistently. Cleaning is a good option when having issues like those as well. Reminder, cleaning completely erase a drive. If you clean the drive and the data on it is not backed up already, you will lose it.First, we want to list disk. Once you've done that, you need to select the disk you want to clean. In this example, we have a flash drive we want to clean which is showing as Disk 1. Type select disk 1 then hit enter.
Once you've selected the correct disk, type clean and hit enter.
You'll get a confirmation message if it was successful with cleaning the drive. Once it's cleaned the drive will be completely free of any formatting or partitions and you can reformat it as you need. If diskpart cannot clean the drive, there's a good chance it's starting to go bad.
Formatting
You can use DiskPart to format a blank drive as well. If you just cleaned a drive, you can continue on after the clean command finishes running. If it's a different drive, make sure you list and select the correct drive like we did at the beginning. Once you've done that, type create partition primary and hit enter.If you want to create a partition that only takes up part of the drive, you can adjust your command to create partition primary size=X, where X is the size in megabytes (1GB = 1024 megabytes). So if we wanted to create a 2GB partition, we'd type create partition primary size=2048.
Once you do that, you then need to type list partition and hit enter, then we need to select it from the list. In our example it's partition 1, so we type select partition 1
We then need to format the partition. The command is "format fs=(file system here) quick," just replace (file system here) with the desired format. You can use NTFS, exFAT and FAT32. NTFS is Windows' file system, exFAT and FAT32 are typically used for external storage devices like flash drives and SD cards. If you're using the drive with just a Windows machine, choose NTFS. If you're going to use it with more than a Windows machine, choose FAT32 or exFAT. exFAT is usually recommended since FAT32 is an older file system that has limitations on the size of the files you can store on it and the size of the partitions on the drive, but there are some cases where FAT32 may be necessary. We type quick at the end to perform a quick format. If you don't type quick you will perform a full format which will scan the drive for bad sectors (you can use this if you think the drive may be failing), however this takes much longer to run. In our example, we'll be reformatting the drive for use with a Windows computer and we know there's no issues with it, so we type format fs=NTFS quick and hit enter.
Once it's done formatting, type assign and it will automatically assign a drive letter to it, and the drive will now be recognized by your system like normal.
Reassigning drive letters
Every drive on your system will have some type of letter. The main drive with Windows on it is the C drive by defualt. You may have some external drives that show up with multiple other letters when they're plugged in. Windows automatically assigns a drive letter any time a new drive is attached, but you can use diskpart to change it if you wish.For reassigning drive letters, we want to list volume first and hit enter. Once you've listed the volumes, determine which volume matches the drive letter you want to reassign. In our example it's a USB drive with drive letter D, showing as volume 4, so we type select volume 4 and hit enter.
Once the volume is selected, to change the drive letter we type assign letter=(letter), just replace (letter) with whatever you want to use. We'll change it to the G drive, so we type assign letter=G and hit enter.
Deleting and extending a partition
DeletingIf you have a drive with multiple partitions, diskpart allows you to select and erase specific one. Under normal circumstances a drive is only going to have one partition unless you manually set it up to have multiple, but if you are in one of those situations this could be a useful tool. For example, if you have multiple partitions on a drive and are trying to merge them without doing a complete reformat, you can erase the extra partition and then extend the main one into it to combine them into one. You can only extend a partition into another one that is unformatted, which is why we have to delete the partition first.
One thing to note is that partitions can only be extended in a specific order, "left to right." If you open Disk Management on your PC (right-click your Windows 10 start button, then click disk management), you can view the arrangement of the partitions. Notice Disk 1 in the following picture:
Disk 1 is a flash drive with three partitions on it. If we want to extend New Volume D, we have to erase and use Extra Volume G to do so, because it is to the immediate right. We cannot erase G and extend H into it from right to left, nor can we erase H and then extend D into it because G would be in the way. You can only extend left-to-right, into unallocated space. If you check the order of your partitions and you can't extend them because of the order they're in, there are third-party tools/software you can use to rearrange partitions, but there is some risk involved with those to where you could damage/corrupt a partition and potentially lose data on the drive. We won't go into those here.
Once you've determined your partitions are in the right order, first we want to list disk. Then, select the disk that has multiple partitions. In our example it's a flash drive showing as disk 1, so we select disk 1. Once you've selected the correct disk, type list partition and hit enter. This will give a breakdown of all the partitions that are listed on the drive.
We then need to select the partition we want to delete. Our partitions are showing in numerical order as they're arranged left to right, and we want to extend our first partition, so the partition we need to delete is partition 2. Type select partition 2 and hit enter.
Once you've selected the right partition, type delete partition and hit enter. This will erase that specific partition from any formatting/data on it.
Now that we've deleted the partition, we can extend it, but first we have to list volume and select the correct one. The partition we just deleted won't show up in this list, but that's fine. In our case we're extending the 2000MB partition on our flash drive which is listed as the D drive, showing as Volume 4, so w type select volume 4 and hit enter.
Last, we type extend and hit enter. This will combine the space from the D partition into the unallocated space we created in the previous steps.
There are a lot of other things you can do with diskpart beyond this, but these are some of the more common options you may find useful.
Categories
- All Categories
- 1 The Blog
- 1 What's Trending
- 8K The Community
- 3.2K General Discussion
- 146 New Members
- 873 Consumer Tech
- 234 Prebuilt PCs and Laptops
- 168 Software
- 33 Audio/Visual
- 54 Networking & Security
- 4 Home Automation
- 5 Digital Photography
- 14 Content Creators
- 30 Hobby Boards & Projects
- 84 3D Printing
- 83 Retro Arcade/Gaming
- 62 All Other Tech
- 455 PowerSpec
- 2.6K Store Information and Policy
- 152 Off Topic
- 63 Community Ideas & Feedback
- 619 Your Completed Builds
- 4K Build-Your-Own PC
- 2.9K Help Choosing Parts
- 328 Graphics Cards
- 335 CPUs, Memory, and Motherboards
- 145 Cases and Power Supplies
- 54 Air and Liquid Cooling
- 51 Monitors and Displays
- 93 Peripherals
- 70 All Other Parts
- 65 Featured Categories
We love seeing what our customers build
Submit photos and a description of your PC to our build showcase
Submit NowLooking for a little inspiration?
See other custom PC builds and get some ideas for what can be done
View Build ShowcaseSAME DAY CUSTOM BUILD SERVICE
If You Can Dream it, We Can Build it.

Services starting at $149.99