Windows 10 Display Color Calibration Tips & Tricks
If you're not happy with how your monitor looks on your Windows 10 PC, you can use the built in calibration software to help you pick out some new settings for your monitor. The Windows 10 Display Color Calibration is a built-in tool that will walk you through step by step with various settings and changes that are available to get your monitor/display looking its best.
Here is how to go through the calibration:
1. Check your monitor manual on how to navigate the monitor calibrations. Depending on monitor, there will typically be a Menu button for monitor settings found somewhere on the physical monitor. This will vary by monitor, but commonly is found on the bottom or right side of the monitor.
The picture below is just an example of what this may look like on your monitor:

The monitor itself will have plenty of settings found in its menu that can be adjusted as well, so be sure to look through the various options / presets your monitor may offer.
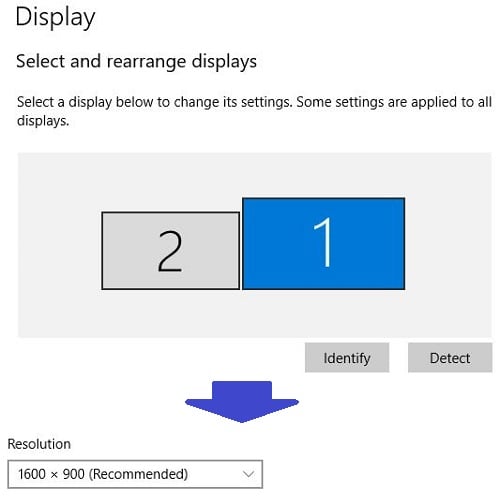
2. To continue with the Windows calibration settings, if you are running multiple monitor setups, make sure the correct monitor is selected first. Go into Display Settings by right clicking on the desktop and selecting Display Settings on the menu.

3. Under Resolution, click the drop-down box and choose the one with recommended in parenthesis beside it. If you have multiple displays, make sure you select each monitor in the Display Settings window and repeat this step.

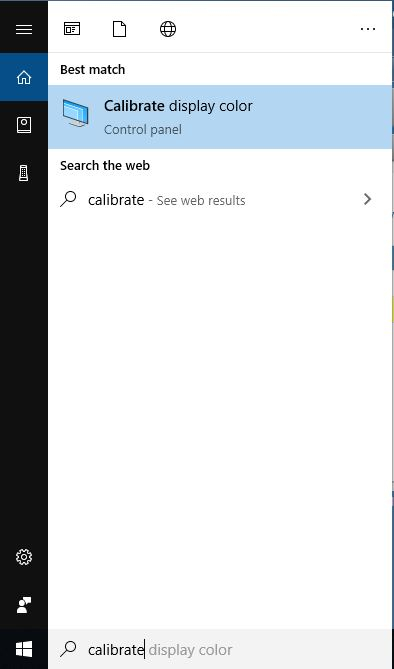
4. Click the search box by the Windows Start Menu and search for calibrate. Click on Calibrate display color.

5. Choose the best Gamma option. Gamma changes color values and the amount of light emitted for each value. Move the slider up and down to change any settings, then click Next to continue.


6. Choose the best brightness option. You will need to use the controls found on your monitor directly to adjust the brightness, and can use the reference picture to pick your preferring setting. Once finished, click on Next.


7. Choose the best contrast option. You will need to use the controls found on your monitor directly to adjust the contrast, and can use the reference picture to pick your preferring setting. Once finished, click on Next.

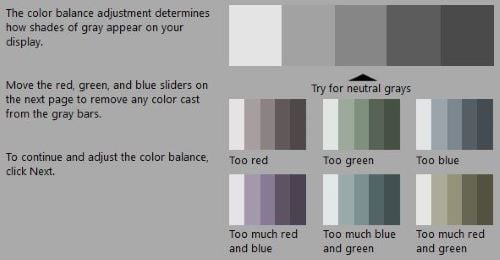
8. The next setting to be changed is for color balance, which allows you to change the color value for red, blue, and green. You will need to use the controls found on your monitor directly to adjust the contrast, and can use the reference picture to pick your preferring setting. Once finished, click on Next.


9. The final screen allows you to compare your previous settings with the new changes. Click Finish if you are satisfied with the new calibration or click on Cancel if you are not and wish to discard it.

Categories
- All Categories
- 1 The Blog
- 1 What's Trending
- 7.9K The Community
- 3.2K General Discussion
- 142 New Members
- 866 Consumer Tech
- 231 Prebuilt PCs and Laptops
- 167 Software
- 33 Audio/Visual
- 54 Networking & Security
- 4 Home Automation
- 5 Digital Photography
- 14 Content Creators
- 30 Hobby Boards & Projects
- 83 3D Printing
- 83 Retro Arcade/Gaming
- 61 All Other Tech
- 415 PowerSpec
- 2.6K Store Information and Policy
- 150 Off Topic
- 60 Community Ideas & Feedback
- 614 Your Completed Builds
- 4K Build-Your-Own PC
- 2.9K Help Choosing Parts
- 328 Graphics Cards
- 335 CPUs, Memory, and Motherboards
- 145 Cases and Power Supplies
- 54 Air and Liquid Cooling
- 49 Monitors and Displays
- 93 Peripherals
- 68 All Other Parts
- 65 Featured Categories
We love seeing what our customers build
Submit photos and a description of your PC to our build showcase
Submit NowLooking for a little inspiration?
See other custom PC builds and get some ideas for what can be done
View Build ShowcaseSAME DAY CUSTOM BUILD SERVICE
If You Can Dream it, We Can Build it.

Services starting at $149.99
