Configuring the Xinmotek Controller with Retropie


Configuring the Xinmotek controller with RetroPie is very easy, especially if you are using our distro from the Atari Games Card. If you’re not using our image, skip the first 2 sections of this article and complete section 3 before completing sections 1 and 2. If you are using out distro you only need to worry about sections 1 and 2. These instructions apply for prebuilt Dual Fight Sticks and arcade kits since they use a Xinmotek controller.
1. Emulation Station
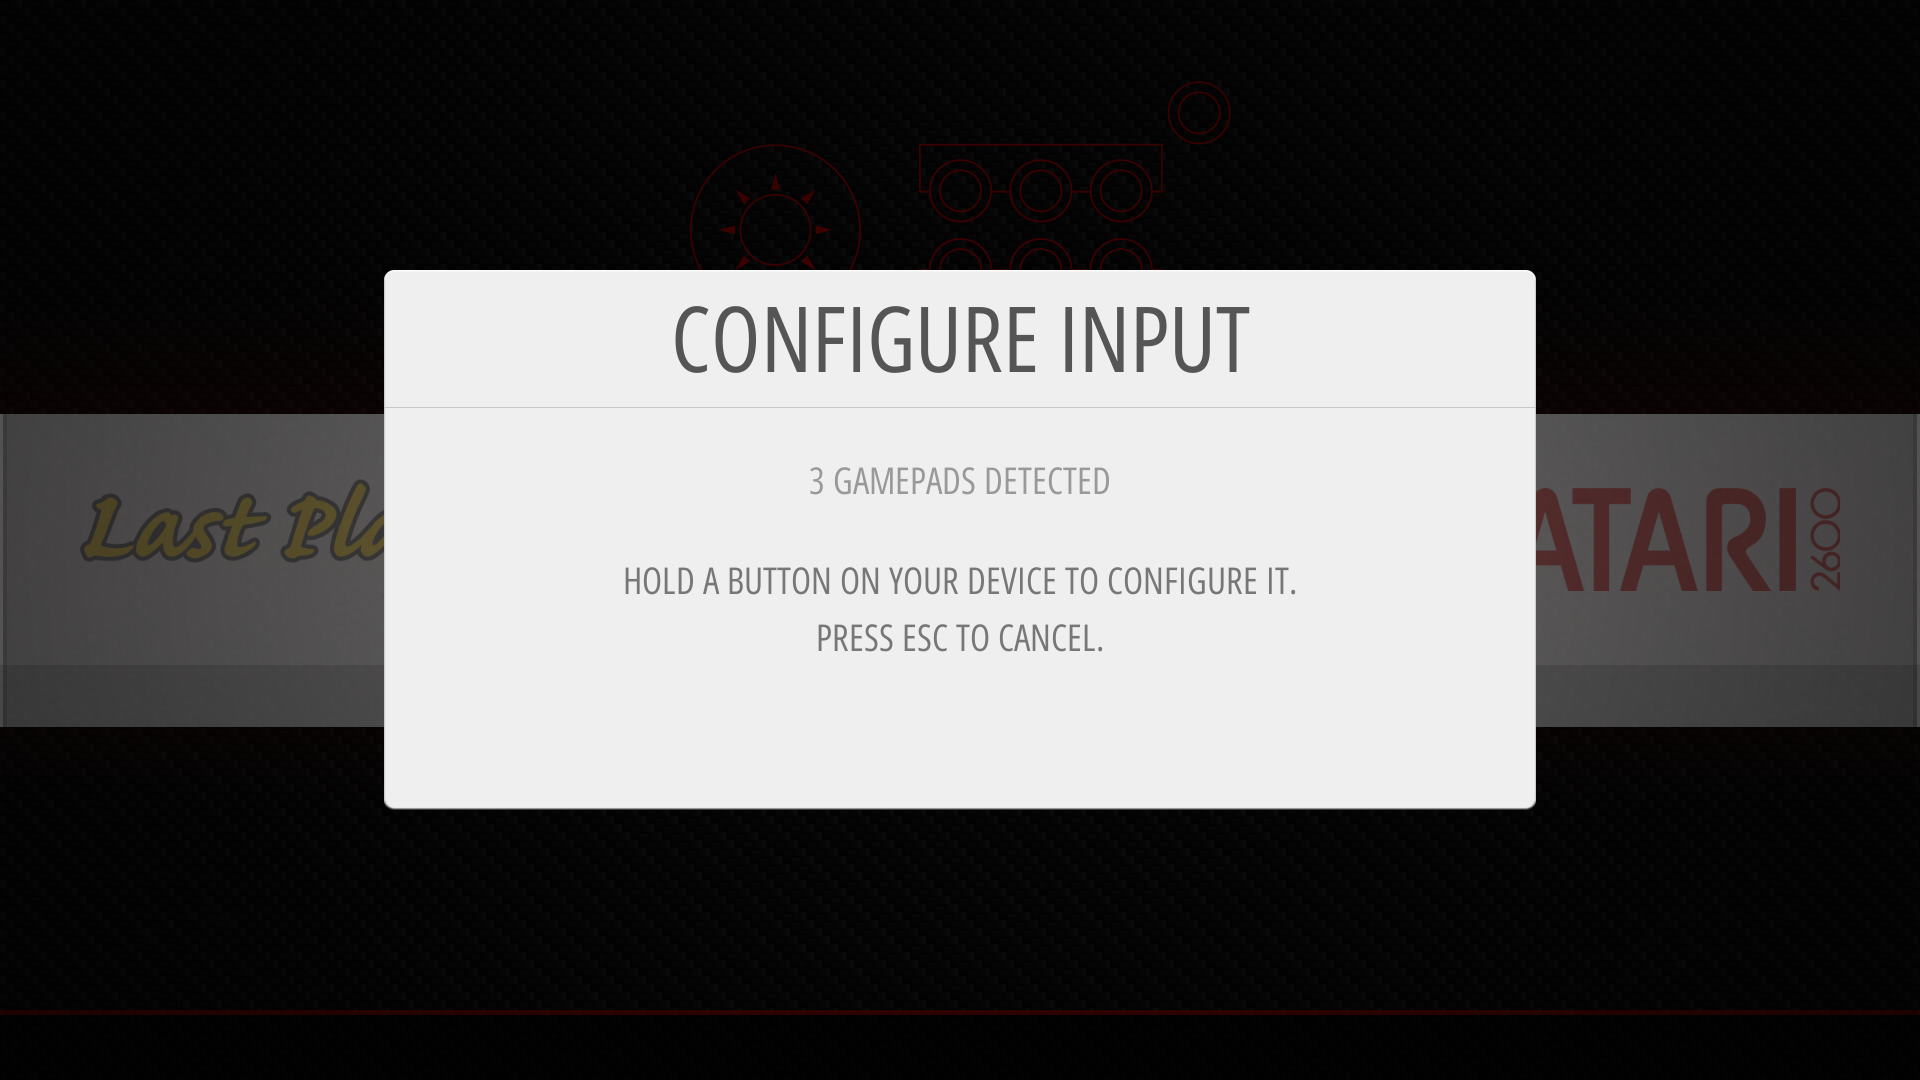
Press the start button on your controller and select “configure input”, then select “yes”.
You should see a window like this. Mine says 3 gamepads detected because I have another controller plugged in as well. If you only have a Fight Stick plugged in it should say 2 gamepads detected. If your fight stick or arcade control panel is seen as 1 gamepad, skip to section 3 then come back to the beginning.
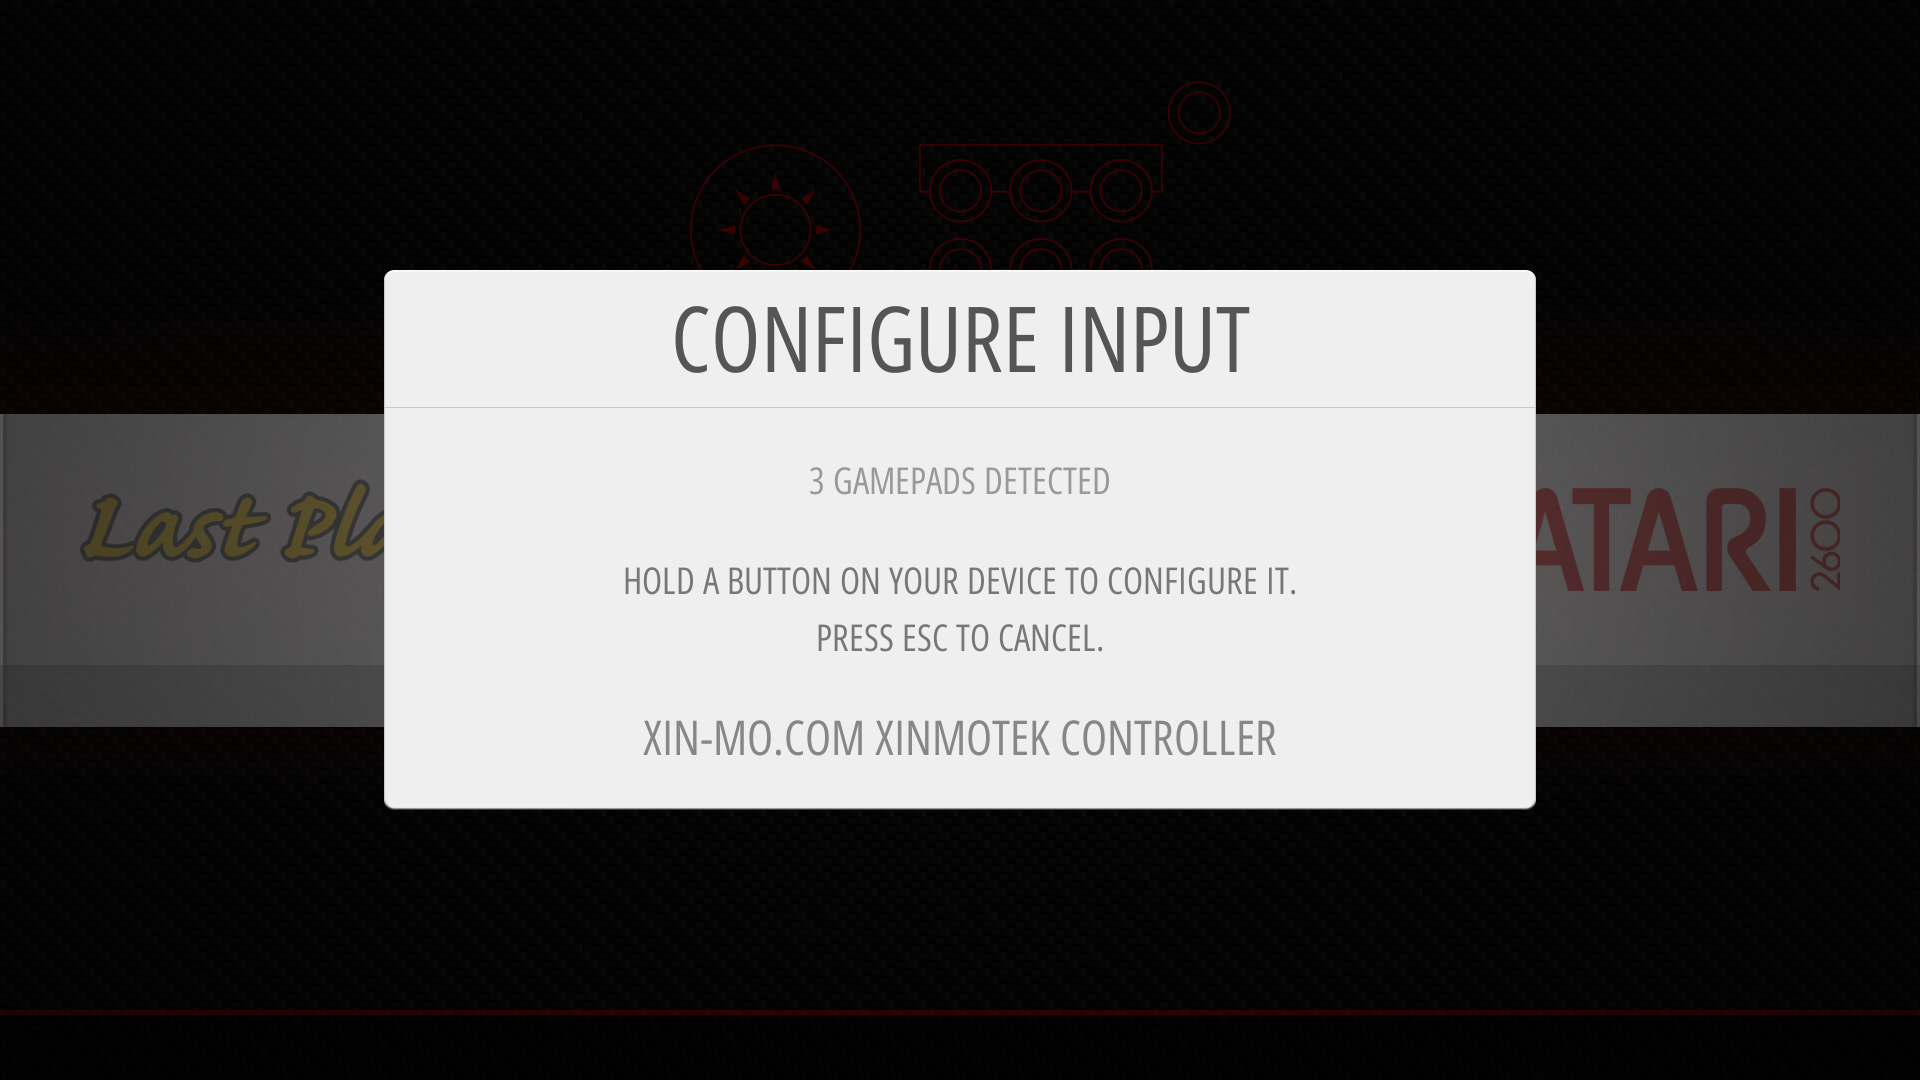
Press and hold any button on the fight stick. You should see the name “Xin-Mo.com Xinmotek Controller” appear in the pop up.
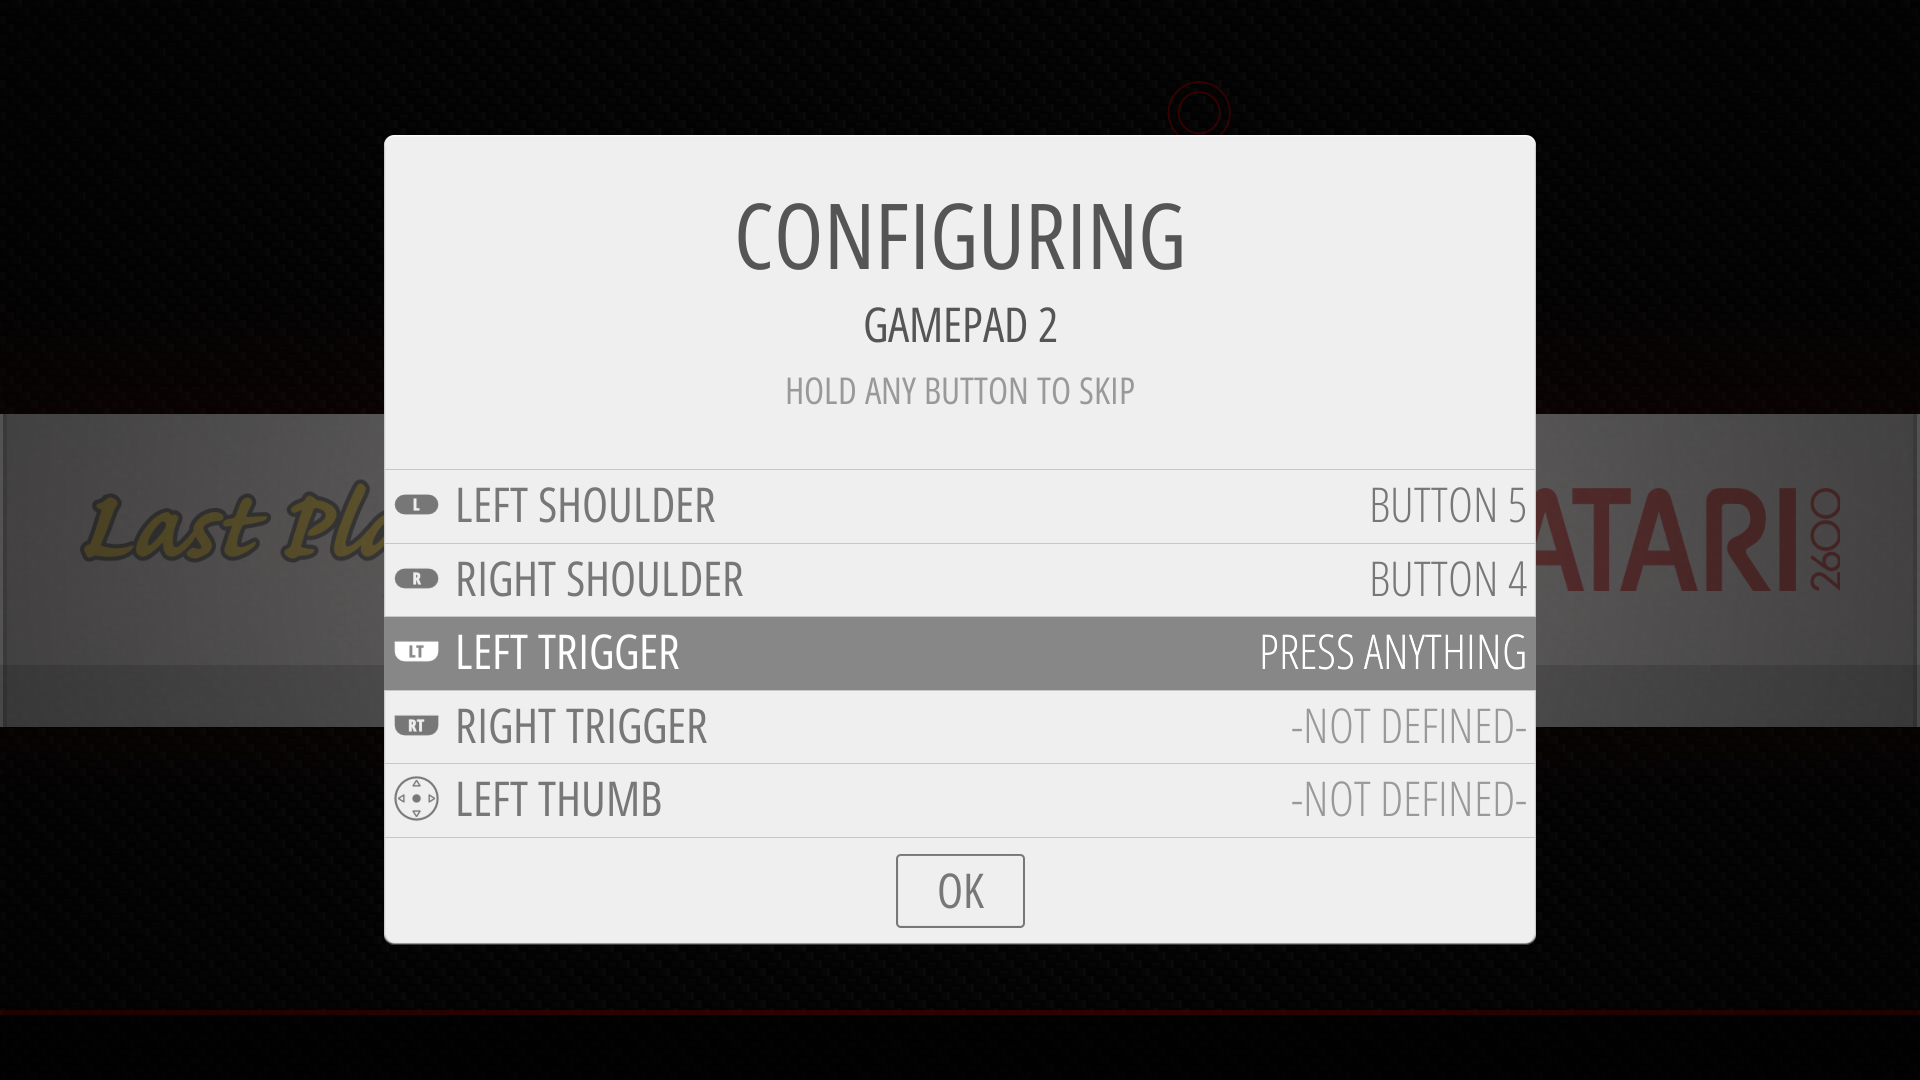
Press each button as it is listed. If you want to skip a control, press and hold any button. Each button is assigned a number, so you should see the list of controls populate with “Button x” as you fill in each control. You can’t map the same buttons to multiple controls.
If you skip “hot key enable”,
you’ll get the following message. Say yes. If you want to use a hotkey, you’ll
press select+hotkey. 
Repeat this process for any other controllers (including the second player's controls on your arcade or fight stick), then select quit and restart Emulation Station. If you press the wrong button as you’re mapping your controls you’ll need to redo the mapping from the beginning. There’s no easy way to return to a button you mapped previously.
2. RetroArch
Next we’ll map our controls in RetroArch. Scroll to the RetroPie icon and press A. Then scroll to RetroArch and press A.
Next, scroll to the gear icon, then to “inputs” and select “port 1 binds”. You should see the name of the controller (xin-mo.com Xinmotek Controller) listed in “Device Index” in the next window:

Scroll down to “Bind All” and press each button as they come up. You can wait a few seconds for the timeout if you want to skip a button. Use B to get back to the previous menu and repeat this process to set "port 2 binds" for player 2.

Hit B to return to the main menu, then select Configuration File under the RetroArch logo.

Select "save current configuration", then hit B, then select "Quit RetroArch:. This will take you back to EmulationStation. All of your controllers should now be mapped properly.
3. Adding 2 player support on RetroPie
The XinMo Co controller interface we use shows up as a single player on RetroPie. This can easily be fixed by adding a little information to a boot file. Boot to EmulationStation and plug in a keyboard. Press shift+f4 to open the terminal. Next, type
sudo nano /boot/cmdline.txt
Add the following text on the same line as any other text already there:
<p>usbhid.quirks=0x16c0:0x05e1:0x040</p>
For more information on the XinMo controller you can check the manufacturer’s website or the RetroPie documentation:
http://www.xin-mo.com/dual_player.html
https://retropie.org.uk/docs/Xin-Mo-Controller/
For reference, here’s a screenshot of cmdline.txt from our image after opening it in Nano:

And the raw text so it’s easier to read:
usbhid.quirks=0x16c0:0x05e1:0x040 dwc_otg.lpm_enable=0
console=serial0,115200 console=tty3 root=/dev/mmcblk0p7 rootfstype=ext4
elevator=deadline fsck.repair=yes rootwait loglevel=3 consoleblank=0
plymouth.enable=0
We have usbhid.quirks at the beginning of the line, but it can be at the end too. Everything needs to be on one line.
Hit ctrl+x to exit, then Y to save, then enter. Type “sudo reboot” to reboot the system. Your Fight Stick should now be seen as 2 controllers. Head back up to section 1 and map controls for each player.
Mapping and configuring your Xinmotek controller is a simple but important step in building your arcade system. By following the instructions above you’ll have your arcade up and running in no time whether you choose to use our RetroPie image from the Atari Games SD card or the base image available from RetroPie.
Comments
-
I am using the RetroPie image for the RPi3.
I have configured both controllers and both will move around in EmulationStation.
But when I start a game in Arcade (R-Type Leo) only the last controller configured works
If it's the 1st controller , then only P1 can play. If it was the 2nd controller, then only P2 can play.
None of the buttons or joystick for the other player work
In this directory, I only have one controller config file:
/opt/retropie/configs/all/retroarch/autoconfig# ls -ltotal 8-rw-r--r-- 1 pi pi 608 Aug 27 19:32 'xin-mo.com Xinmotek Controller.cfg'I feel like I should have two files, one for each set of controls.
Any help is much appreciated. -
@JHam Are you able to play other 2 player games (like Space Duel)?
There should only be one config file. The config files are for a brand and model of controller, not a particular controller. -
This method also worked in Lakka. Unfortunately Android RetroArch does not have a boot or cmd file. I cannot get the 2nd controller to work. Whats worse is I cant find a version of Lakka, Retropie, Emuelec, Batocera that boots up on a SD card for and Android TV box so I am using RetroArch from the Google Play Store. Any help would be greatly appreciated.
-
dream theater r u setting the controls up in mame as well? the direct emulator running the games? u can also setup the controls directly in mame 2003


Categories
- All Categories
- 1 The Blog
- 1 What's Trending
- 7.8K The Community
- 3.2K General Discussion
- 136 New Members
- 852 Consumer Tech
- 223 Prebuilt PCs and Laptops
- 165 Software
- 32 Audio/Visual
- 53 Networking & Security
- 4 Home Automation
- 5 Digital Photography
- 14 Content Creators
- 30 Hobby Boards & Projects
- 83 3D Printing
- 83 Retro Arcade/Gaming
- 61 All Other Tech
- 389 PowerSpec
- 2.6K Store Information and Policy
- 149 Off Topic
- 56 Community Ideas & Feedback
- 613 Your Completed Builds
- 4K Build-Your-Own PC
- 2.9K Help Choosing Parts
- 327 Graphics Cards
- 335 CPUs, Memory, and Motherboards
- 144 Cases and Power Supplies
- 54 Air and Liquid Cooling
- 47 Monitors and Displays
- 91 Peripherals
- 66 All Other Parts
- 64 Featured Categories
We love seeing what our customers build
Submit photos and a description of your PC to our build showcase
Submit NowLooking for a little inspiration?
See other custom PC builds and get some ideas for what can be done
View Build ShowcaseSAME DAY CUSTOM BUILD SERVICE
If You Can Dream it, We Can Build it.

Services starting at $149.99