Intel Memory Overclocking & Performance Tuning Guide


Contents
- (Page 1) Introduction
- (Page 2) Overclocking & Performance Validation
- (Page 3) Stress Testing & Stability Validation
- (Page 4) Conclusion
Part 1: Introduction
Welcome to my Intel memory overclocking & performance tuning guide. This guide will cover how to overclock your memory for the best performance and validate stability while doing so. There is a lot of information to cover so we will break this up into several parts to make the information easier to consume. Before we begin, let me answer a few questions you may have.
- What is overclocking?
- Overclocking is the act of increasing the performance of your components beyond that of their original specifications through various tweaks. For memory, this can be changes in both frequency AND timings.
- My memory has an XMP (Extreme Memory Profile), is this an overclock?
- Depending on the specific configuration of the profile, an XMP profile can be considered an overclock.
- Why would I want to overclock my memory if I already have an XMP profile?
- While XMP profiles offer a decent performance boost with little effort, they still leave a lot of performance on the table and XMP profiles are often not compatible with every CPU/motherboard configuration. A hand-tuned overclock will not only outperform an XMP profile, but will be far more compatible and tailor-made to your specific CPU/motherboard configuration.
- I hear overclocking is dangerous. Am I going to destroy my hardware by doing this?
- There are always risks when you force hardware to operate outside of their original specifications. With that said, memory is quite resilient and the information provided in this guide will include voltage values that are still within spec for both the memory and processor. As long as you do not deviate from these voltage values, the risk of harm to your memory should be no greater than an XMP overclock while offering a nice performance boost.
With those questions out of the way, let's move on to a brief summary on some of the terminology we will be using throughout the guide.
General Terminology: These are common words & phrases we will use throughout to describe your memory, motherboard slots and various memory-related technologies.
- RAM: Random Access Memory. This is the proper description of what desktop memory is.
- DIMM: Dual In-Line Memory Module. This is the correct terminology used to describe your "RAM Stick" or memory module.
- DIMM Slot: This is the correct choice of words used to describe the memory slots on your motherboard.
- IMC (Integrated Memory Controller): This is the portion of your processor responsible for controlling your memory.
- JEDEC: This stands for "Joint Electron Device Engineering Council". This group is responsible for defining the standards of memory speed. When we reference "JEDEC" in this guide, we are referring to "stock" values or those defined by standard specifications.
Voltages: There are a few different voltages we will need to pay attention to and adjust in order to stabilize our overclocks. These include:
- VDIMM (Sometimes called VDDQ or DRAM Voltage): This voltage is supplied from your motherboard directly to your memory DIMM's.
- VCCIO: This is the voltage for the path going into and out of the IMC.
- VCCSA (Sometimes called System Agent Voltage: This is your IMC and PCIe subdomain voltage.
For DDR3, typical voltages are 1.35v (DDR3L), 1.5v (JEDEC DDR3), and 1.65v (OC'd DDR3). Intel's max recommended voltage for DDR3 on Sandy/Ivy/Haswell, is 1.5v +5%, which is 1.575v. For DDR4, typical voltages are 1.2v (JEDEC DDR4), and 1.35v (OC'd DDR4). Intel's max recommended voltage for Skylake's DDR4 half of it's IMC is 1.2v + 5%, which is 1.26v. For the DDR3 half of Skylake's IMC, it's 1.35v + 5% which is 1.4175v. It is important to note that these are voltage recommendations, not requirements. Exceeding these voltages isn't inherently dangerous, it simply means that longevity has not been tested at voltages beyond what is specified. If you'd like to read my thoughts regarding these voltages and their "safety", click the spoiler below:
To address the giant elephant in the room: Yes, Intel said going above 1.35v will damage the IMC. You know what else Intel said? Going above 1.5v on Haswell would damage it's IMC. Don't believe me? Here's their own whitesheets:
Skylake: http://www.intel.com/content/www/us/en/processors/core/desktop-6th-gen-core-family-datasheet-vol-1.html (Go to page 116)
Haswell: http://www.intel.com/content/www/us/en/processors/core/4th-gen-core-family-desktop-vol-1-datasheet.html (Go to page 103)
You will see this for Skylake:
https://i.imgur.com/uiwroiy.jpg
Notice how it says Max VDDQ (VDIMM) = 1.35 +5%? This means your max "safe" VDIMM is 1.4175v. Pretty scary, huh?
Now let's look at Haswell:
https://i.imgur.com/zI4SYO0.jpg
Max is 1.5 + 5%. This means 1.575v is the max "save" VDIMM. Now tell me, how many people do you know of that ran 1.65v kits on their Haswell CPU's for years, without any issues? Under load, you typically see spikes of 1.7v on VDIMM on those kits. A massive 13.4% increase over their "safe" number. Meanwhile, 1.5v is only 11.2% over Skylakes "safe" number. To further put this myth to rest, I've been running 1.65v memory on a Core i5 6600T for several years now, and nothing has happened. No degradation, no random crashes, nothing. Chip still overclocks fine at 4.59ghz, and the memory itself is a super tight 2133 C9 kit with tight tertiaries. If anything, that IMC is under heavier stress than any normal XMP profile could ever provide.
My point is, Intel's standards are silly. We've all broken them in the past, and nothing bad happened then. Why everyone makes a big deal out of it, simply because it's Skylake/Kaby Lake/Coffee Lake, etc, is beyond me. Besides, I run my 3600 C14 DDR4 kit at 1.4v, which spikes to 1.44v under load. This is already outside of Intel's safe specs, and it's also doing just fine. If VDIMM could kill a CPU, i'd be the first to know.
For VCCIO/VCCSA, I do not recommend exceeding a value of 1.25v for each. I personally use a value of 1.14v for VCCIO, and 1.15v for VCCSA. Going beyond 1.25v is silly, and may potentially damage your IMC or traces on your board.
Primary Timings: These are timings that are normally listed on every sales page of your ram. They include:
- CAS Latency (tCL)
- RAS to CAS delay (tRCD)
- Row Precharge Time (tRP)
- RAS Active Time (tRAS)
- Command Rate (CR) (Note: Command Rate is not a timing, but it's listed under Primary Timings, so I included it here)
They are also commonly available to tinker on most chipsets, and are often made available for tuning in software like XTU.
Secondary Timings: These are timings that are seldom ever listed anywhere on a marketing page, but you can find them within your BIOS on some chipsets. They include:
- Write Recovery Time (tWR)
- Refresh Cycle Time (tRFC)
- RAS to RAS Delay Long (tRDD_L)
- RAS to RAS Delay Short (tRDD_S)
- Write to Read Delay Long (tWTR_L)
- Write to Read Delay Short (tWTR_S)
- Read to Precharge (tRTP)
- Four Active Window (tFAW)
- CAS Write Latency (tCWL)
Most of these timings are inaccessible on lower-end chipsets and more restrictive BIOS's. Very rarely will you have access to them on lower-end configurations, and even XTU lacks control over most of these timings.
Tertiary Timings: These are timings that are NEVER listed anywhere on a marketing page, and are different per motherboard/CPU IMC/ ram IC. They are generated by your IMC, after your board probes it repeatedly looking for a stable configuration. Some of you might have noticed your PC restarting a few times when installing new memory kits. These timings are often the cause of that, as they need special training in order for you to post properly. They include:
- tCKE
- tRDRD (_SG, _DG, _DD, _DR)
- tRDWR (_SG, _DG, _DD, _DR)
- tWRRD (_SG, _DG, _DD, _DR)
- tWRWR (_SG, _DG, _DD, _DR)
SG = Same Group, DG = Different Group, DD = Different DIMM, DR = Different Rank.
Very specific boards and chipsets will allow modification of these timings. They are by far one of the most important groups of timings you can adjust and are directly involved in improving your bandwidth efficiency. More on that later.
Round Trip Latency: Since these settings are not timings, and are not always listed under tertiary timings, I feel they need their own section, as they are probably the single most important settings you can adjust to see the biggest impact on performance. They include two settings:
- RTL (the title of this section should give you hints as to what this is)
- IO-L
As the title of this section hints at, Round Trip Latency is directly involved in how long it takes your ram to complete it's total cycles. The tighter this value is, the lower your overall latency is. Sounds great, right? Well, the problem is: literally every timing is associated with this setting, and tightening other settings, makes it harder to tighten this. It's also annoying to adjust, as you cannot adjust it without also adjusting IO-L settings (the two must be adjusted as a pair) and there is no secret formula for doing so. All I can tell you is: your RTL channels cannot be more than 1 apart in either direction. Example: If RTL of Channel A is 50, RTL of Channel B can be 51 or 49. It cannot be 52 or 48, as this will result in extremely terrible performance, or worse, system instability.
With the introduction out of the way, we can move on to why you are here...
Comments
-
Part 2: Overclocking & Performance Validation
Preparation: The very first thing I advise you do, is locate your CLEAR_CMOS button on your motherboard (if you have one) or put your system in a location that adjusting your CMOS jumpers/battery is easily accessible. You are certainly going to be using them, no exceptions. Next be sure to have your power supply's power cable near you. Sometimes, removing this and holding down the power button for 60 seconds, results in enough of a clear to allow you to get back into BIOS without completely resetting everything. Lastly, save all of your "pseudo-stable" profiles, so that you can continue to adjust them for better stability without starting over.
It's important to keep in mind that the information provided below based on an ASRock board but is universally applicable to all Intel-based motherboards. The names of certain timings/settings might differ slightly, but their functions will be identical. If you have questions during this process, feel free to comment down below.
Overclocking Time!: Now that we have the preparations out of the way, it's time to start tinkering. I recommend focusing on Frequency first, while keeping your primary timings the same. I personally dial in a vDIMM of 1.35v, and then I start increasing my memory frequency one memory strap at a time. If I was at 3000 C15, I would try 3200 C15, then 3333 C15, 3466 C15, and so on. When you reach a point to where it no longer posts, you have 3 options. Option 1: Throw more voltage at it. Option 2: Loosen your primary timings. Option 3: settle for last bootable configuration.
I advise trying option 1 first, as it might only take a little bit more vDIMM to make it stable. For example: My 3600 C14 profile is unstable at 1.35v, but stable at 1.39v. With modern XMP kits now launching at up to 1.5V on DDR4, this is still quite tame and most DIMM's will be perfectly fine with even bare minimum airflow at this voltage. Now, your VRM components near your ram on the motherboard, that's a different story entirely. Use common sense, and try to avoid going over 1.55v for 24/7 vDIMM and you should be fine.
Option 2 is what we call "compromising". You have to be careful when making compromises on timings for speed. The end must justify the means. If you gain a slight amount of bandwidth, but lose on latency at all, it's a bad trade. Memory is already so ridiculously fast in regards to bandwidth, that latency should ALWAYS come first in your mind. That being said, frequency can be just as good for latency as it is with bandwidth. It just takes a little balance. If you increase frequency while keeping timings the same, latency improves. If you loosen latency while increasing bandwidth, one of two things can happen:
- You have faster bandwidth, and latency remains the same as a result. This is a good trade with no negative side effects, so I tend to allow this.
- You gain bandwidth, but latency suffers. This is a terrible trade, and should never be made. Go back to your last configuration, and work on making that stable instead.
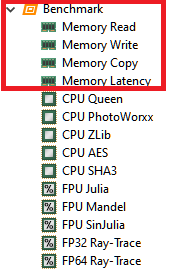
When making minor tweaks, I recommend using software like Aida64's memory bandwidth test (cachemem test) to see your gains in performance. Yes, I know it sucks using paid software, but it seriously helps with knowing whether or not your timings are making a positive or negative impact in performance.
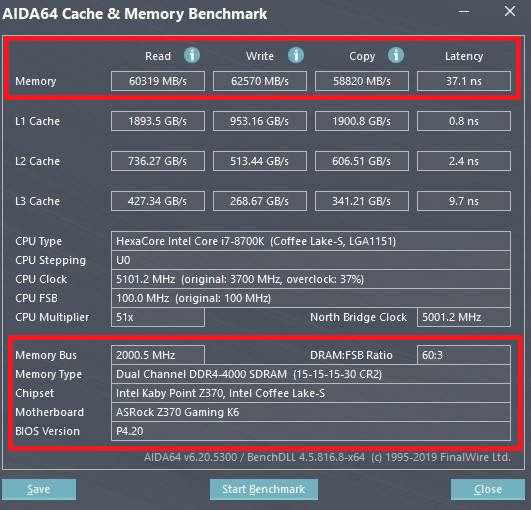
If you choose not to purchase AIDA64 or do not see yourself using the features often, you can use the individual benchmarks on the left hand side to get an idea of how your memory is performing. Still, if you want to be serious about this, I strongly urge you to consider this software. Outside of memory overclocking it has other fantastic features and it never hurts to support software developers.
Now that we've gotten frequency and primary timings taken care of, it's time for secondary timings. While you will see small gains from most of these timings, I want to focus on one very important secondary timing. tRFC. You see, memory is a matrix of billions of capacitors that need to be recharged. You have tRFC, a secondary timing, that works alongside tREFI, a tertiary timing. Every <tREFI>, they are recharged in order, for <tRFC> amount of time. Simply put: tRFC is the amount of time your ram can do nothing, while being recharged. tREFI = the amount of time your ram can do things, before needing recharged. Both are very important, and have significant impact on your latency. tRFC works best as low as you can get it, and tREFI functions best as high as you can get it. tRFC, for most people, is best left at 270, as it's the easiest value to keep stable while having the best gains in performance. tREFI on the other hand, can go as high as 65535 and provide much lower memory latency, but can potentially lead to corruption if your motherboard's quality is lackluster. The warmer your DIMMS, the more often they need recharged. If motherboard is bad, it can't recharge high enough to meet the required interval. Basically, if motherboard is bad, stick to the JEDEC standard of 7.8usec refresh interval. If your ram is 3000mhz, the formula is 1500 x 7.8 = 11700. If your ram is 3600mhz, the formula would be 1800 x 7.8 = 14040 tREFI.
There are other formula's for your secondary timings worth following, such as: tFAW = tRRD x 4. The others, they tend to take trial and error. Gain's can be small, or big, depending on whether or not you are using DDR3 or DDR4. I can say that with DDR4, the gains are not as massive as touching tertiary timings. Speaking of which...
Tertiary timings. Depending on your level of masochism, this will be the part you love the most, or absolutely dread. There is no in-between. As you saw above during the terminology half, tertiary timings tend to have a few suffixes after their name. These are SG, DG, DD, and DR. As for DD, these are related to 2DPC (DIMMS Per Channel) and only matter if you have 2 DIMMS per channel (ITX users rejoice, less complication) while DR matters when using multi-rank kits. It's easier to associate DR with "Dual Rank". If you have a single rank kit, touching _DR timings does literally nothing. No positive or negative, and no instability issues either. I recommend taking these one at a time, or at the very least, one group at a time. Focus on tRDRD (and all of it's suffixes), followed by tRDWR, and so on. Fun fact about tRDWR: these timings directly impact AVX. The tighter they are, the hotter AVX is. The looser they are, the cooler AVX is. Those of you that fear AVX, you might be able to use this to your advantage, and make those stress tests easier on yourself. I promise not to judge you.
Once you've finally settled on your tertiary timings, and have gone through countless hours of stress tests, it's time for the bane of my existence. RTL/IO-L's. I honestly cannot give you any better advice, other than "You gotta feel it". There is no magical value that I can tell you to dial in, and have it work. RTL has one very specific value it likes, and a few others that it "tolerates", and that's it. Either it works, trains poorly, or doesn't work at all. Now, with DDR4, we do have a trick up our sleeves to at least prevent it from training poorly. It's a very simple formula for a specific setting called "RTL Init". This formula is: IO-L + IO-L Offset + CL (x2) + 10. Let's say your IO-L is 4, and your offset is 21. You have a CAS Latency of 14. The formula would be: 4 + 21 + 14 (x2) + 10 = 63. Once you input 63 in the RTL Init setting, your IMC will no longer train RTL's beyond it's current threshold. This is great, as it at least prevents performance from getting worse. However, this is only a band-aid. You should still strive to find optimal settings for RTL/IO-L. That being said, do not beat yourself up dwelling on this. If you've gained significant strides in all other aspects of your ram, then feel proud of what you've accomplished. It's still worlds beyond what XMP can offer you, and you've gotten one step closer to mastering one of the most difficult "overclocking disciplines" there is.
-
Part 3: Stress Testing & Stability Validation
This part is always met with some sort of controversy, as everyone has their own way of doing things. That being said, I too have my own way, and it's the only way I've ever done it, so I'll have to stick by what I know. When making adjustments in your BIOS for timings or frequency, I always recommend running a full pass of memtest86. Memtest86 is not a stress test, but it will test things that can potentially show your IMC not liking your current memory configuration. I use it as a precursor to actual memory stress testing, as it helps prevent instant crashing in Windows due to IMC outright hating your memory configuration. We use memtest86 in two phases:
Phase 1: Full Pass
Phase 2: IMC Smackdown.
Phase 1 is pretty self explanatory. It's running memtest86, using all 13 tests. Phase 2 is where the fun begins, as we disable all tests excluding test 6, and run it several times. I personally do 10 runs of test 6, but feel free to do however many you wish to do. It will test different rows and addresses with each subsequent test, so the more you run it, the better your chances are for finding IMC/RAM incompatibility. This phase is critical when making adjustments to tertiary timings, as this test will find issues quicker than any other. When using Memtest86, make sure you hit C, and select "All Cores: Parallel". This will make the test go much quicker. Believe me, you will want to save as much time as you can, as memory overclocking takes a long time to validate 100% stability.
Next, we have my tool of choice for basically all forms of stress testing, Prime95. I know, some of you are scared when you see this come up. In fact, pretty sure I felt someone's heartbeat increase somewhere in the world due to the sheer mention of it. Relax. For this purpose, Prime95 is going to be 100% harmless. In fact, we won't be using an FFT size small enough for it to get hot, so you should be fine. If you are absolutely terrified, feel free to use the non-AVX version, as it shouldn't matter for ram stability (unless you are stress testing specific AVX-based tertiary timings, such as tRDWR_DD/DR, but more on that later. For now, let's focus on how to stress it. Open up Prime95 of your choice (I am currently using 28.10 as of this guide) and input the following settings:
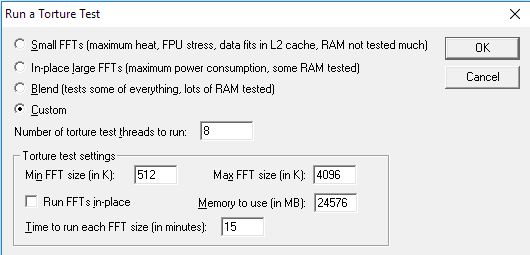
(Do note: Number of threads should be equivalent to the amount of threads available on your processor. For example, if you have an Intel 11700K, you would input 16 threads due to SMT/Hyperthreading)
Now, for "Memory To Use", make sure you enter your own value. I highly recommend 75% of your total capacity. If you have say, 16GB, then your capacity = 16 x 1024 - 25% = 12288MB. For 8GB, that value would be 6144MB. Since I have 32GB, I'll be using 24576 to stress test. Once this starts, let it run for several hours. I personally let mine run for about 8-12 hours, depending on how I feel and how much I've tinkered from my last stable profile, but I do not recommend running for less than 8 hours. I know it's tempting to cut corners, but memory instability is not a game you want to play. It can seriously corrupt your windows installation, and require a fresh install. Take this part seriously.
As for why we use the settings above, allow me to explain. 512k-1024k is hard on the IMC and IO lanes. 2048k+ is hard on your ram. By setting the range at 512-4096, we not only stress the IMC and IO Lanes, we also stress the memory itself. Be warned: 1344k and 2688k are also included in this range, and are the hardest stress on vCore. If your CPU is unstable by any means, it will fail this, and will likely hold you back on memory overclocking. Always make sure your CPU is 100% stable before attempting memory overclocking. The less variables involved, the better. For those of you with Haswell, and worried about that old myth of Prime95 killing CPU's, understand this. This range lacks 448k, which was the hardest FFT to test on FIVR. You should be fine here.
If the idea of Prime95 is still off-putting, you can use HCI Memtest and test 95% of your memory capacity to 200% or TestMem5 but I don't have too much experience with these tests so I can't really give you much advise on using them. The goal is to make sure your system is stable to meet your needs and I'd recommend erring on the side of caution here. You can never be "too stable".
As for when you should test for stability, that's entirely up to you. I like to overclock in small chunks so I'll start by creating a stable foundation and then tweak that slowly in small groups, stressing again to make sure it can be stabilized before wasting too much time on it. On the other hand, I know of many overclockers that prefer to wait until after they've dialed everything in before they begin stress testing, so it's pretty subjective.
-
Part 4: Conclusion
I am hoping that this guide made sense and that it wasn't too difficult to follow. I know that reading through it can be pretty daunting especially with the large glossary of timings, voltages and general terminology but honestly you do not need to know what anything does in order to adjust the settings to improve your performance. As long as you know what the "safe" values are and what not to exceed, you can pretty much wing it and still come out with a solid memory overclock. I plan to write supplementary guides explaining what each timing does and which ones are typically more impactful on performance so stay tuned for those. I also plan to write a guide specifically for AMD's Ryzen processors as the process is significantly different and warrants a different thread.
Lastly, I am hoping to see what you guys can do. Nothing gets me more pumped for overclocking than someone to compete against and I think it would be fun to show off what we can do, especially if you've just recently picked this up. Would be a great way to track your improvement over time. Looking back at some of my old overclocks, it's definitely a significant difference now compared to then.
Here is an example of my first time overclocking DDR4 back in 2015:

Here is an example of me overclocking DDR4 now:

If you asked my friends and myself a few years back, we would have thought that sub-40ns latency on DDR4 was impossible for 24/7 stability but it's most definitely possible. Here's to hoping we all keep improving. Just don't improve too much, I'd like to remain the best at something on this forum...
-
Wow, this has so much detail to it. I'll definitely be re-reading this to better understand the more complex details, but I think you've done a great job with it! Can't wait to try using this guide on my system!
-
Agree with this! Very helpful, thank you for posting this!
-
This is so freaking in-depth. I love it.
-
As a recent personal beneficiary of MageTank's memory overclocking expertise, I would encourage to basically treat this man's advice as Gospel and offer him sacrifices in the form of Dual-Rank Samsung B-Die memory kits.
-
Great information!


Categories
- All Categories
- 1 The Blog
- 1 What's Trending
- 8K The Community
- 3.2K General Discussion
- 145 New Members
- 873 Consumer Tech
- 234 Prebuilt PCs and Laptops
- 168 Software
- 33 Audio/Visual
- 54 Networking & Security
- 4 Home Automation
- 5 Digital Photography
- 14 Content Creators
- 30 Hobby Boards & Projects
- 84 3D Printing
- 83 Retro Arcade/Gaming
- 62 All Other Tech
- 438 PowerSpec
- 2.6K Store Information and Policy
- 150 Off Topic
- 61 Community Ideas & Feedback
- 616 Your Completed Builds
- 4K Build-Your-Own PC
- 2.9K Help Choosing Parts
- 328 Graphics Cards
- 335 CPUs, Memory, and Motherboards
- 145 Cases and Power Supplies
- 54 Air and Liquid Cooling
- 49 Monitors and Displays
- 93 Peripherals
- 69 All Other Parts
- 65 Featured Categories
We love seeing what our customers build
Submit photos and a description of your PC to our build showcase
Submit NowLooking for a little inspiration?
See other custom PC builds and get some ideas for what can be done
View Build ShowcaseSAME DAY CUSTOM BUILD SERVICE
If You Can Dream it, We Can Build it.

Services starting at $149.99