How to Access and Configure a Router

Configuring a Router
Nowadays, a wireless router is required for nearly every home. I personally do not know anyone that does not have one in their house. A lot of you purchase routers with a lot of great features but may not know how to use them. Even if you do not consider yourself an expert with computers, you can learn how to use them yourself. I will walk you through how to change some basic settings that will benefit you and anyone that is connected. I will also do my best to explain some of these settings and features so that you are aware of how the changes you make will affect you and your home network.
How do I access my router?
First, in order to change any settings, we must access and (usually) “sign-in” to the router. What do I mean by this? To access Facebook on a PC, you would type in facebook.com on your web browser and sign in to our account with a username and password. This process is similar to accessing your router. We are simply typing in the address to your router and signing in with a username and password. Make sure you are connected to the router with an ethernet cable or through Wi-Fi. Now, the first step is to find either the hostname to your router or the IP address to your router. The hostname for your router depends on the brand, would be something like ‘router.asus.com’ or ‘tendawifi.com’. The easiest way is to find this is directly on the router.
There is a label either on the bottom, side, or back of your
router. It should have things like hostname, IP
address, username, password, pre-shared key, and more. Find the label and take note of either the hostname or IP address,
whichever is available. For example, in the picture above, we can see the
IP address: 192.168.0.1. This is also a good time to write down the username
and password. You will need this later to log in to the router.
If you cannot find either one of these or are unsure, do not worry. I will show you another method for finding this.
Windows PC
We can easily use command prompt or Windows Powershell on your PC to find the IP address of your router. You can open command prompt by clicking the start button, then scrolling down your list of programs until you find Windows System. If you right-click on the start button, you can click Windows Powershell (See pictures below). You can search for either of these in the Windows search bar at the bottom of your screen.


Windows Powershell/Command Prompt
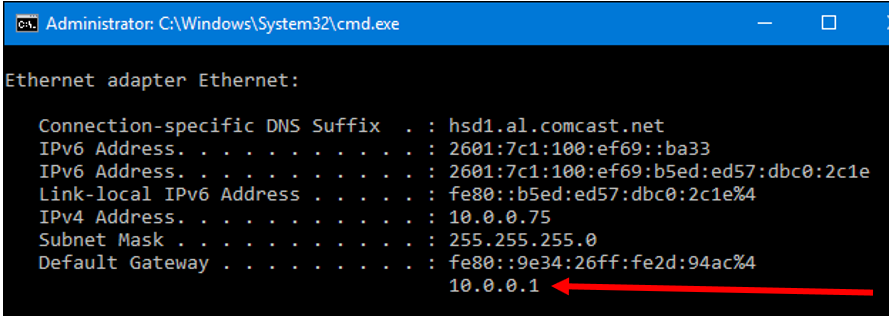
Once you have either of those open, just type in this command: ipconfig (see picture below). Once you enter 'ipconfig' with no spaces, hit Enter. Then your networking information will appear in command prompt or Windows Powershell.
**Just know if you are using command prompt then your screen should look identical to this. The only difference should be the username that I covered up.**

What we are looking for is the Default Gateway IP address. The default gateway, in this case, would be your router. You will type the IP address listed next to Default Gateway into any web browser (Chrome, Edge, Firefox, etc). You can see we used Command Prompt in the picture below. If you are using Windows Powershell, it will look the same but the windows will just have different colors.
**It is very likely that your IP address and default gateway will start with 192.168.xx.xx**

Signing into your Router

Once you have typed in the IP address of your router in your web browser (see picture above), you should see a screen similar to the picture below. From here you will need that username and password listed on your router. The password is typically something basic like ‘admin’, ‘1234’, or ‘password’. Remember this step because we will be changing the password later.

Once you have signed in, congratulations! You have successfully accessed your router. Take a moment to get familiar with the user interface and layout of your router settings. Be sure you don’t click save or apply on any pages so you don’t accidentally change anything.
If you try that username and password and it is not working or you have simply forgotten what it could be then you can reset the router back to original settings. You can find more information on how to do that here.
Navigating through your Router settings
Once you have signed into your router, you should see a screen similar to the one below. The first settings you should change are the password to both your router (the one you used to sign into it) and the password to your Wi-Fi (this is the password you would type in on all of your devices to connect them).
**Changing the Wi-Fi name or password WILL disconnect any device that you currently have connected. You will have to connect all of them again using the new password or to the new Wi-Fi name**
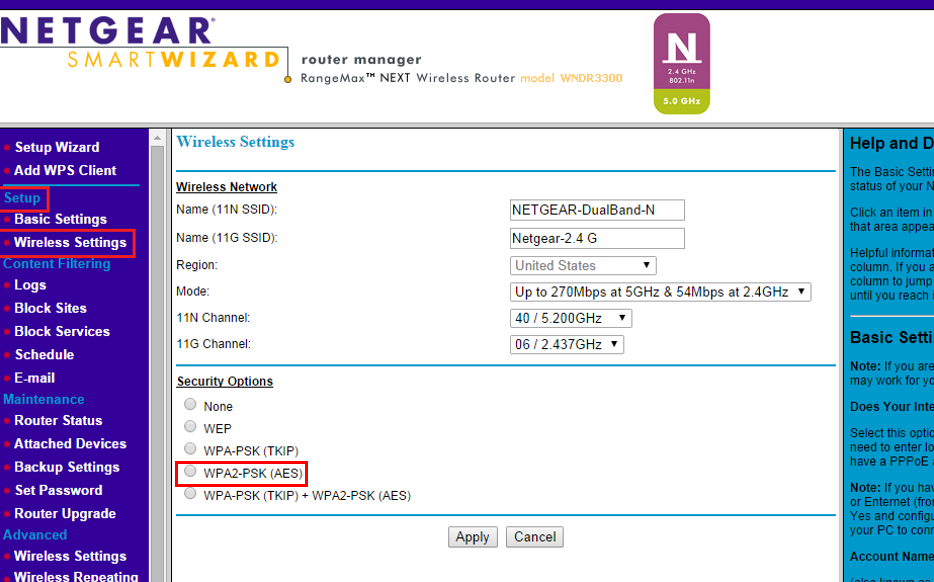
Now, to change the name of your Wi-Fi and the password, you will want to find Wi-Fi settings or Wireless Settings. Different manufacturers will have different labels for this so just look for those keywords. You can see the Asus router shows ‘Wireless’ under Advanced settings and the Netgear router lists it as ‘Wireless Settings’ under Setup. It can even be found under Security or Wireless Security.


Changing the Wi-Fi password
Once you have found the correct screen, you can change your password to whatever you would like. It is very important that you have a secure password for your Wi-Fi. Typically, a longer password = more secure. Adding symbols and numbers can also make it more secure. Be sure that WPA2 is selected as the security method. If you also have the option for ‘Encryption’ select AES. Once you have typed in your new password and selected these settings, click in ‘Apply’ or ‘Save’.
If you are currently accessing your router through Wi-Fi, it WILL kick you off after you change the password. You will just have to sign into Wi-Fi once the router restarts. After connecting to the router, you can type in the IP address of the router again and log back in.
One thing I have to mention is that many routers have 2 different Wi-Fi names that you can connect to. You may have noticed that your Wi-Fi names have ‘2.4G’ and ‘5G’ in the name. This is because your router can emit a Wi-Fi signal using different frequencies, these routers are called "dual-band". The 5 GHz band is faster and is better for most modern devices. However, the signal does not reach as far as the 2.4 GHz band. If you do not have a strong signal on the 5 GHz Wi-Fi then just connect to the 2.4 GHz. The reason I want to mention this is because you can set different Wi-Fi names and passwords for each of these. If you look in the pictures below, you will see the D-Link router has two different boxes to see the name, password, and security for each frequency. Make sure that you change the password to BOTH. You can use the same password or a different one for each frequency.


Changing the Router Password
The last thing we will do is change the password to your router. It is potentially the most important step in securing your home network. Just be sure you set a secure password for this but do not forget it! If you happen to forget this password, you will have to reset the router and reconfigure everything that you have already done.
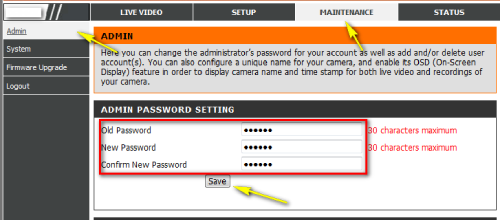
Now, this setting can be under different setting screens depending on your router. It could be found under Administration, Maintenance, Management, or Advanced settings. If you look at the pictures below, you can see that the setting is found under Administration then Management on a Linksys router. For the D-Link router it can be found under Maintenance then Admin. Also, you can see on the Linksys router, you have the option to change your username too. This is recommended if you have the option. Just remember after you type in your username and password to click on save or apply. Once the router restarts, you will have to log back into the router with the new username and password.


Now, you have successfully just made your home network more secure. Give yourself a pat on the back! Just remember to only give your Wi-Fi password out to people you trust and NEVER give anyone the password to your router. You can always change these passwords as often that you feel is necessary. Anytime you suspect someone is using your Wi-Fi without your permission, changing the password can solve that problem. They would be disconnected (along with all of YOUR devices) and would not be able to use your Wi-Fi again unless they got the new password.
I hope this helps a lot of you out there. Please comment below if you have any other questions! Thank you for reading.
Be sure to check out some more networking articles below!
Comments
-
You skip right into what shows on the command prompt, but you don't explain how you got the ip address info to show up. Maybe include those steps for users that are unfamiliar with this process entirely and don't know how to use commands? Just a suggestion, otherwise a very helpful tutorial. Good Job!

-
@StarkContrast We haven't received any feedback regarding that so we highly appreciate this! I'll inform the author of this article so we can get some instruction created to break down those stepsStarkContrast said:You skip right into what shows on the command prompt, but you don't explain how you got the ip address info to show up. Maybe include those steps for users that are unfamiliar with this process entirely and don't know how to use commands? Just a suggestion, otherwise a very helpful tutorial. Good Job!

-
As Alex mentioned above, we really appreciate your feedback. I added a few instructions to that section of the guide along with a screenshot. Let me know if these changes make the guide easier to follow.StarkContrast said:You skip right into what shows on the command prompt, but you don't explain how you got the ip address info to show up. Maybe include those steps for users that are unfamiliar with this process entirely and don't know how to use commands? Just a suggestion, otherwise a very helpful tutorial. Good Job!
-
I'm new to most of this process, so I did find it most educational. Thank you so much for posting this for us all.
-
Hello! I recently moved to LA with some college friends and the house we are in is a bit whimsical meaning that it was originally two separate houses, each with their own separate circuit breakers and systems. The owner decided to combine the houses into one without putting the whole house on the same breaker. The problem we face is we can only find ethernet access on one of the systems and not the other. We are all interested in hardline adapters for our pcs because we game and do video editing on a regular basis. Is there a way to set up a hardline or a workaround for this problem? any info would be greatly appreciated!
-
You can use something like a network switch to allow multiple connections to a single hard line and run everything through that. You'll have to run the cables for it but it's definitely an option. Unfortunately powerline adapters will probably not work since the two halves of the house are on separate circuits.lehman721 said:Hello! I recently moved to LA with some college friends and the house we are in is a bit whimsical meaning that it was originally two separate houses, each with their own separate circuit breakers and systems. The owner decided to combine the houses into one without putting the whole house on the same breaker. The problem we face is we can only find ethernet access on one of the systems and not the other. We are all interested in hardline adapters for our pcs because we game and do video editing on a regular basis. Is there a way to set up a hardline or a workaround for this problem? any info would be greatly appreciated!
You could also try contacting your ISP to see if they could set up another hard line on the other side of the house if the network switch isn't a viable option. However, that may entail paying for two different plans.
Categories
- All Categories
- 1 The Blog
- 1 What's Trending
- 7.9K The Community
- 3.2K General Discussion
- 142 New Members
- 867 Consumer Tech
- 230 Prebuilt PCs and Laptops
- 167 Software
- 33 Audio/Visual
- 54 Networking & Security
- 4 Home Automation
- 5 Digital Photography
- 14 Content Creators
- 30 Hobby Boards & Projects
- 83 3D Printing
- 84 Retro Arcade/Gaming
- 62 All Other Tech
- 413 PowerSpec
- 2.6K Store Information and Policy
- 150 Off Topic
- 60 Community Ideas & Feedback
- 614 Your Completed Builds
- 4K Build-Your-Own PC
- 2.9K Help Choosing Parts
- 328 Graphics Cards
- 335 CPUs, Memory, and Motherboards
- 146 Cases and Power Supplies
- 54 Air and Liquid Cooling
- 49 Monitors and Displays
- 93 Peripherals
- 68 All Other Parts
- 65 Featured Categories
We love seeing what our customers build
Submit photos and a description of your PC to our build showcase
Submit NowLooking for a little inspiration?
See other custom PC builds and get some ideas for what can be done
View Build ShowcaseSAME DAY CUSTOM BUILD SERVICE
If You Can Dream it, We Can Build it.

Services starting at $149.99

