Be sure to check out some more networking articles below!
How to Troubleshoot Network Problems 2020 [Guide]
How to Boost Your WiFi Signal
How to Access and Configure a Router
How to manually set your DNS server in Windows 10
This discussion has a more recent version.
Ian
✭✭✭✭✭


Many companies and services offer their own DNS servers that can be used. If you are interested in using one of these DNS servers, you will need to set up your PC to manually configure to that server.
This article will show you how to manually setup a DNS server on your Windows 10 PC:
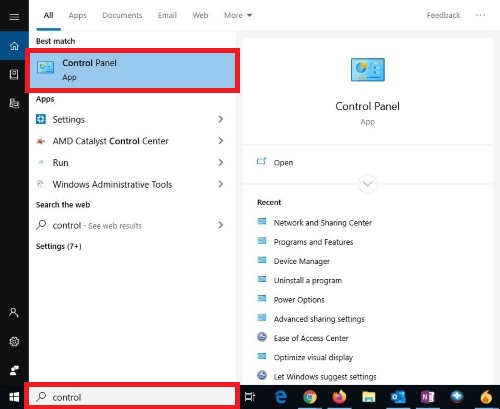
2. Click Network and Internet in Control Panel.
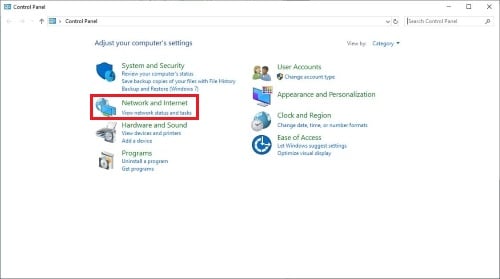
3. Click Network and Sharing Center.
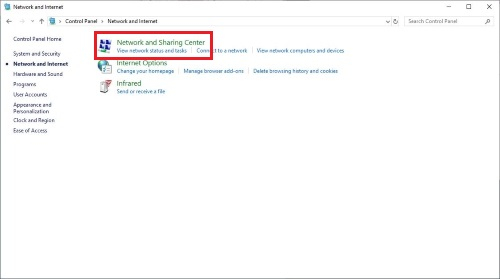
4. Next click Change adapter settings.
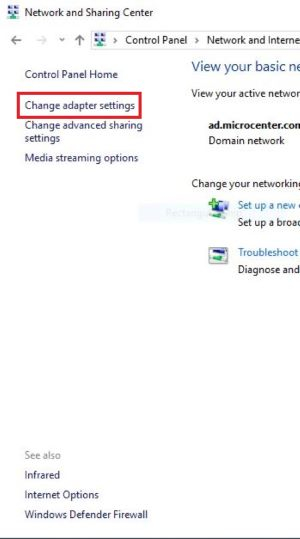
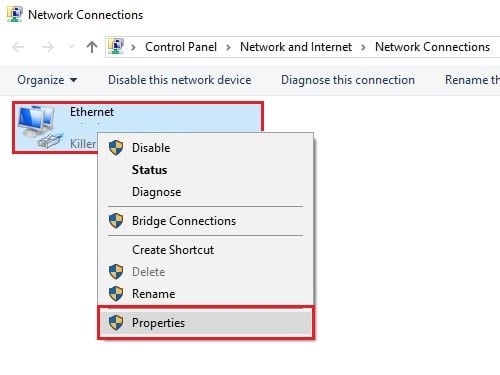
5. Right click on either “wireless” or “Ethernet,” then click Properties.
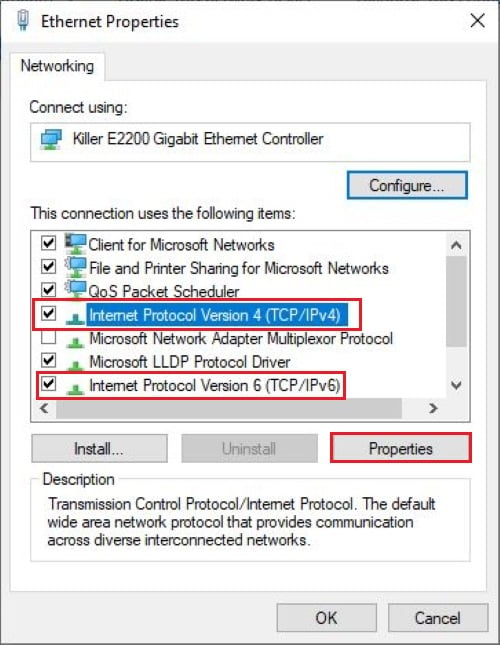
6. Under the Networking tab, select Internet Protocol Version 4 (TCP/IPv4) or Internet Protocol Version 6 (TCP/IPv6).
7. After selecting the IPv4 or 6, click Properties.
8. Select Use the following DNS server addresses.
Now type in the IP addresses of the new DNS server
Example: Google Public DNS server
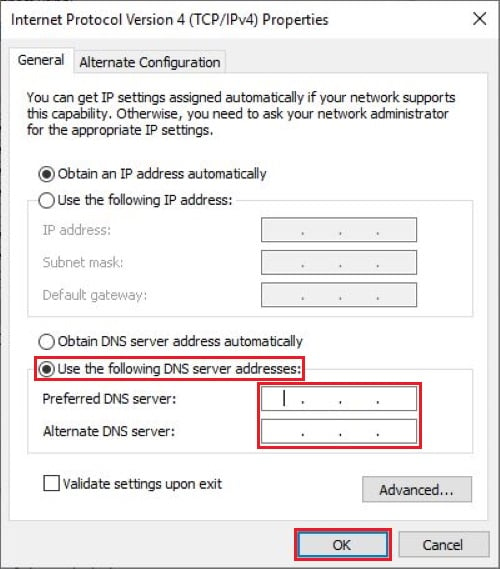
9. After entering the new DNS server, click OK.
10. Restart your PC to complete the changes.
This article will show you how to manually setup a DNS server on your Windows 10 PC:
- Go to Control Panel. Search for it on your PC by clicking on the Start button or where it says "type here to search" and type in Control Panel.

2. Click Network and Internet in Control Panel.

3. Click Network and Sharing Center.

4. Next click Change adapter settings.

5. Right click on either “wireless” or “Ethernet,” then click Properties.

6. Under the Networking tab, select Internet Protocol Version 4 (TCP/IPv4) or Internet Protocol Version 6 (TCP/IPv6).
7. After selecting the IPv4 or 6, click Properties.

8. Select Use the following DNS server addresses.
Now type in the IP addresses of the new DNS server
Example: Google Public DNS server
- IPv4: 8.8.8.8 and/or 8.8.4.4
IPv6: 4860:4860::8888 and/or 2001:4860:4860::8844

9. After entering the new DNS server, click OK.
10. Restart your PC to complete the changes.
Categories
- All Categories
- 1 The Blog
- 1 What's Trending
- 7.9K The Community
- 3.2K General Discussion
- 143 New Members
- 867 Consumer Tech
- 231 Prebuilt PCs and Laptops
- 167 Software
- 33 Audio/Visual
- 54 Networking & Security
- 4 Home Automation
- 5 Digital Photography
- 14 Content Creators
- 30 Hobby Boards & Projects
- 83 3D Printing
- 83 Retro Arcade/Gaming
- 62 All Other Tech
- 417 PowerSpec
- 2.6K Store Information and Policy
- 150 Off Topic
- 61 Community Ideas & Feedback
- 614 Your Completed Builds
- 4K Build-Your-Own PC
- 2.9K Help Choosing Parts
- 328 Graphics Cards
- 335 CPUs, Memory, and Motherboards
- 145 Cases and Power Supplies
- 54 Air and Liquid Cooling
- 49 Monitors and Displays
- 93 Peripherals
- 68 All Other Parts
- 65 Featured Categories
We love seeing what our customers build
Submit photos and a description of your PC to our build showcase
Submit NowLooking for a little inspiration?
See other custom PC builds and get some ideas for what can be done
View Build ShowcaseSAME DAY CUSTOM BUILD SERVICE
If You Can Dream it, We Can Build it.

Services starting at $149.99
