How to Use StreamLabs OBS (SLOBS)


You’ve built your computer, picked out your streaming accessories, and are ready to start streaming! But one question lingers: how do I get what’s on my screen onto Twitch? The answer is Open Broadcast Software, or OBS, a program that will capture footage from your computer and display that online. The most common is Open Broadcast Software, for which the platform is named, and StreamLabs OBS (SLOBS). Streamlabs OBS is a modified version of OBS with StreamLabs functionality baked in, and because of that, making the setup is similar. However, Streamlabs adds several tools and enhancements to make it easier for new-comers to use. So, if you’re looking to get into streaming, we recommend starting with SLOBS.
Now, let’s break down how to do that.
How to Connect SLOBS to Twitch, YouTube, and Facebook
How to Setup StreamLabs OBS:
1) Upon launch, you will be prompted to connect to the account of one of three platforms: Twitch, Youtube, and Facebook. If you’re looking to get started quickly, link an account here. If you would like to manually set up your connection/Stream Key, you can also click Skip and jump to step 3.
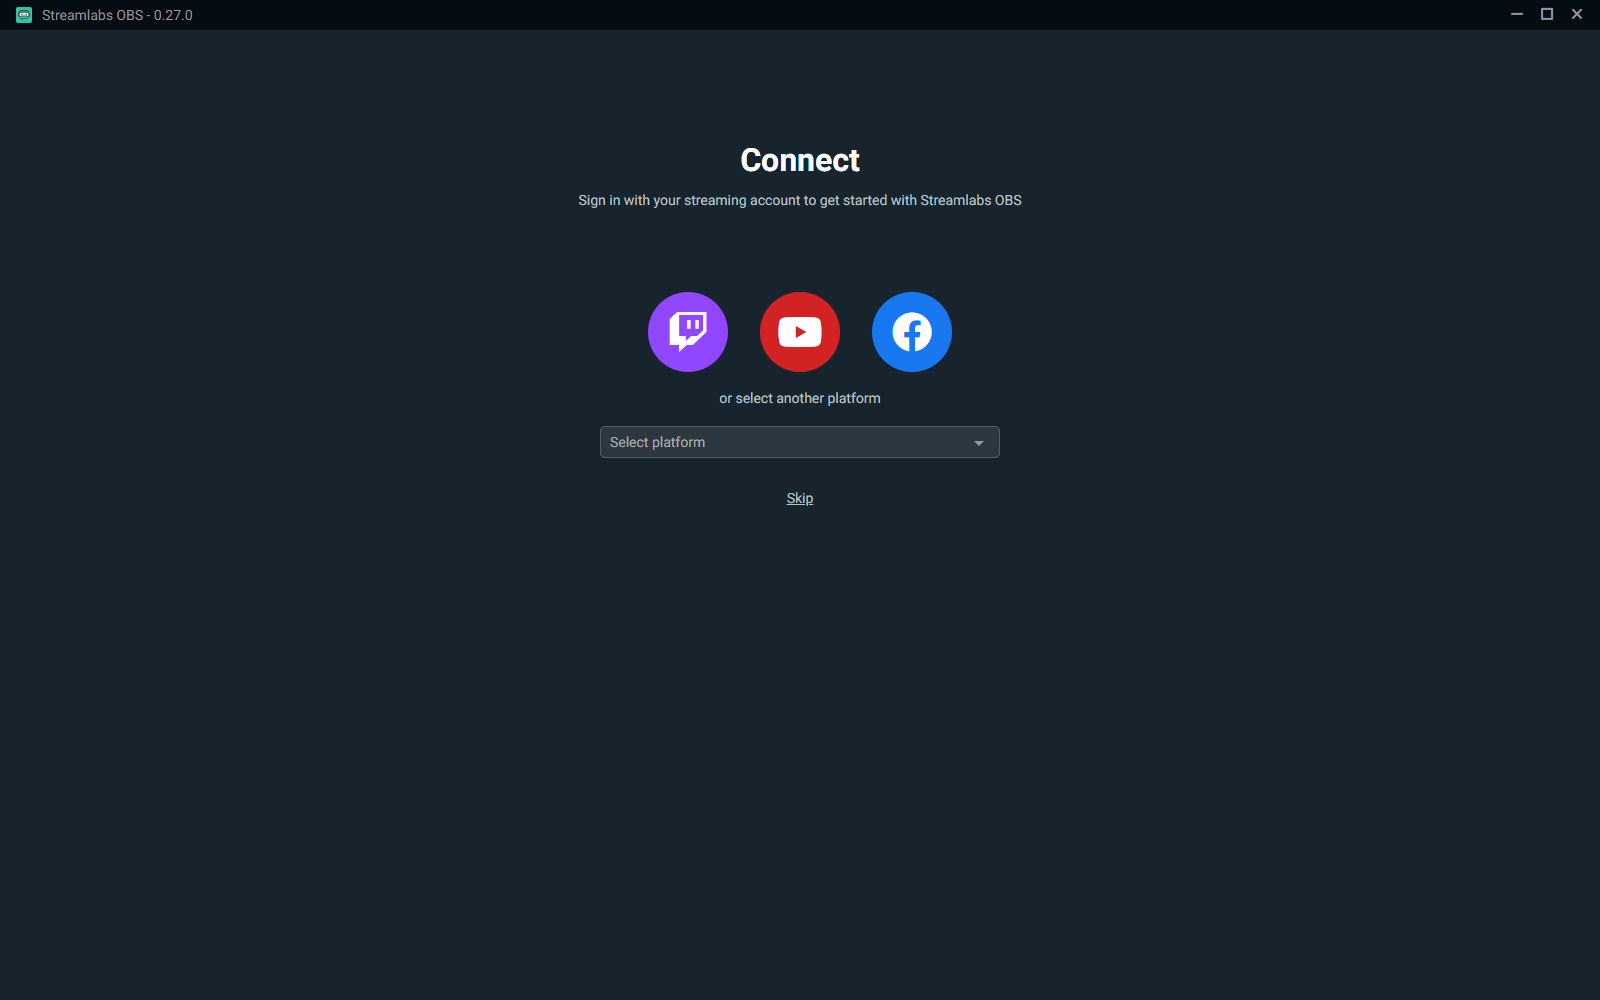
2) After you connect your account, you will be prompted to either go with a Starter or Prime plan for Streamlabs OBS. Prime offers additional features and more customizability for the cost of $12 a month.

3) You will then be prompted with either Import from OBS or Start Fresh. Select Start Fresh unless you already have OBS settings saved.

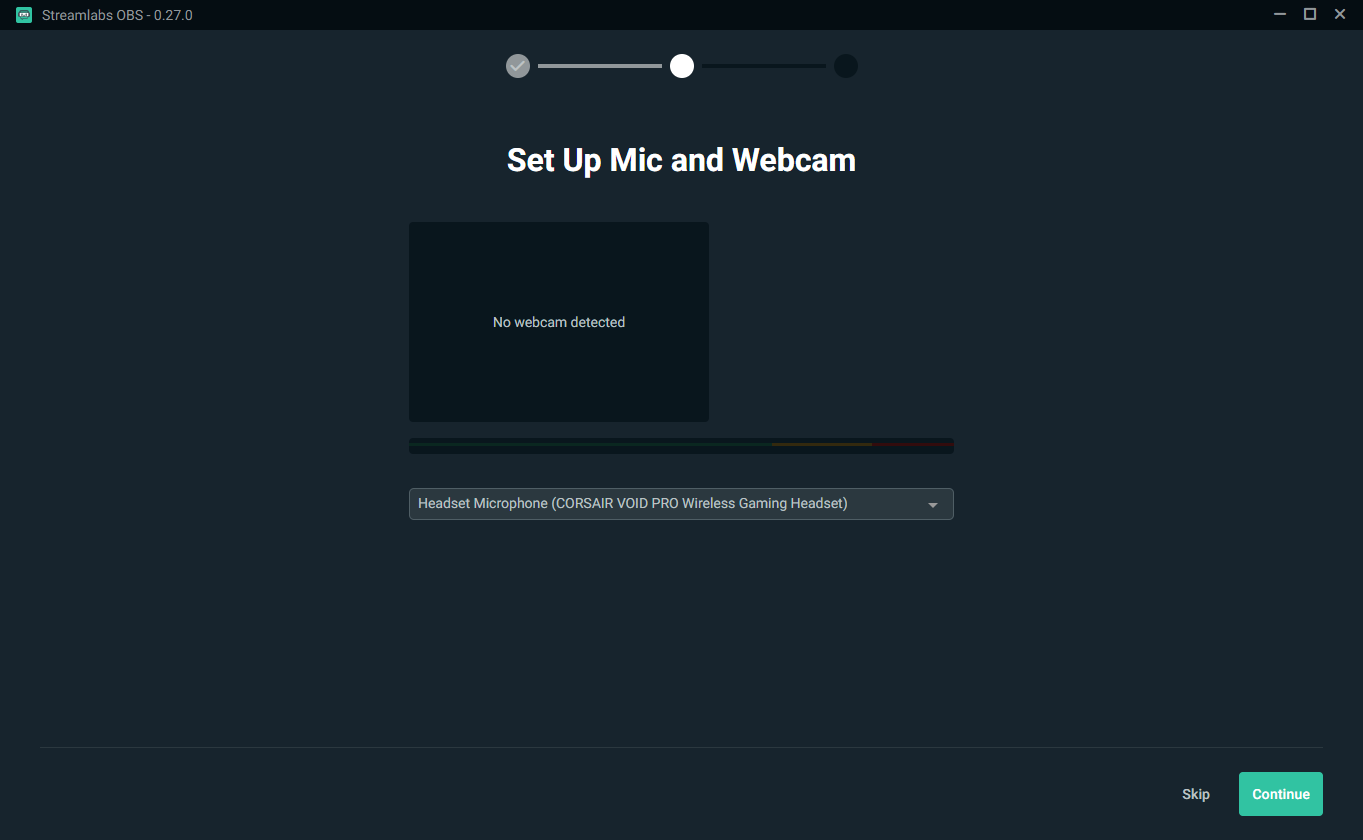
4) It will then look for a webcam and a microphone automatically. Check your settings to make sure they are picking up the correct microphone and webcam. You can also skip this step for any reason, including missing equipment.
5) SLOBS will then ask you to pick a Theme for your stream. You can select one of the six here or skip this step. Themes are preset designs for your stream and a good start if you wanted to set up some fancy overlays.

Creating Your Scene
Next, with your account connected now, we need to set up our SLOBS to capture the game and our voice.
First, a clarification: there are Scenes and Sources. Scenes are preset formats of sources, and sources are what your stream will use and display. Each scene will keep its sources, and you can change your scenes based on the activity you are doing on your stream, and it will change the sources to the preset settings for that scene.
Example:
You design your first scene to be your “gaming” scene, positioning your webcam in the bottom right, a chat window in the top left, and a game, or source, occupying the rest of the space. After an hour, you decide it’s time to take a quick 10-minute break. You can change your scenes to a static intermission screen. When you return, all you need to do is return to the original scene, and everything will be as you left it.
Now to create your first scene. We’ll be making a gaming scene, but this works for most streaming content.
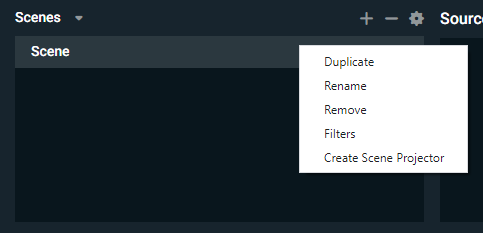
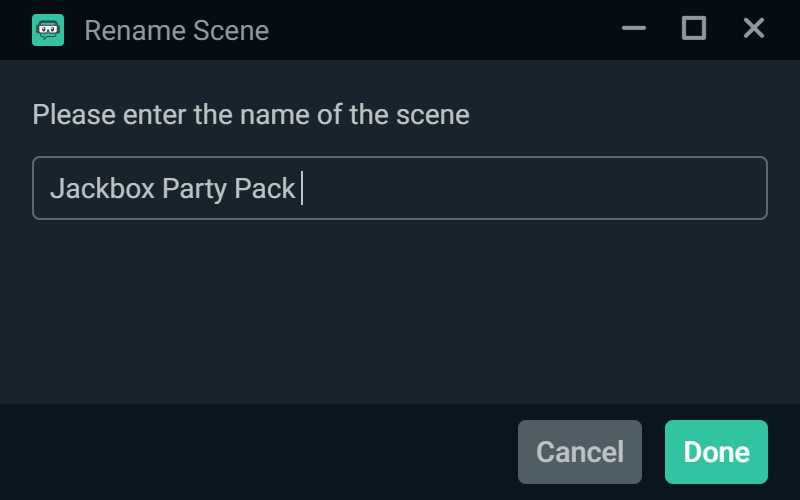
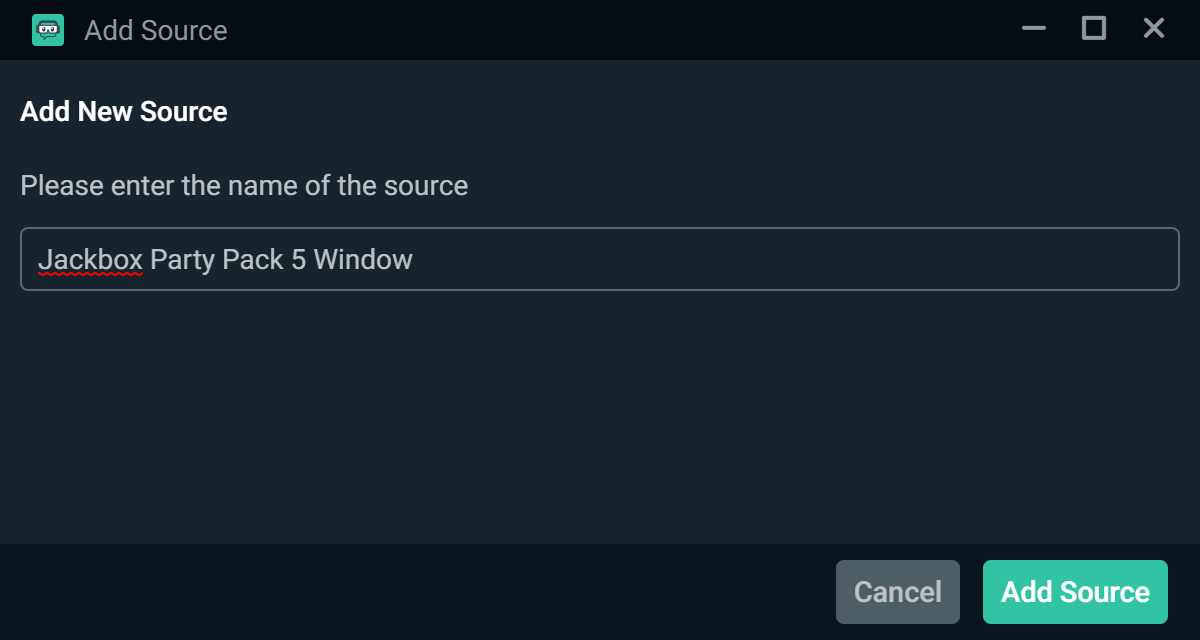
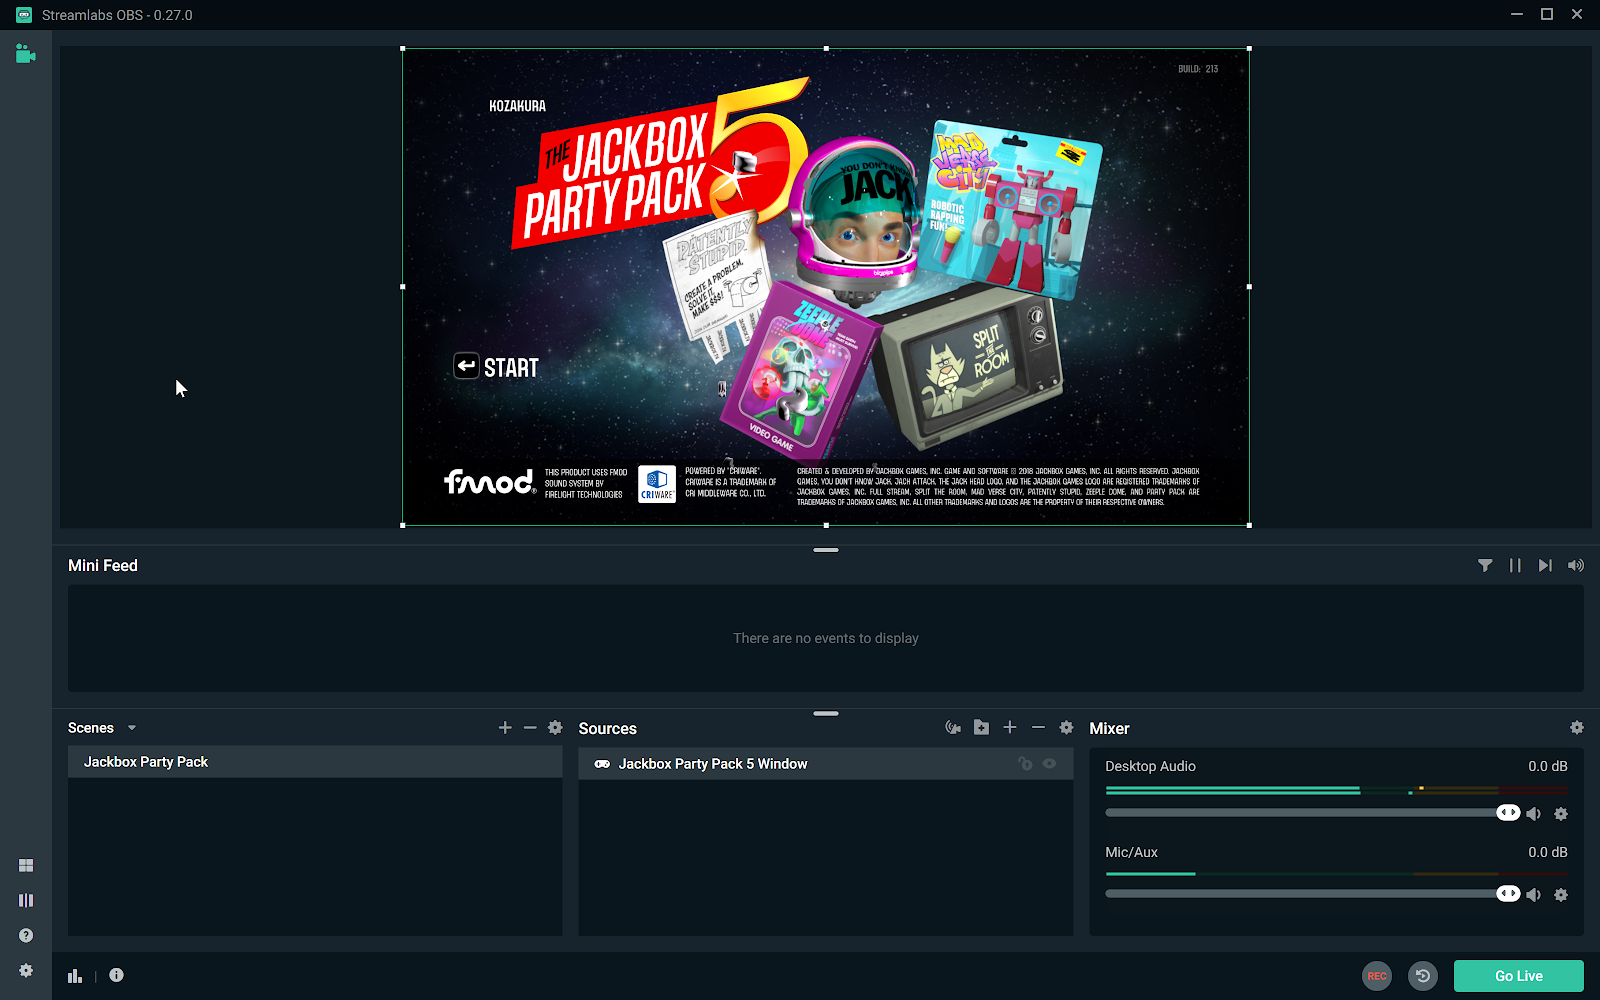
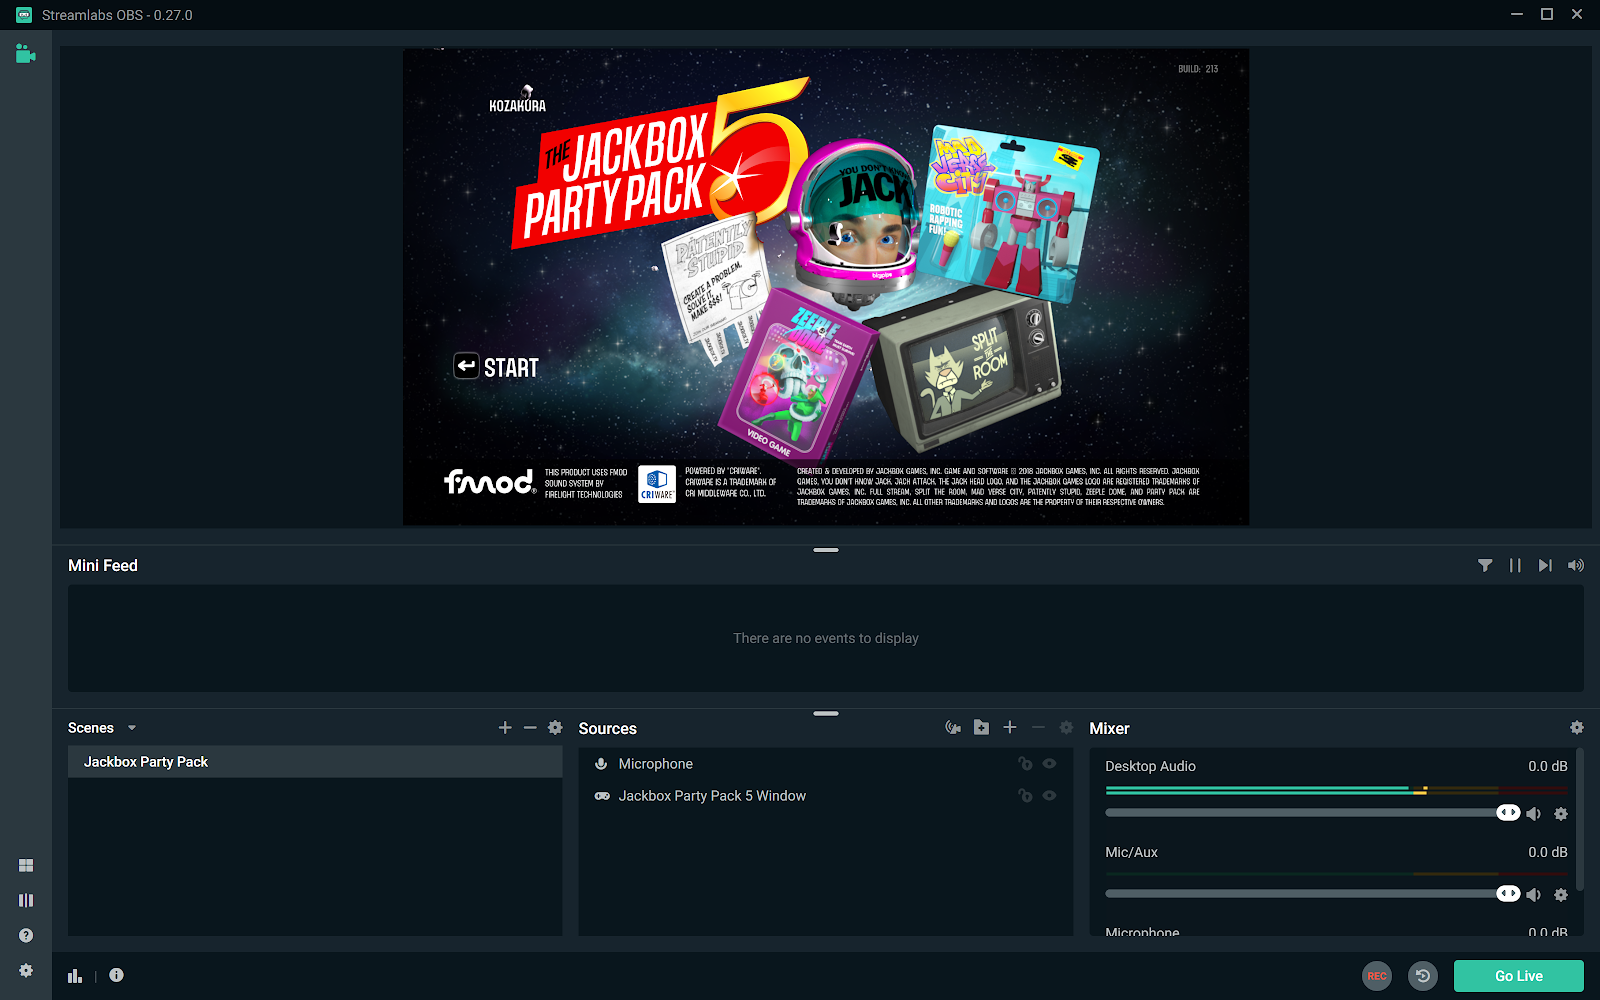
1) First, rename the default scene to the content you’ll be streaming, or whatever name you will remember. For my example, we will be streaming the party game Jackbox Party Box 5. Right-click the Scene that is towards the bottom and select Rename. You can also click the + sign to create a new scene and name it whichever name you will remember.
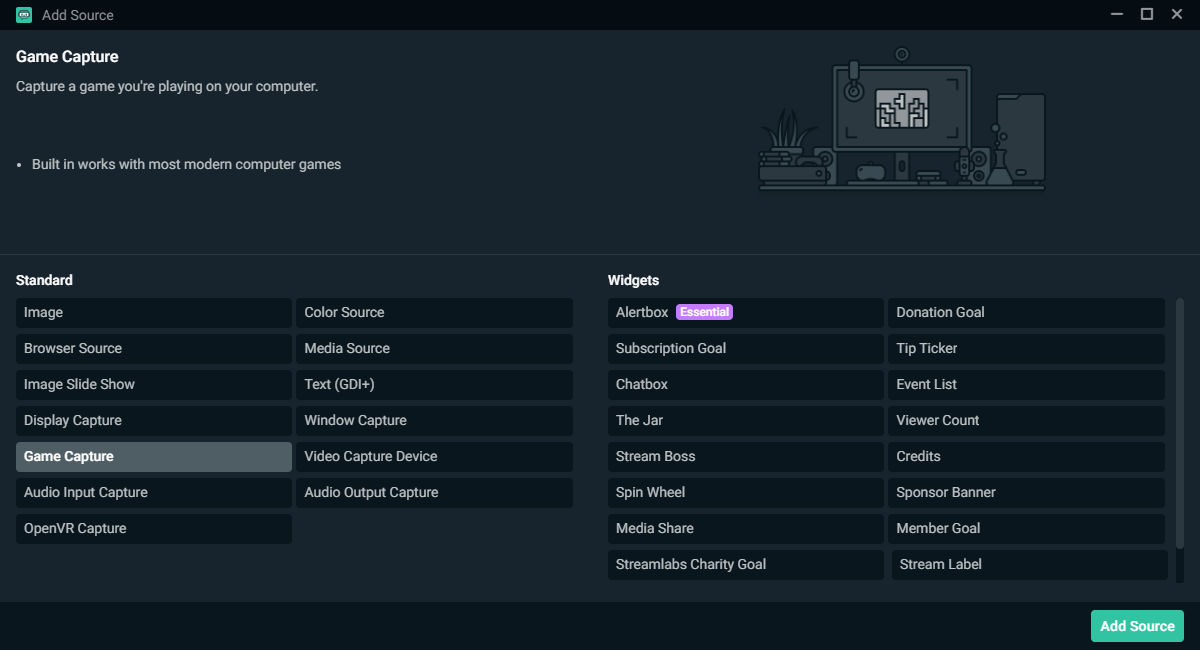
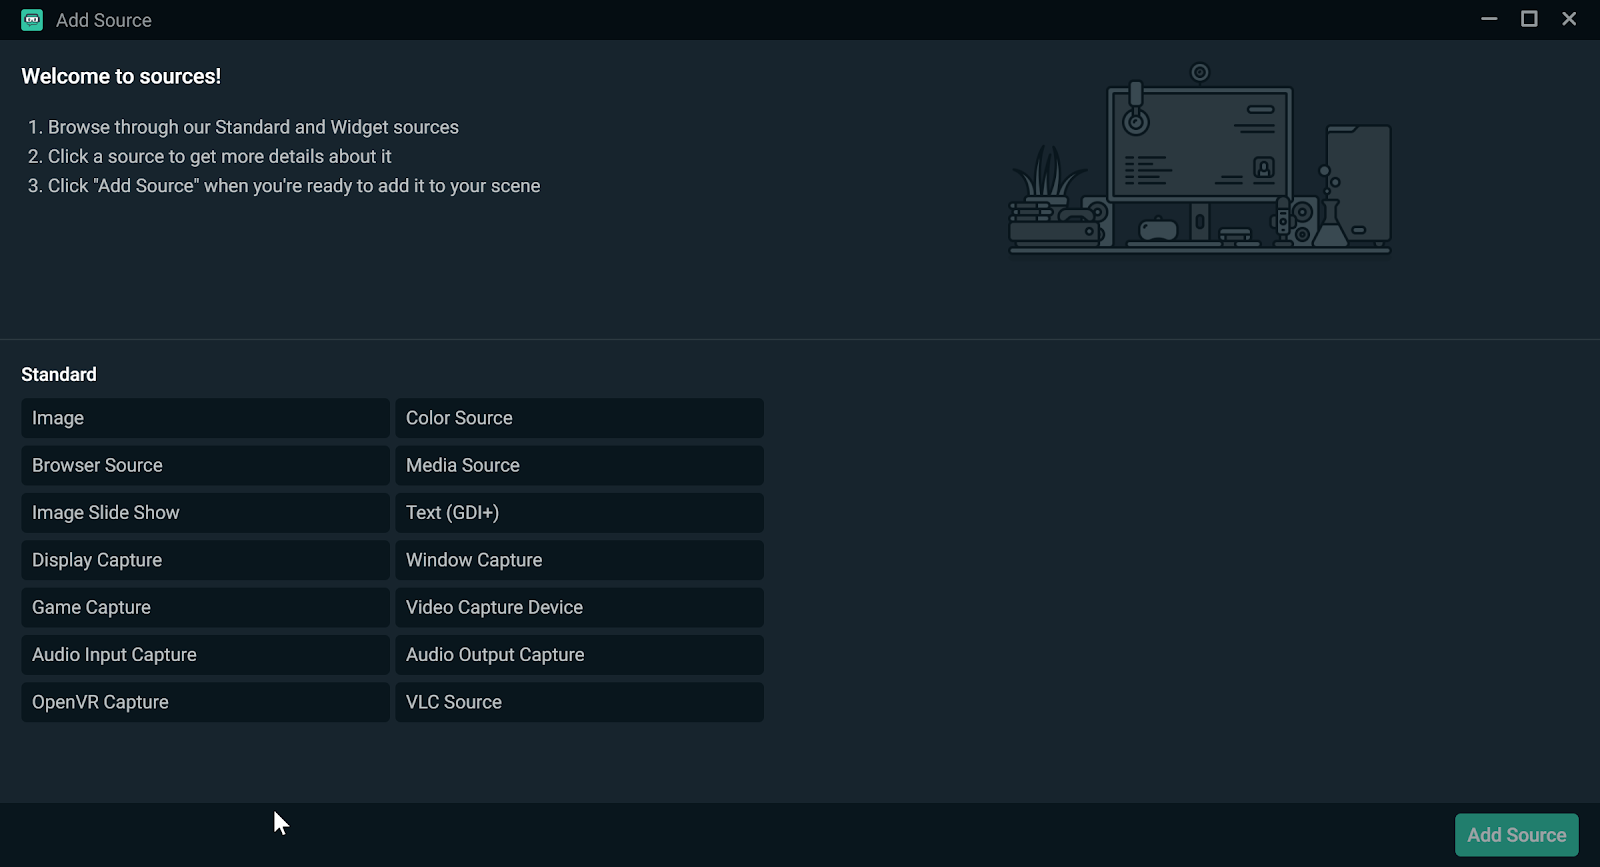
2) Next, we will add a source so that your game will show up, click the + sign in the Sources section, then select
3) In the next screen, you will want to select Game Capture, then Add Source, and name the Game Capture. I highly recommend being somewhat detailed as you may be adding similar sources.
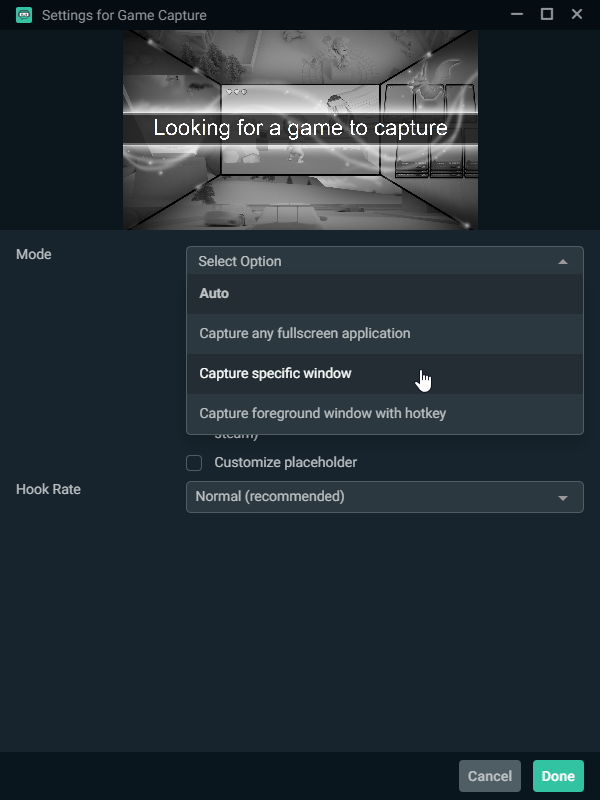
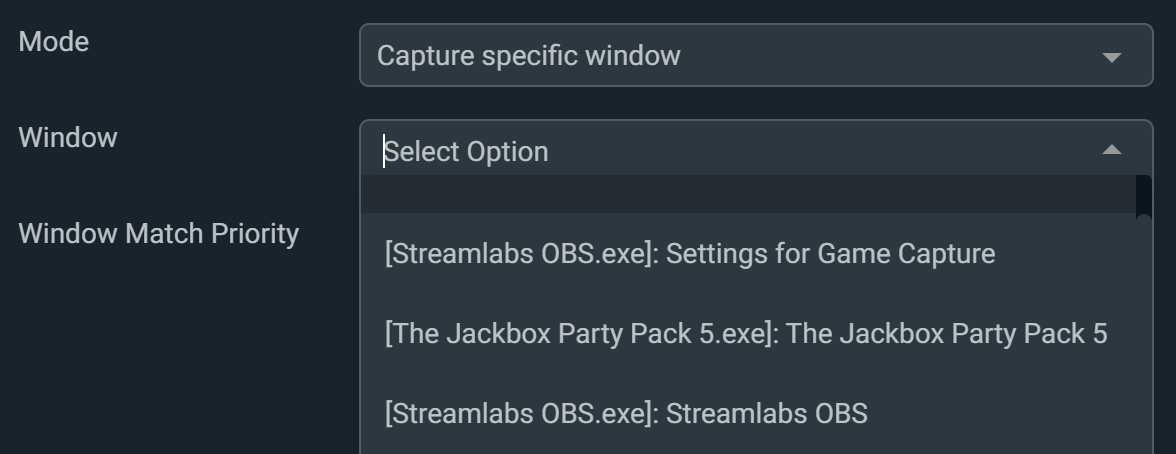
5) After selecting Capture specific window, we will then go to the Window option and pick the window we would like to stream. You will need to have the program already running to choose it from the dropdown.
6) Now, the game should be showing in your preview window.
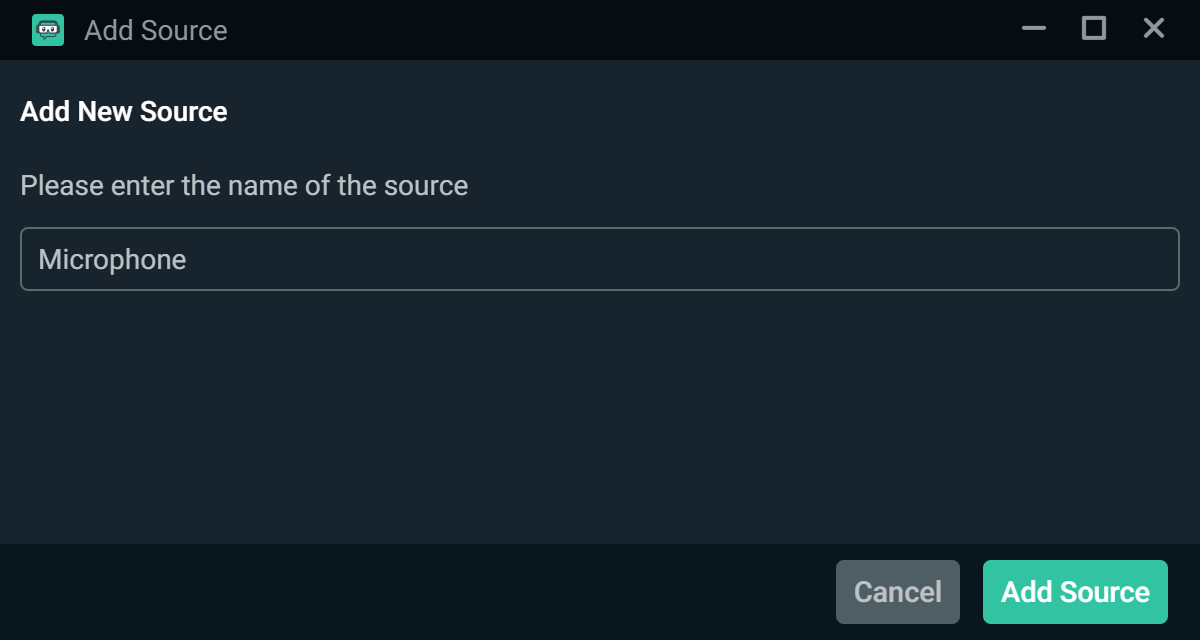
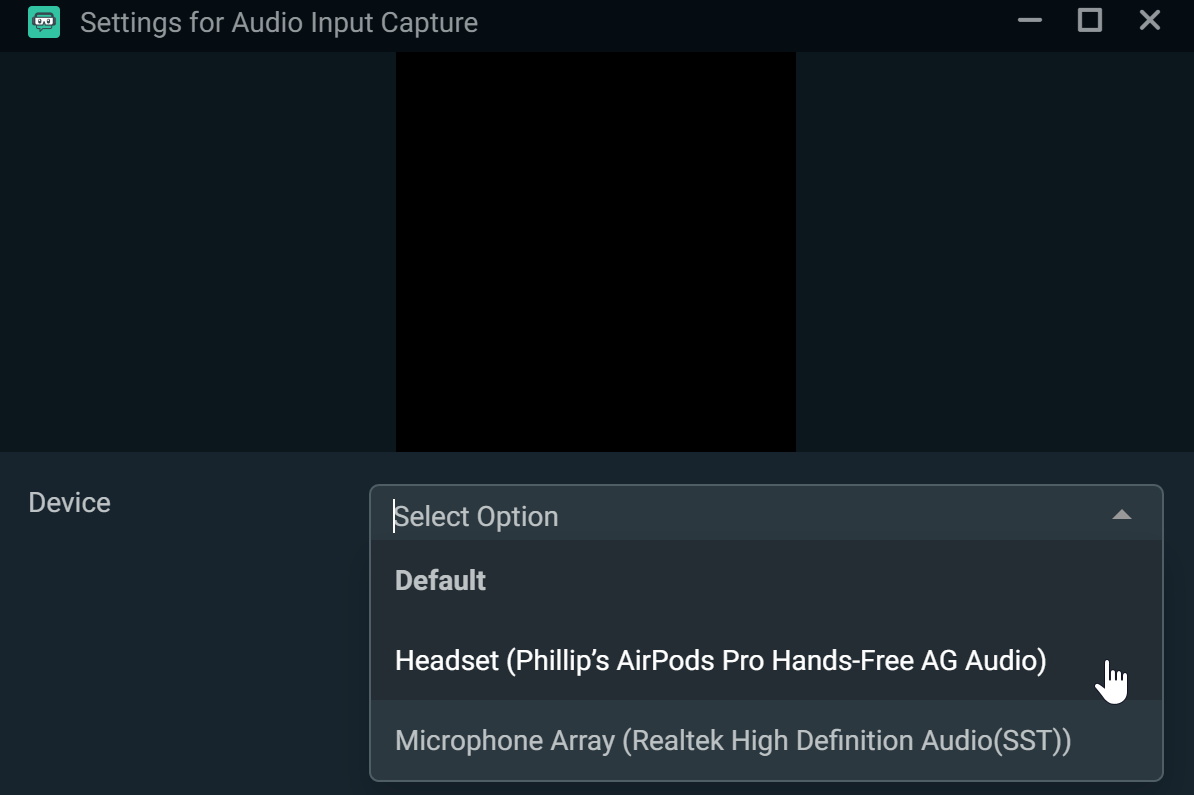
7) Next, add your audio input if it didn’t automatically add earlier. Click on the + in the Sources section, similar to what we did for the Game Capture. This time, select Audio Input Capture.
8) Next is to name it; we will call it Microphone. You don’t need to be as detailed as your video sources, as Audio Input Sources aren’t added often.
9) Then, select the microphone you intend to use.
10) With your Microphone and Game Capture setup, you could go live right now! To go live, click on Go Live in the bottom right. SLOBS will ask you to name your stream and select which game you are playing. Once you’ve chosen your game and given your stream a creative title, hit confirm, and you’ll be streaming to the world! Keep in mind, though, this is just the minimum needed, and you will likely continue to build out your SLOBS set-up with additional scenes and streaming accessories.
Here are other Sources that are commonly added. Sources will be displayed through a layer system, with sources displaying over those on the bottom.

Image - This is putting an image onto the layout. You can use this as a background or for any other reason. A lot of creative use for this one.
Image Slide Show - More commonly used for Introduction, Break/Pause, or Ending Scenes, it cycles through pictures.
Display Capture - Used for displaying everything on your monitor. The easiest way to set up something to show. HOWEVER, as it captures the entire screen and all windows on that screen, it is easy to accidentally reveal sensitive information.
Game Capture - Used to capture games. We recommend using “Specific Window” mode. You can switch it to auto if you would like, but you may accidentally stream something other than the intended window.
Audio Input Capture - Used to capture sounds, mainly microphones.
Media Source - Use GIFs, Videos, or specific sound clips. They are mainly used to open and close out streams.
Text (GDI+) - Adds text to the scene. Many cool tricks can be done here, as you can have the text read from a document. It can be as basic as typing “BRB 15 Minutes” on the screen or having your music info reader for the music you are playing.
Window Capture - Shows specific Windows, mainly used for browsers or other non-gaming Windows. A great alternative to display capture if you are concerned about showing sensitive material.
Video Capture Device - Used to display Webcams and Capture Cards.
How to use StreamLabs, StreamElements, or Widgets on SLOBS
What are StreamLabs and StreamElements? The best way to describe them is as “stream enhancers.” They add key elements to your stream that are not part of your base streaming software, such as notifications, chatbox, donation goals, etc. The most commonly used of these enhancers are notifications, as it is great to have your stream know when you received a follow, subscription or donation.
Since we are using StreamLabs OBS, you will notice Widgets as an option for your Sources. These include popular use sources like Alertbox and Chatbox. For SLOBS, it’s as easy as adding them as a source. If you plan on switching to OBS later, you will most likely need to use StreamLabs or StreamElements as a stream enhancer and add those Widgets manually. There are also Widgets that do not come with SLOBS that you will need to add manually as a browser source.
Here are links to both StreamLabs and StreamElements YouTube Channel as they both have great video guides when it comes to using their resources for your stream.
What a StreamLabs OBS Scene/Source Can Look Like
After adding Sources and creating additional Scenes, my SLOBS looked something like this.

I created a scene for the main game I am playing with an AFK Scene as an intermission since I can randomly get pulled away from my stream. Also, I created a Browser React scene to show my browser and a larger view of my webcam for reactions.
Adjusting Your Stream Settings
After your first stream, or maybe you want the correct settings before your first stream, you can adjust some stream settings. An example is software vs. hardware encoding, or lowering your stream’s quality to watch viewers with worse internet. The default is generally ok, but you will want to adjust them later, and I recommend giving Tony’s guide on Streaming Software a read as he goes into more details on settings for your stream.
Categories
- All Categories
- 1 The Blog
- 1 What's Trending
- 7.9K The Community
- 3.2K General Discussion
- 136 New Members
- 856 Consumer Tech
- 227 Prebuilt PCs and Laptops
- 165 Software
- 32 Audio/Visual
- 53 Networking & Security
- 4 Home Automation
- 5 Digital Photography
- 14 Content Creators
- 30 Hobby Boards & Projects
- 83 3D Printing
- 83 Retro Arcade/Gaming
- 61 All Other Tech
- 397 PowerSpec
- 2.6K Store Information and Policy
- 149 Off Topic
- 58 Community Ideas & Feedback
- 614 Your Completed Builds
- 4K Build-Your-Own PC
- 2.9K Help Choosing Parts
- 327 Graphics Cards
- 335 CPUs, Memory, and Motherboards
- 146 Cases and Power Supplies
- 54 Air and Liquid Cooling
- 48 Monitors and Displays
- 93 Peripherals
- 66 All Other Parts
- 65 Featured Categories
We love seeing what our customers build
Submit photos and a description of your PC to our build showcase
Submit NowLooking for a little inspiration?
See other custom PC builds and get some ideas for what can be done
View Build ShowcaseSAME DAY CUSTOM BUILD SERVICE
If You Can Dream it, We Can Build it.

Services starting at $149.99