How to set up a Raspberry Pi


Have you just recently purchased a Raspberry Pi and don't know where to start? Then, this is the place to be. We'll go over what you need and where to start when setting up your Pi for the first time so you can jump right into making projects!
What You Will Need

- Raspberry Pi (Any Model)
- Micro USB Cable
- MicroSD Card
- Keyboard & Mouse (Wired)
- HDMI Cable (Micro HDMI on Pi 4)
- MicroSD card adapter or port
- PC or Mac
- Ethernet Cable (optional)
Setting Up The MicroSD Card
The MicroSD card is important for your Pi as it will house the Pi's operating system (OS), a necessity for almost everything you can do with Pi.
- Go to the Pi downloads page here, scroll down, and select the download link for your computer's OS.

- Once the installer has downloaded, go to your downloads and run the program. You will be prompted to select the OS you want to install. There are a lot of options, so it's helpful to know what you want to use your Pi for. If you're looking for a starter project, however, keep following along. We are going to download Raspberry Pi OS to turn our Pi into a mini-computer! We will do this by selecting "Raspberry Pi OS (32-bit)."

- Next, you will insert the MicroSD Card into your PC (Or SD card Adapter for MicroSD) and hit "chose storage" to select your card from the list. Once your card is selected, you can move on.

- Once you have the OS and storage selected, click on write, and the program will start to image the card!

Connecting The Pi
- Once the OS has been successfully written to the card, remove the MicroSD card from your PC and insert it into the Pi's Micro-SD card port.

- Next, connect your wired keyboard and mouse to the Raspberry Pi's USB ports.

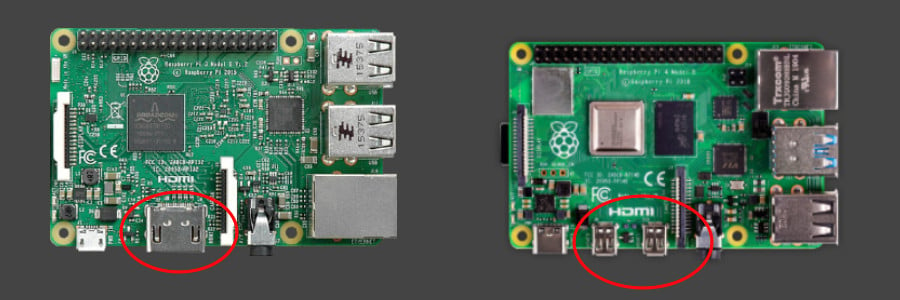
- Next, we'll set up a display. If you have a Raspberry Pi 1, 2, or 3, you will connect to your display with HDMI. (Left Image) If you have a Raspberry Pi 4, you will connect with one of the two Mini HDMI ports. (Right Image) The Pi 4 supports up to two displays as well.
- Time for the internet! If you want your Pi to have access to the internet, you can hook it up via ethernet to this port. You can connect this to a wall ethernet port, router, or any other device that outputs ethernet.

- Last but certainly not least is power. You will need to connect the Pi to a USB wall adapter with a Micro-USB cable, just like charging a smartphone.

Going Through the Initial Setup
- When you plug in the Pi, this will display on your screen after boot up. Select next to begin

- Select your country, time zone, and language on this screen, then select next

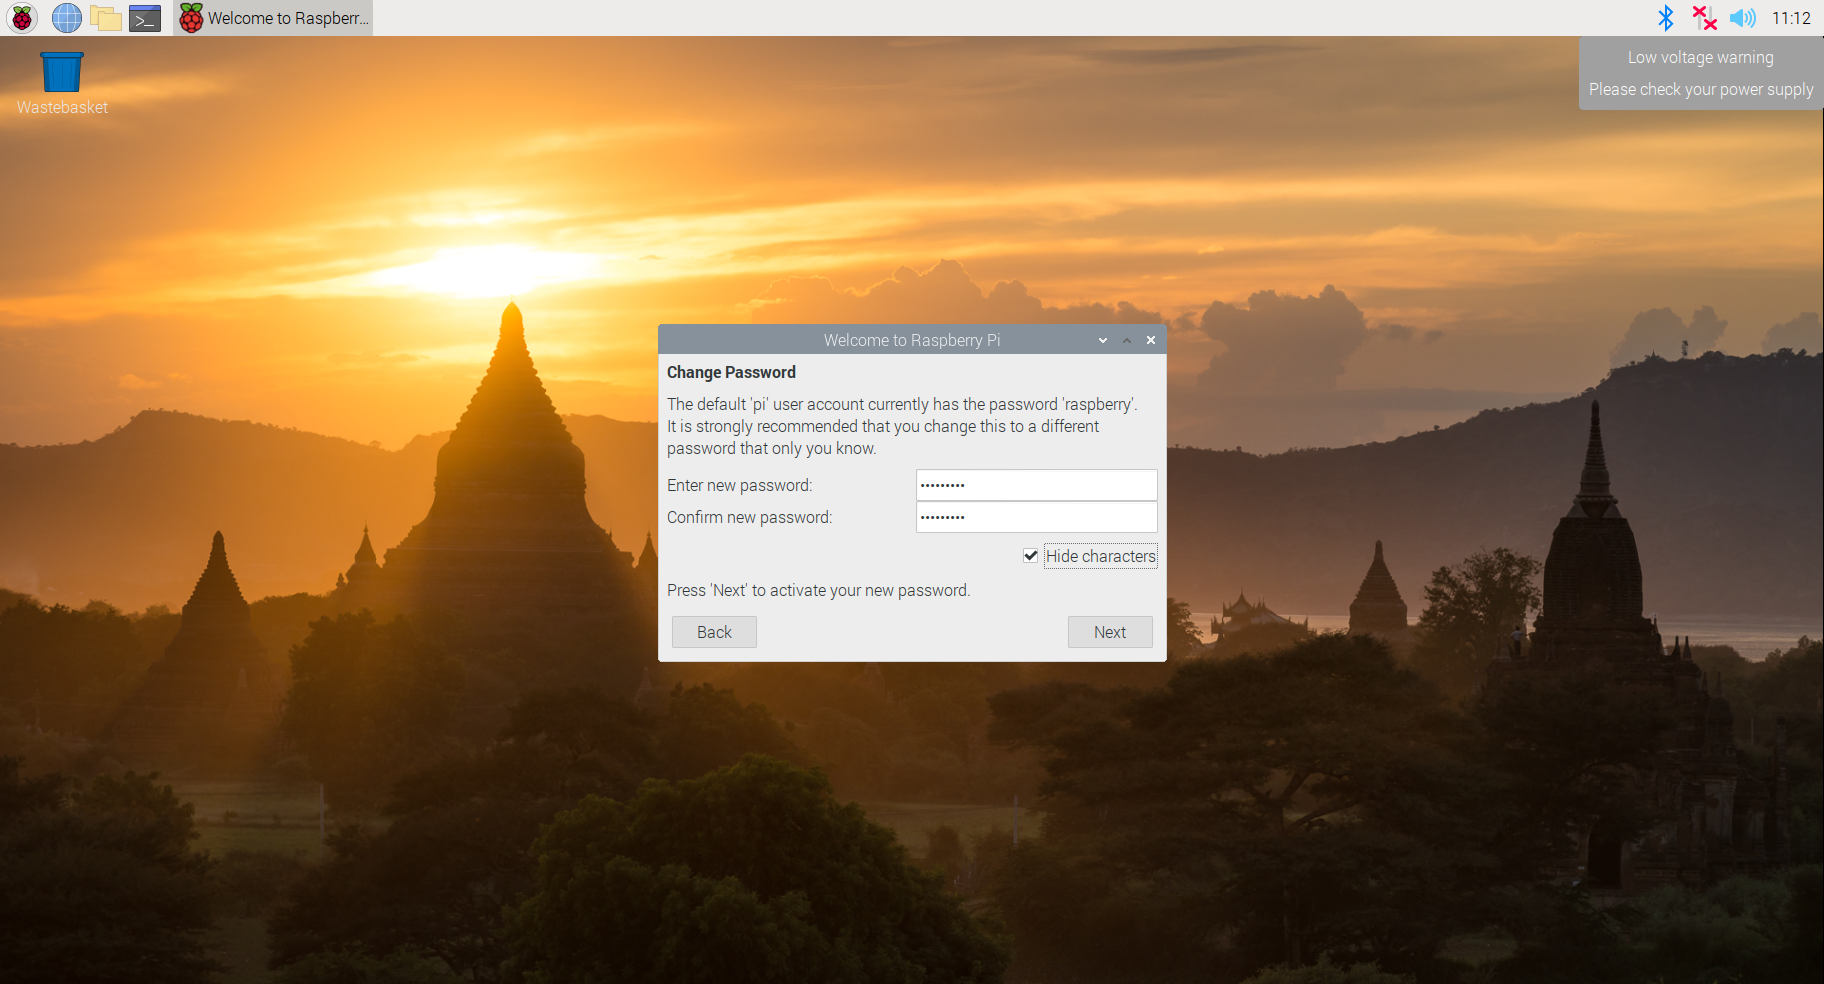
- Next, you will select your password and confirm it. Once you confirm the password, you can select next to move on.
- This is a section unique to Pi set-up - the Pi is checking to make sure it is accurately filling the whole screen. Check if there is a black border around your screen. If it is surrounded by a black border, then check the box and push next.

- Select your Wifi network here and login if needed. If you don't want wifi or plan to use ethernet, select skip. Otherwise, push next after you selected your network.

- Your Pi is completely set up as a mini-computer! Now you can treat this as a small PC and use it for any purpose you need! But, before you do.....

You should put your Pi in a case!

Raspberry Pi's are functional motherboards, but they leave the components exposed. A case protects your Pi and its components from dust, falls, and other damage. A case also allows the user to install a fan if needed as some processes will require cooling.
Finding the Right Case
Pi cases are not hard to find but finding the right one is important. Not all Pis are the same size, and not all Pis have the same ports. Make sure to select the case your Pi needs. If you have a Raspberry Pi 4, you'll want to choose a case for the Pi 4. Also, keep in mind whether you intend to install fans, as some cases don't allow for this type of expansion.
Installing the Case
When installing the case, make sure the Pi sits evenly in the case and that the ports are correctly aligned with their cutouts. Once it is aligned correctly, the top half of the case will snap into place. If it does not, make sure the Pi is even with the bottom of the case. Some cases will require you to screw the top half in, while others will only require it to be snapped in.
Installed and Good to Go
Once you have your Pi screwed or snapped in, you are all set! Your Pi is now protected. You can switch your case at a later time to fit the look you want as there are many different designs. There are even some retro game console themes!

If you would like to see cases that Micro Center carries, click here. You might find something that fits your needs and style!
More from the Micro Center Community:
Looking for more information about Raspberry Pi? We’ve got a Hobby Board section of the community, as well as Hobby Board guides like The Definitive Micro Computer Buying Guide, Raspberry Pi Basics, and Using the Raspberry Pi Pico. And if you can’t find what you’re looking for, don’t hesitate to post a new discussion and the Community will be happy to help!
Comments
-
Is there an easy way to use my laptop's keyboard and screen as the i/o for my Raspberry Pi?
-
I found this guide from Raspberry Pi that may be able to assist you with that process:


Categories
- All Categories
- 1 The Blog
- 1 What's Trending
- 8K The Community
- 3.2K General Discussion
- 146 New Members
- 873 Consumer Tech
- 234 Prebuilt PCs and Laptops
- 168 Software
- 33 Audio/Visual
- 54 Networking & Security
- 4 Home Automation
- 5 Digital Photography
- 14 Content Creators
- 30 Hobby Boards & Projects
- 84 3D Printing
- 83 Retro Arcade/Gaming
- 62 All Other Tech
- 449 PowerSpec
- 2.6K Store Information and Policy
- 152 Off Topic
- 63 Community Ideas & Feedback
- 619 Your Completed Builds
- 4K Build-Your-Own PC
- 2.9K Help Choosing Parts
- 328 Graphics Cards
- 335 CPUs, Memory, and Motherboards
- 145 Cases and Power Supplies
- 54 Air and Liquid Cooling
- 51 Monitors and Displays
- 93 Peripherals
- 69 All Other Parts
- 65 Featured Categories
We love seeing what our customers build
Submit photos and a description of your PC to our build showcase
Submit NowLooking for a little inspiration?
See other custom PC builds and get some ideas for what can be done
View Build ShowcaseSAME DAY CUSTOM BUILD SERVICE
If You Can Dream it, We Can Build it.

Services starting at $149.99