How to set up a VPN on Raspberry Pi
Privacy is an integral aspect of our lives, and yet privacy remains one of the most overlooked apects of internet usage. Whenever you do anything on your network, your ISP, or Internet Service Provider, can see what you're doing. The best way to browse the web privately is by installing a VPN onto your home network devices, including the Raspberry Pi. This can block anyone from seeing your web footprints left while browsing the internet.
What is a VPN?
VPN stands for (Virtual Private Network). A VPN hides your IP (Internet Protocol) address, so what you do online cannot be traced. They also allow you to mask your IP with an IP from a different country, granting you access to content from other countries that aren't available in your physical location. However, some VPNs can slow down internet speeds and cause connectivity issues. This is why it is important to make sure you select a VPN that is great for everyday use and won't limit your internet speeds. For that, we turn to NordVPN. NordVPN subscriptions support up to 6 devices, so once you install it on your Pi, you've got plenty left over for phones, tablets, and laptops!
How do I set up a VPN on Raspberry Pi?
First things first, you'll need to grab a copy of NordVPN. After you set up your NordVPN account, you'll need to image your Pi. This project requires Raspberry Pi OS to be installed on the device. For a full tutorial on how to do this, check out our How to set up a Raspberry Pi article. Once these initial steps are done, you are ready to start setting up NordVPN on the Pi.
- Begin by logging into your Pi via SSH with the command below. SSH allows you to remotely log into your PI remotely and gain access to the terminal. This gives you the ability to send system commands to the Pi to download programs and change system settings.
- Once you are logged in, you will need to download the NordVPN client for the Pi with the command below. This will take a moment while it downloads the files.
- Once it has been downloaded, you will need to log in to your account. Make sure you set up an account when purchasing the NordVPN code or subscription. You will use the command below and be prompted to enter your e-mail and password.
- Sometimes you may run into an error saying permission denied. To solve this, enter "usermod -aG nordvpn $user" and then reboot.
- After that, retry the login process, and it should finish setting up. You'll know it worked when you see "Welcome to NordVPN," as shown in the image below!
- To be able to log back into your VPN, you will need to whitelist or allow your device. You can do this by using the command below.
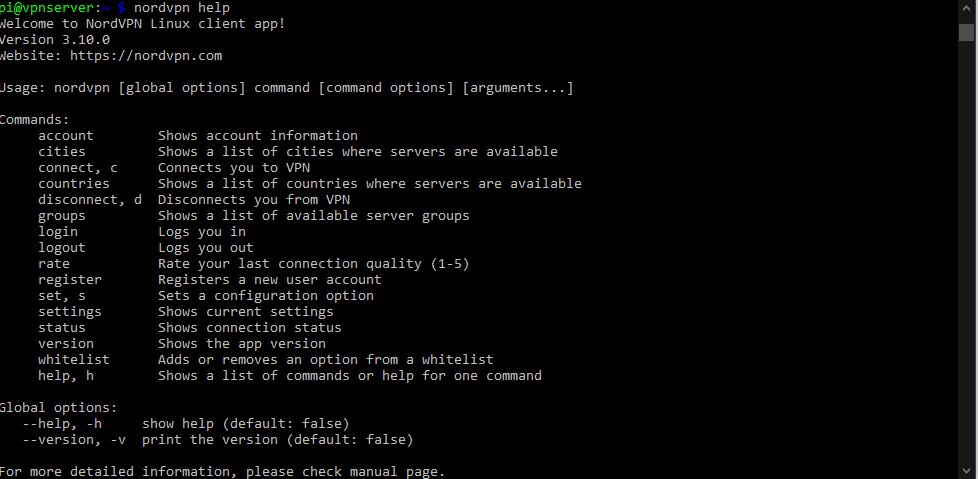
- After that, you are all set. Below you can see the command list to change settings on your VPN server.
Protected!
Now that you have your Raspberry Pi VPN is set up! This allows you to browse the web with confidence, knowing that your IP is masked through other nodes and you can't be directly traced. In addition, with the cities and countries commands, you can set your IP location to be anywhere you would like to have access to different types of content not available in your region. So have fun surfing the web securely and confidently!
More from the Micro Center Community:
Looking for more information about Raspberry Pi? We’ve got a Hobby Board section of the community, as well as Hobby Board guides like The Definitive Micro Computer Buying Guide, Raspberry Pi Basics, and How to Create a Retro Game Console with Raspberry Pi! And if you can’t find what you’re looking for, don’t hesitate to post a new discussion and the Community will be happy to help!
Comments
-
Does this only work with NordVPN or can one use another VPN provider?
-
Yes, you can use other VPNs, our guide uses NordVPN as an example.
Categories
- All Categories
- 1 The Blog
- 1 What's Trending
- 7.9K The Community
- 3.2K General Discussion
- 143 New Members
- 869 Consumer Tech
- 233 Prebuilt PCs and Laptops
- 167 Software
- 33 Audio/Visual
- 54 Networking & Security
- 4 Home Automation
- 5 Digital Photography
- 14 Content Creators
- 30 Hobby Boards & Projects
- 83 3D Printing
- 83 Retro Arcade/Gaming
- 62 All Other Tech
- 419 PowerSpec
- 2.6K Store Information and Policy
- 150 Off Topic
- 61 Community Ideas & Feedback
- 615 Your Completed Builds
- 4K Build-Your-Own PC
- 2.9K Help Choosing Parts
- 328 Graphics Cards
- 335 CPUs, Memory, and Motherboards
- 145 Cases and Power Supplies
- 54 Air and Liquid Cooling
- 49 Monitors and Displays
- 93 Peripherals
- 68 All Other Parts
- 65 Featured Categories
We love seeing what our customers build
Submit photos and a description of your PC to our build showcase
Submit NowLooking for a little inspiration?
See other custom PC builds and get some ideas for what can be done
View Build ShowcaseSAME DAY CUSTOM BUILD SERVICE
If You Can Dream it, We Can Build it.

Services starting at $149.99


