
How to Build a Gaming PC
This discussion has a more recent version.

JS_MC
admin


Written by TSTonyV
Hello! Welcome to the Micro Center Community. Many of you out there come to us asking about building your PC and, from experience, I can tell you it's one of the most fun and satisfying things I've learned how to do. If you're interested in building a computer, first check our guide on How to Choose Parts for Your Custom Computer Build. Once you have your parts together, today's guide will help you through the assembly.
Contents
- Preparing the motherboard
- Install the CPU
- Install the RAM
- Install CPU cooler/backplate
- Out-of-box POST test
- Final Assembly
Getting started
Building a PC is not very difficult. I like to call it electronic legos: as long as you can follow instructions and have a Phillips head screwdriver, you shouldn't run into any problems. There are a few things I want to make sure I go over before you start assembling it though:
Build on a flat surface, ideally with a lot of space to make it easy to keep track of everything.
Ensure you're building on a non-conductive surface like a wood tabletop to avoid static discharge and possibly shorting something.
Ensure you don't have any static buildup by either wearing an anti-static bracelet or touching your hand to some other metal object.
Be careful! PC components can be delicate, and if you drop something or force something the wrong way, you can damage them and make them unusable.
Comments
-
Preparing the motherboard
- The first thing to do is prep your motherboard for installation before you put it inside your case. If you install the board before putting anything else on it, it can be challenging to work with, so we advise installing as much as we can onto the board beforehand as it makes everything easier.
-
Install the CPU
- Lift up the retention lever/bracket
- Lining up the arrow on the socket with the CPU will ensure it is oriented correctly.

- Drop the CPU into the socket. Don't force it; it should drop in with no resistance. If using an AMD processor, make sure there are no bent pins before installing it. Intel CPUs do not have pins, but the same principle applies. It should just drop into the socket with no resistance.
- Lower the retention lever/bracket to secure the CPU in place.
-
Install the RAM
- Undo the clip on the RAM sockets.
- Check your motherboard manual for the correct slots to install your RAM (typically slots 2 and 4). Installing RAM in the wrong slots can sometimes result in performance issues.
- Check that the notch in the RAM module is lined up with the slot, press down evenly on both sides until you hear the modules fully click into the socket.


-
Install CPU cooler/backplate
- Unless the CPU cooler gets in the way of plugging in any other cables, I would recommend installing this out of the box as well.
- CPU coolers will come with backplates to install depending on the CPU socket on your motherboard. Check the installation guide to see which backplate to use and how to install it.

- Make sure your CPU cooler comes with thermal paste. Most have some pre-applied, some may require you to buy thermal paste separately and apply.
- If applying your thermal paste, a pea-sized drop is typically sufficient. Too much thermal paste will cause it to leak out the sides and, in worst-case scenarios, damage something or hinder thermal performance. If you use too little, you won’t have sufficient coverage and will hinder thermal performance.

- The cooler’s mounting pressure should be sufficient to spread the thermal paste; you can also spread the paste using a tool like the Thermal Grizzly Spatula or something like an old credit card. Make sure it’s spread thin and consistent across the whole CPU.
-
Out-of-box POST test
An out-of-box POST test (also called “breadboarding”) means testing your components to make sure your system boots before you assemble it in your case. This step isn’t required, but we always recommend it because it allows you to make sure your components are all working without dealing with the hassle of disassembling your whole PC should something go wrong.

- To do this, make sure at least your RAM, CPU, CPU cooler, and PSU hooked up. If your processor does not have integrated graphics, your GPU is also required. Plug in a monitor to your GPU or motherboard as usual.
- Reminder: make sure you are doing this on a non-conductive surface. If you boot the system and it’s on a conductive surface, you can short your components and damage them. Please do NOT put it on top of the anti-static bag that the motherboard and components often are stored in. A wooden tabletop or a flat piece of cardboard are both appropriate.
- Once the 24-pin motherboard power, 8-pin CPU power, and 6/6+2-pin PCIe connectors for your GPU are connected, you need to jump the power switch pins on the motherboard’s front-panel header. To do this, take your screwdriver and gently touch the metal end to both power switch pins on the front-panel header. Check your motherboard manual if you're not sure which pins to use; there will be a section with a diagram showing the pin layout. Make sure your PSU is on by setting the switch on the back to the "I" position.

- Once you jump the board, if the parts are assembled correctly, and none of them are defective, the fans and lights should come on, and you should get something displaying on your monitor. Either the BIOS or perhaps an error message like “no boot device detected.”
-
Final Assembly
Once you’ve established that your components work in the out-of-box POST test, it’s time to put it together!
I always recommend doing a little planning before actually assembling the system. Look at your case and try to get an idea of how you want to route the cables. Figure out which components should go in first, and which should go in last. For example, if your GPU will make it hard to get to the SATA ports on your board and you have a hard drive to install, plug in the hard drive first and save the GPU for later.
Keep the system lying down to make it easier to plug things in.
Install the PSU
- This is always my first step since the PSU is separate from the other components. It also allows you to route the cables before installing anything else.
- If you have a modular PSU, figure out which power cable you will need and put them in first before installing it (CPU, motherboard, GPU power cables, etc.)

- Make sure PSU is oriented in the right direction so the screws on the back line up correctly. The fan will usually be on the bottom.

- Route the cables to where you think they'll work best so you can just plug them in and not worry about having to navigate them around other parts.
Installing the motherboard
Make sure you install the motherboard standoffs in your case. Some cases have standoffs pre-installed; some require you to put them in yourself.

There should be an I/O shield that fits into the back of your case to help cover your motherboard’s rear ports; install this before installing the motherboard. Some motherboards do have a built-in I/O shield.

If you've already installed your CPU cooler, you may want to take the fans off while leaving the heatsink itself installed, so you have a little more room to work.
When installing your motherboard, install the screws one at a time in a diagonal/star pattern: each corner first, next any in between, and do not fully tighten them down until they’re all in place. It will help you avoid any screws not lining up correctly.
Plug in other components
The next step is plugging in any other components that you need, mainly your drives.
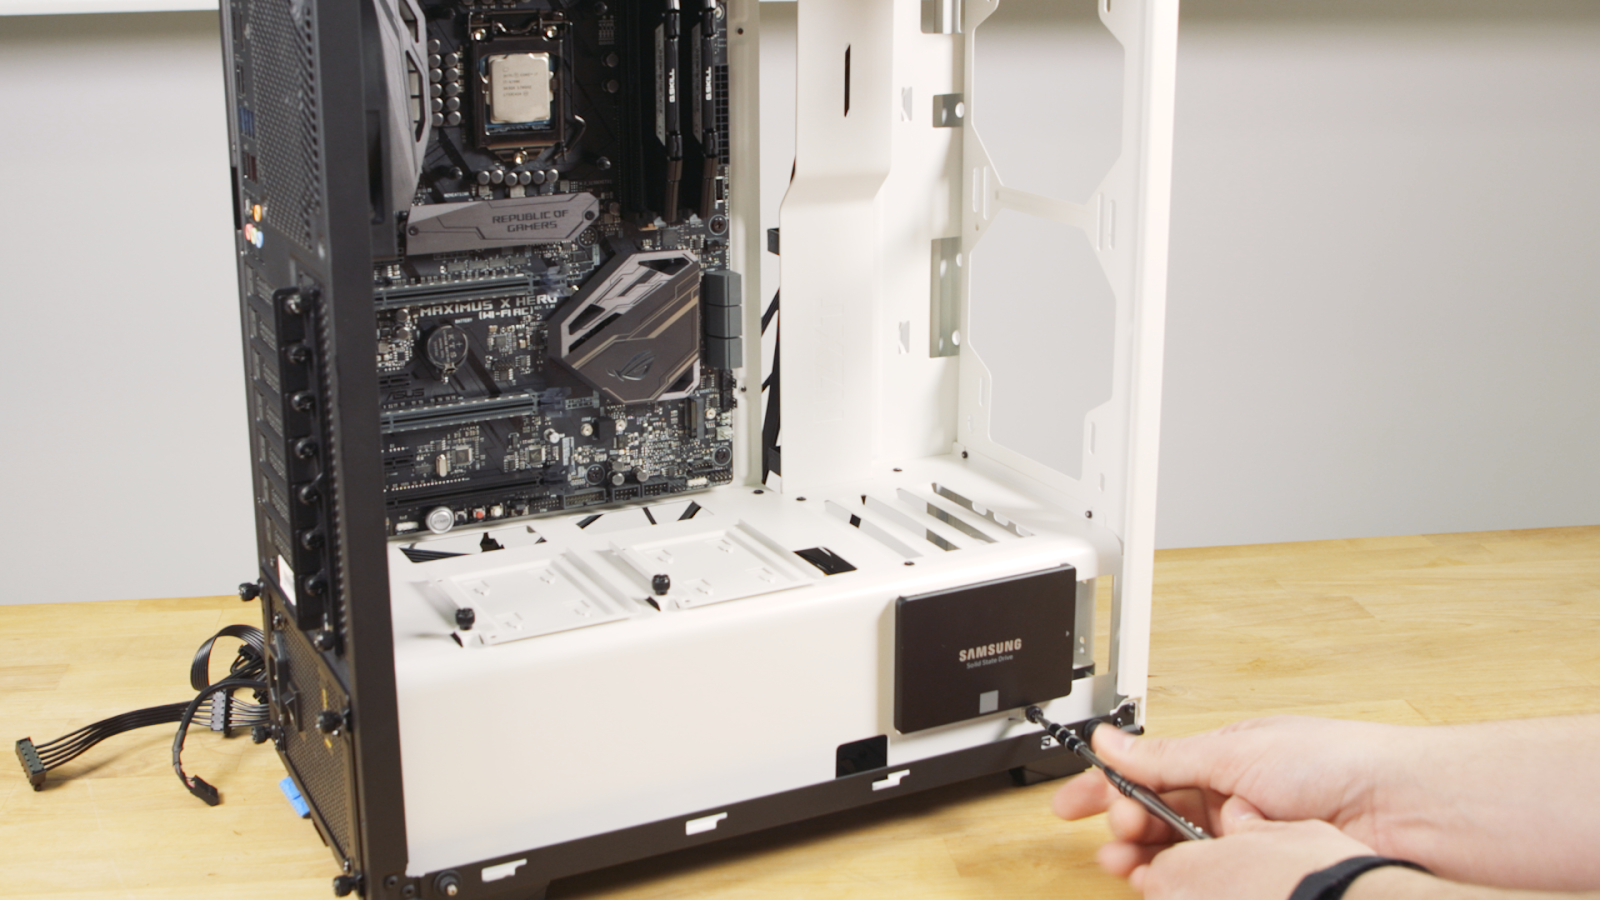
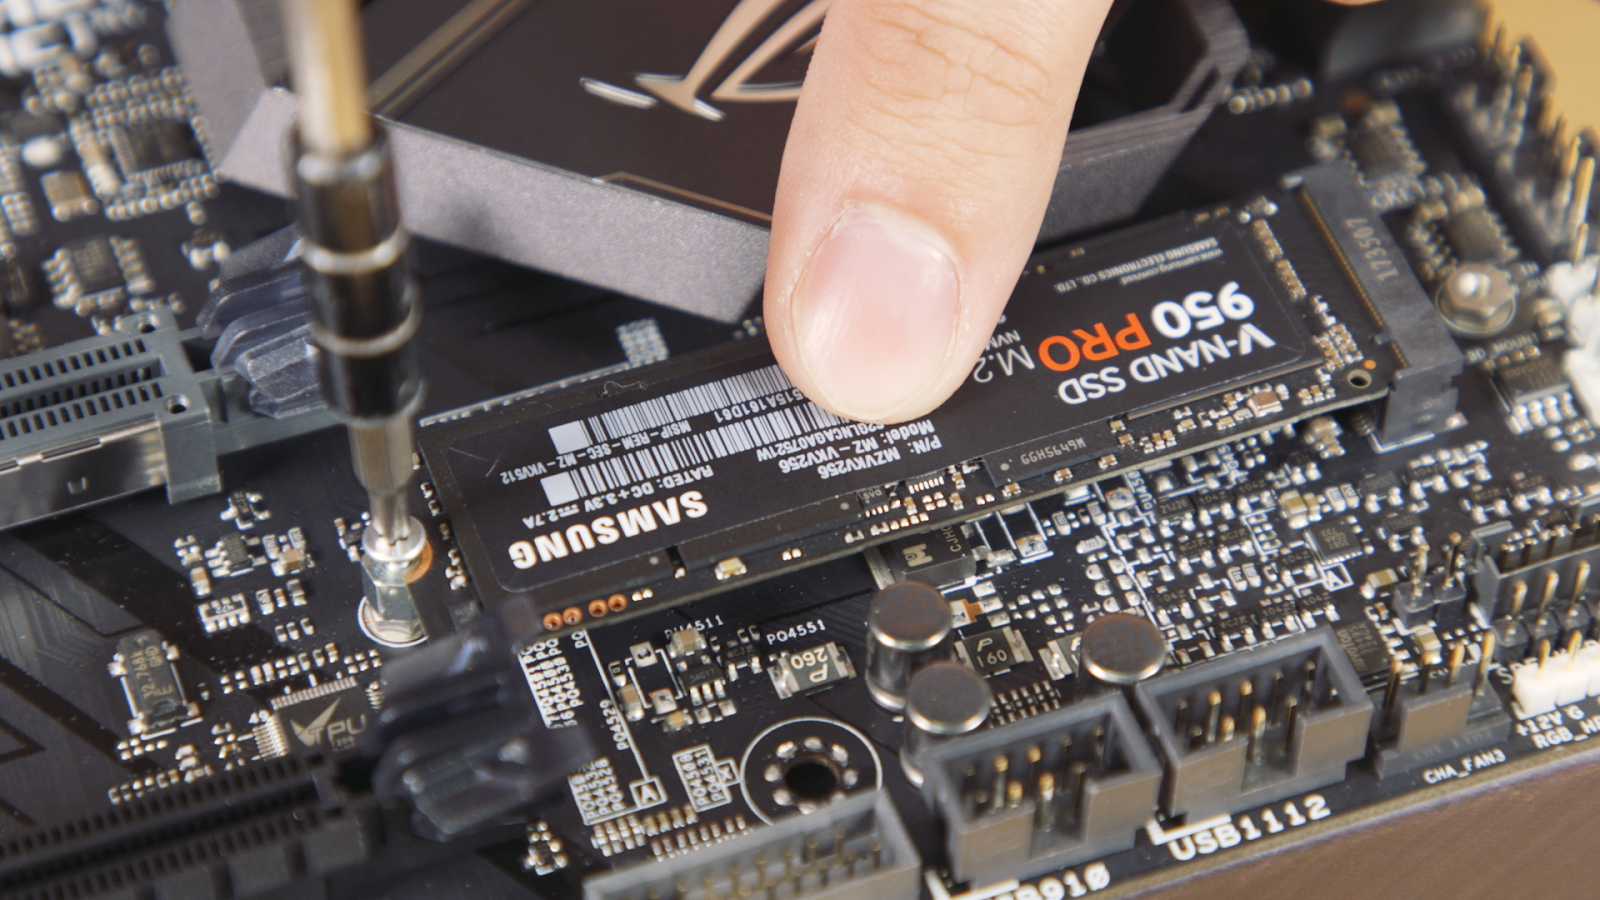
- M.2 SSDs are installed directly onto the motherboard. HDDs/SSDs will have individual bays for installation. If using a SATA HDD/SSD or other SATA device, make sure both the power and data cables are plugged in.

If you are using an AIO liquid cooler, this would be the time to install it.
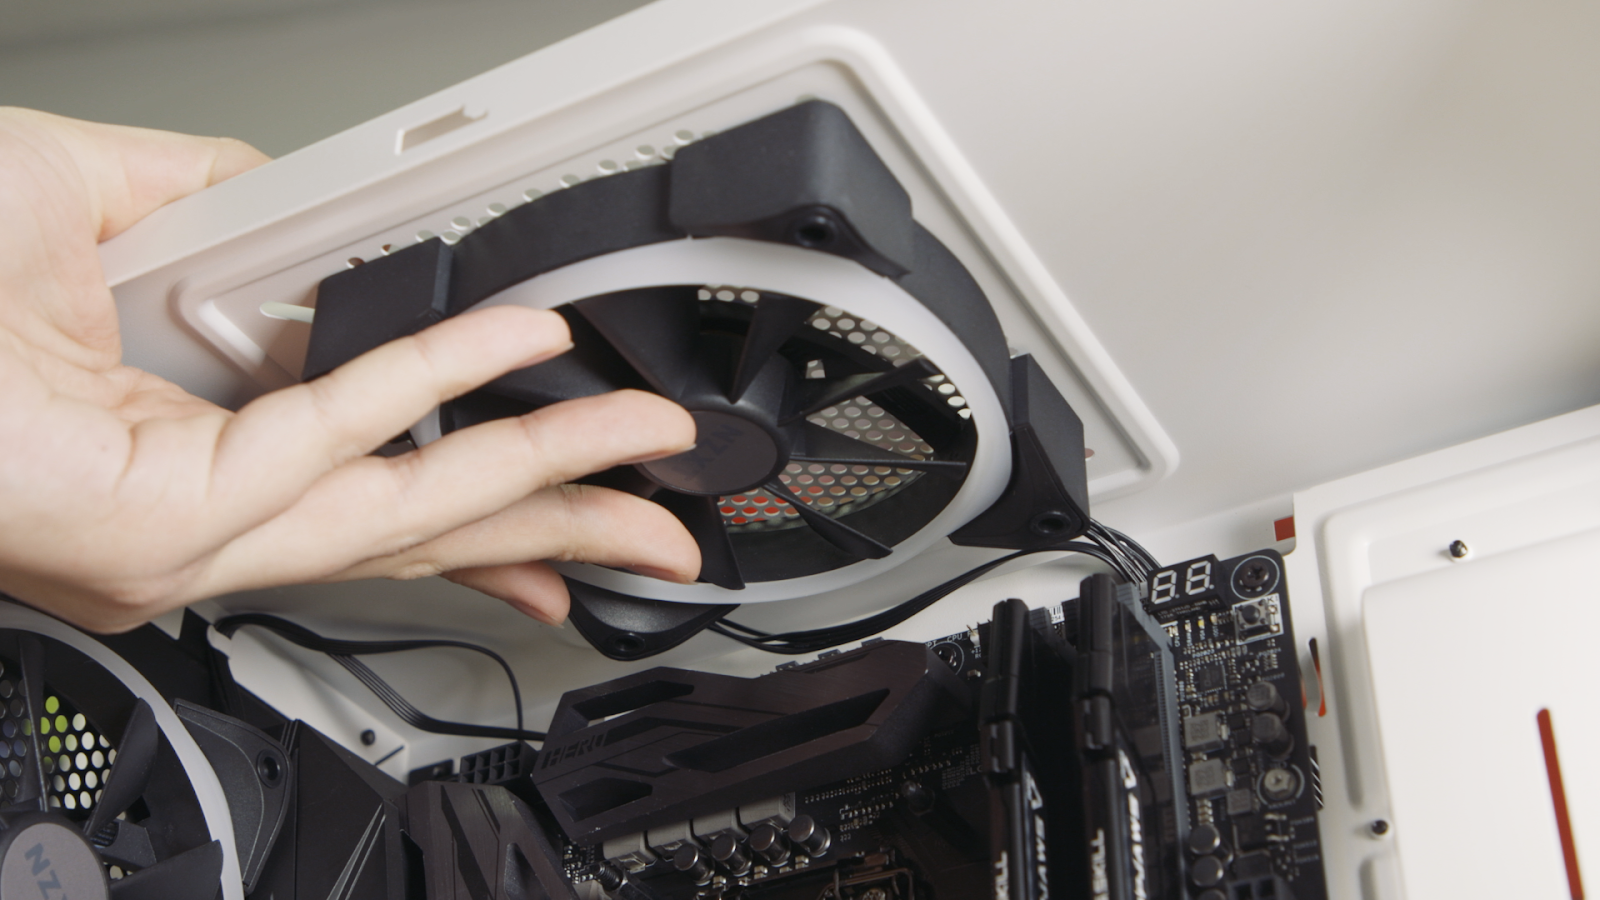
Plug-in fans/cables
Your CPU fan will typically plug in on the top-right corner of your motherboard. Case fan headers can be located in various spots on your motherboard; check your motherboard manual if you’re having trouble finding them. They should all be labelled.
Front-panel cables and front-panel USB cables will also need to be plugged in. Check your motherboard manual for the front-panel header layout to make sure you plug each cable onto the right pins.

Plug in your CPU/motherboard power cables.
Installing the GPU
The GPU is pretty easy to install. Just slot it into the motherboard, then screw the bracket in on the back.
We recommend installing the GPU in the top slot, so it’s operating in PCIe x16 mode; this helps avoid any potential slight performance loss. Some motherboards will allow other GPU slots to work in PCIe x16 mode if used, but that’s not always the case.
Plug in the 6 and 6+2 PCIe power cables as your GPU needs.
Conclusion
After you have plugged in your GPU and components, plug in your power supply, flip that switch to I, plug in your monitor, and try turning your system on! If you did everything correctly and your components are all in good working order, your system should display the BIOS or a similar message on your monitor.- Once your build has passed its POST, you'll want to install an operating system! We've created a helpful guide on How to Perform a Clean Install Windows just for you!
-
I built my first computer 3 years ago (with help) and it was so much fun and easy! Im ready to build a second one AND upgrade my older one. Thanks for the information! This is very helpful and will share with future builders!
-
can you show me how to build a water cooled pc and what to buy
-
We are planning on more build guides in the future that focus on AIO closed loop systems and eventually open loop!Angelo987 said:can you show me how to build a water cooled pc and what to buy
A closed loop system build for an All-In-One cooler like the Corsair iCUE H100i can pretty much follow this gaming PC build guide but you would want to install the cooler after the motherboard it set into the case.
Other water cooling kits can be found here -
Hello @REALLYO78 It looks like the 7010 is a small form factor case. Meaning that it would only be compatible with a low profile GPU.Here's a list of our low profile GPUs https://www.microcenter.com/search/search_results.aspx?N=4294966937+4294820886&sortby=matchWhat kind of work load did you have in mind for the GPU that you'd like to purchase?
-
Hi, I just got a Corsair iCUE H100i AIO and it did not fit when I tried to mount the radiator at the top of the case. Is it ok to mount the radiator to the front of the case?
-
If it's not what should I do?
-
Hey @LaxDude What case are you building in?
-
I have a digital storm lynx case
-
Hmm. I'm not directly familiar with this case, however, from what I can see of it online, it looks like you should be able to mount the H100i on the top or in the front of the case with no issue. Is the H100i not able to fit because of your motherboard?
-
Yes, and the radiator ends up hitting the cpu power
connector and the ram. -
I see. They show the case fitting a 240mm radiator on top, though it could be a different configuration. It still should support a 240mm radiator in the front as well.
-
Ok, if I have fans already mounted to the front should I just use those, or should I replace them with the fans that come with the radiator. Or should I use both in the the front?
-
I wouldn't recommend doubling your fans. The fans in the front of the case should work with your radiator, however, different fans have different performance. It might be worth comparing the fans to see if noise or CFM is drastically different on one set vs. the other. Typically, there shouldnt be any issues with using the fans that are already working well in your case.
-
Ok thank you
-
Also should I use the pre-applied thermal paste?
-
Yeah, that'll work just fine!
-
I just want to double check, should the tube side of the radiator be up or down?
-
i need help picking out parts for my pc build my budget is around 1100$-1200$
-
any recommendations?
-
The side of the radiator where the tubes connect should be at the bottom, and the pump should be mounted in a position where it is slightly lower than the top of the radiator, where air is captured.LaxDude said:I just want to double check, should the tube side of the radiator be up or down?
What kind of build were you looking for? Are you planning to game? Work from home? Other tasks?yxng_ad said:i need help picking out parts for my pc build my budget is around 1100$-1200$If you're gaming, what kind of games are you looking to play? Also, does your budget need to include your accessories? Mouse, Keyboard, Monitor? If you have a monitor already, what monitor is it?We can use this info to give you better recommendations 😊 -
I need advice when it comes to my first PC build, I need something that can handle VR and content creation, and something that's hefty enough to handle large volume modpacks and such. I have SOME idea of a parts list, but I don't want to have to deal with bottlenecks, not to mention any physical restrictions with the build. Help me, please! And as for the price, I'd like to keep it around 1k.
Mobo: MSI B450 Gaming Plus MAX
CPU: Ryzen 5 3600
GPU: Zotac GeForce GTX 1660 SUPER
Memory: Crucial Ballistix 2x8GB DDR4-3600
Cooler: be quiet! Pure Rock Slim 35.14
Storage: Western Digital Blue SN550 1TB M.2-2280
Case: Lian Li LANCOOL 205 Mid Tower Case
PSU: Corsair CXM 550 W 80+ Bronze
Also, sorry if this wasn't the correct place to ask all of this -
This seems solid all-around at the budget you're looking for. A couple things you could potentially do would be to ditch the aftermarket CPU cooler and use the stock one included with the 3600 (it's just barely enough) and maybe go with a slightly cheaper motherboard to free up a little bit of cost and try to stretch up your budget on the GPU, but I'd only do that if that would allow you to go from the 1660 Super to an RTX 2060 or RX 5600XT (cost increase for a 1660ti isn't really worth it IMO).PendragonGames said:I need advice when it comes to my first PC build, I need something that can handle VR and content creation, and something that's hefty enough to handle large volume modpacks and such. I have SOME idea of a parts list, but I don't want to have to deal with bottlenecks, not to mention any physical restrictions with the build. Help me, please! And as for the price, I'd like to keep it around 1k.
Mobo: MSI B450 Gaming Plus MAX
CPU: Ryzen 5 3600
GPU: Zotac GeForce GTX 1660 SUPER
Memory: Crucial Ballistix 2x8GB DDR4-3600
Cooler: be quiet! Pure Rock Slim 35.14
Storage: Western Digital Blue SN550 1TB M.2-2280
Case: Lian Li LANCOOL 205 Mid Tower Case
PSU: Corsair CXM 550 W 80+ Bronze
Also, sorry if this wasn't the correct place to ask all of this
As for "bottlenecks," that's ultimately going to depend how heavy your workload is. VR can be very GPU heavy if I recall and you'll probably always have room for improvement there. Depending on the type of content creation you're doing CPU, RAM and GPU will all have big impacts on your workflow. Don't be too fixated on the idea of bottlenecks because there's always going to be something faster, bigger, or newer. At the budget you listed you've made good choices so I'd be happy with that and remember, you can always upgrade in the future if you need.


Categories
- All Categories
- 1 The Blog
- 1 What's Trending
- 8K The Community
- 3.2K General Discussion
- 146 New Members
- 873 Consumer Tech
- 234 Prebuilt PCs and Laptops
- 168 Software
- 33 Audio/Visual
- 54 Networking & Security
- 4 Home Automation
- 5 Digital Photography
- 14 Content Creators
- 30 Hobby Boards & Projects
- 84 3D Printing
- 83 Retro Arcade/Gaming
- 62 All Other Tech
- 451 PowerSpec
- 2.6K Store Information and Policy
- 152 Off Topic
- 63 Community Ideas & Feedback
- 619 Your Completed Builds
- 4K Build-Your-Own PC
- 2.9K Help Choosing Parts
- 328 Graphics Cards
- 335 CPUs, Memory, and Motherboards
- 145 Cases and Power Supplies
- 54 Air and Liquid Cooling
- 51 Monitors and Displays
- 93 Peripherals
- 69 All Other Parts
- 65 Featured Categories
We love seeing what our customers build
Submit photos and a description of your PC to our build showcase
Submit NowLooking for a little inspiration?
See other custom PC builds and get some ideas for what can be done
View Build ShowcaseSAME DAY CUSTOM BUILD SERVICE
If You Can Dream it, We Can Build it.

Services starting at $149.99